Wondering how to do something?
Click on any topic to learn.
Overview
This quick tutorial covers how to make an appointment, sign e-consents, chart treatment, present a treatment plan, complete a clinical note, and send out an e-claim.

Scheduling
Change the length of an appointment
Move an appointment to a different time
Move an appointment to a different day

Move an appointment to a different location
Send consent forms to a patient's email

Sign electronic consent forms in person
Send patient intake form to a patient's email
Make an appointment for a new patient

Make an appointment for an existing patient
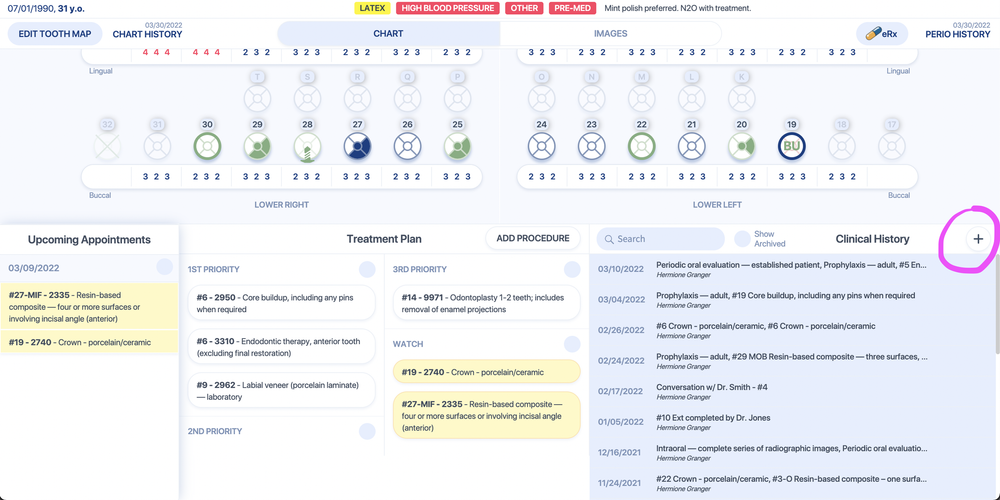
Clinical
Edit a patient's tooth chart/odontogram
Periodontal (gum) measurements for a new patient
Periodontal (gum) measurements for an existing patient
Move treatment plan procedures to different priorities
Remove procedures from a treatment plan
Diagnose a filling

Diagnose a crown
Diagnose scaling & root planing
Treatment plan the same procedure for multiple teeth
- Click "Add Procedure" from the patient's chart
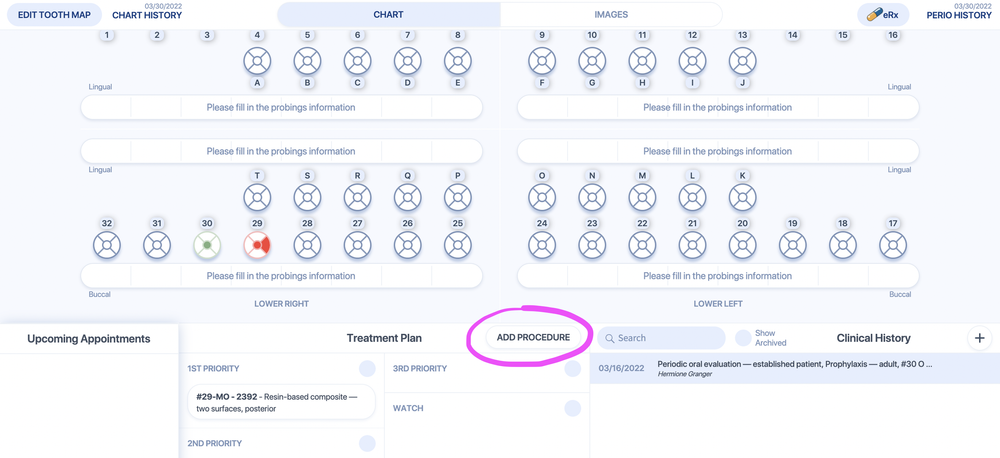
- Select the teeth you would like to treatment plan for, then click "Next"
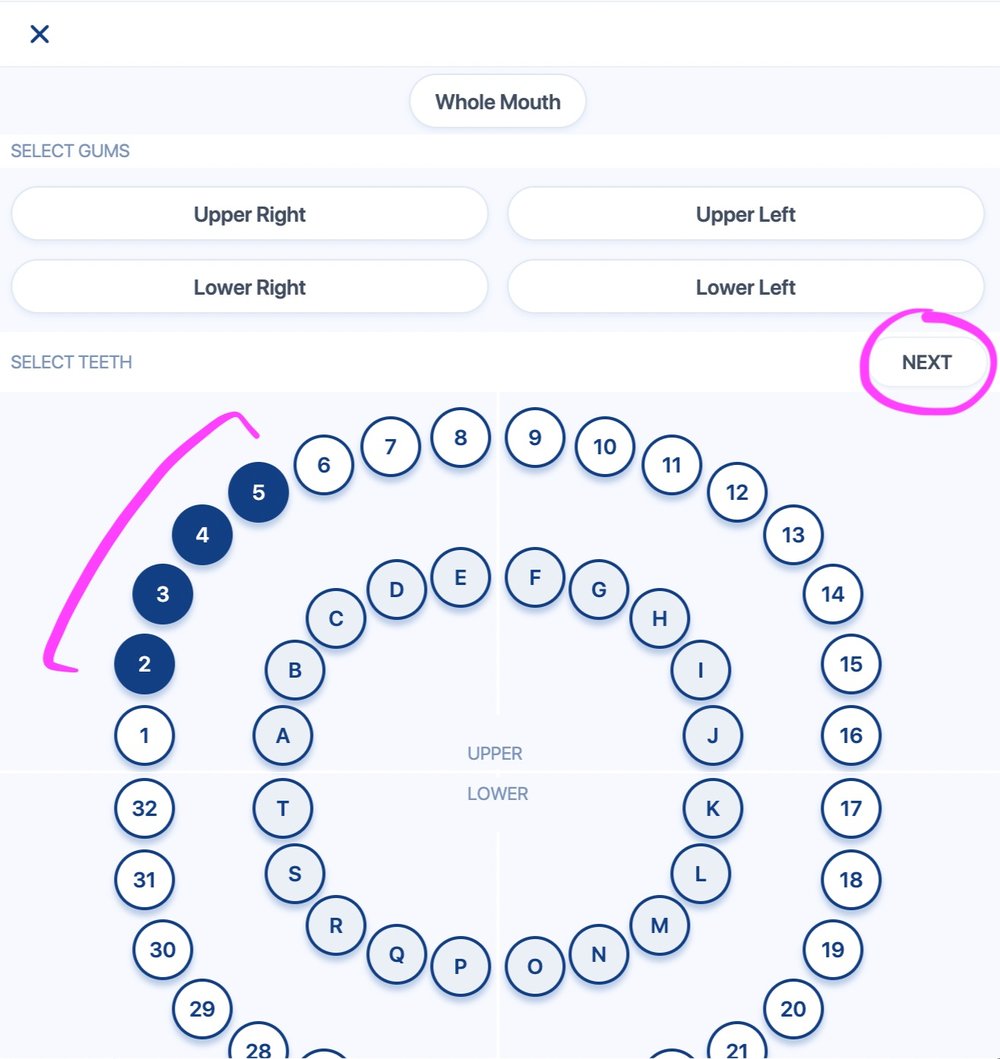
- Selecting a procedure will add that procedure to all the teeth you chose
*Please note that if you select a combination of anterior and posterior teeth, the filling codes won't be available because the anterior and posterior teeth have different surfaces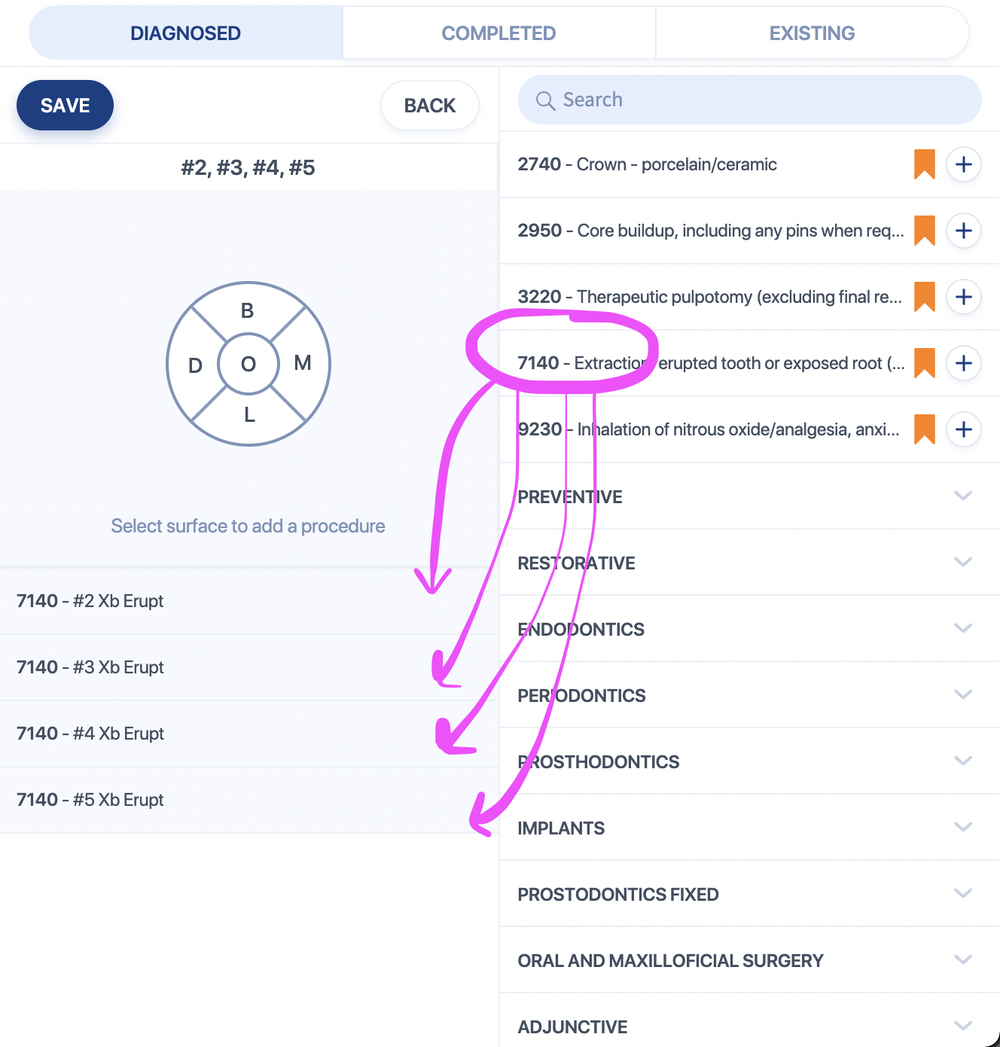
Add clinical note templates
Write a clinical note / Mark procedures as complete
*Note - this action also pushes the procedure into the patient's ledger
Save a treatment plan as a draft and sign the draft later
1. Select the procedures you wish to present 2. Click "Present treatment plan" 3. Make any changes to the treatment plan 4. Click "Save as draft" 5. Find your treatment plan under the Drafts tab 6. Click "Sign now" to have the patient sign it in person, or "Send to" to send it via text or email for their signature
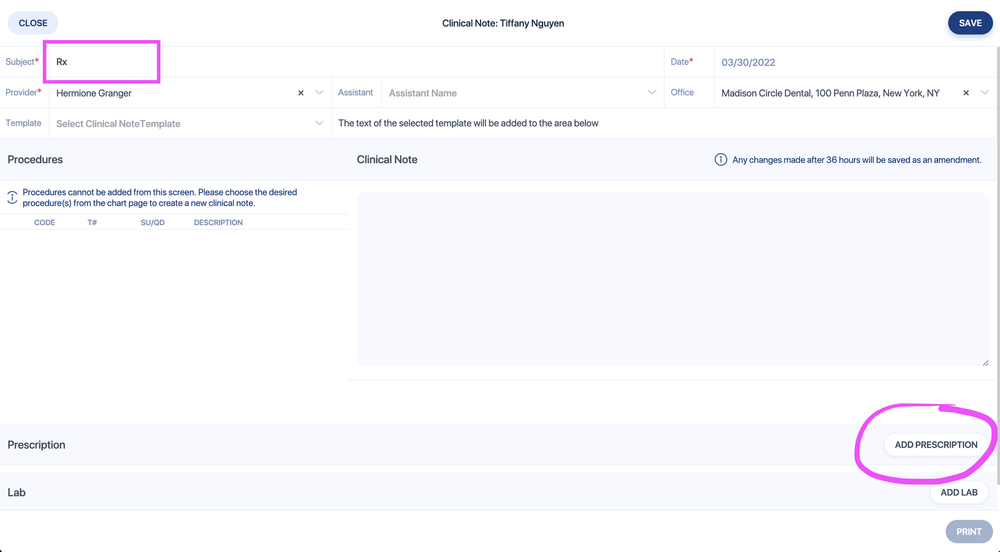
Print a paper prescription
Start from the patient's Chart page and add a new clinical note, or choose an existing clinical note if this prescription relates to an existing note.
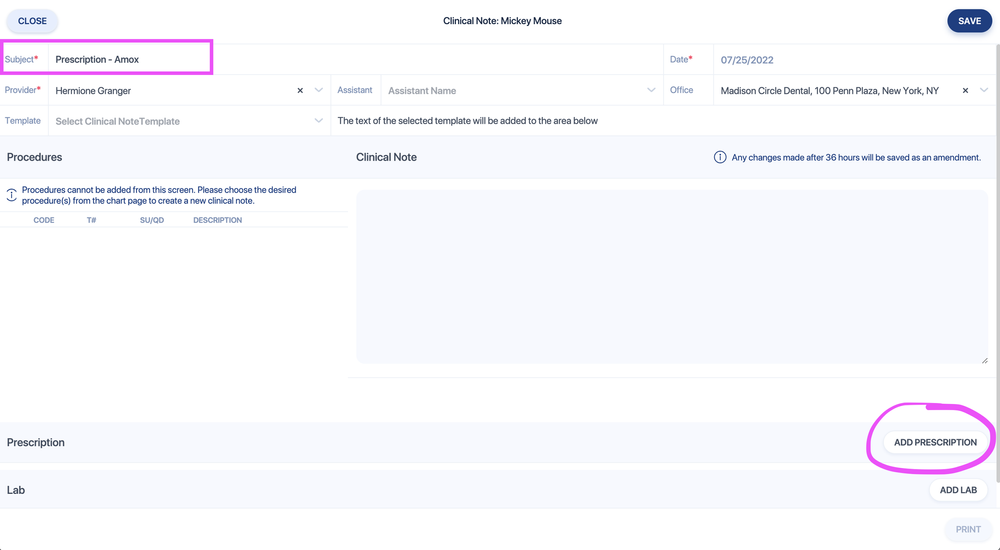
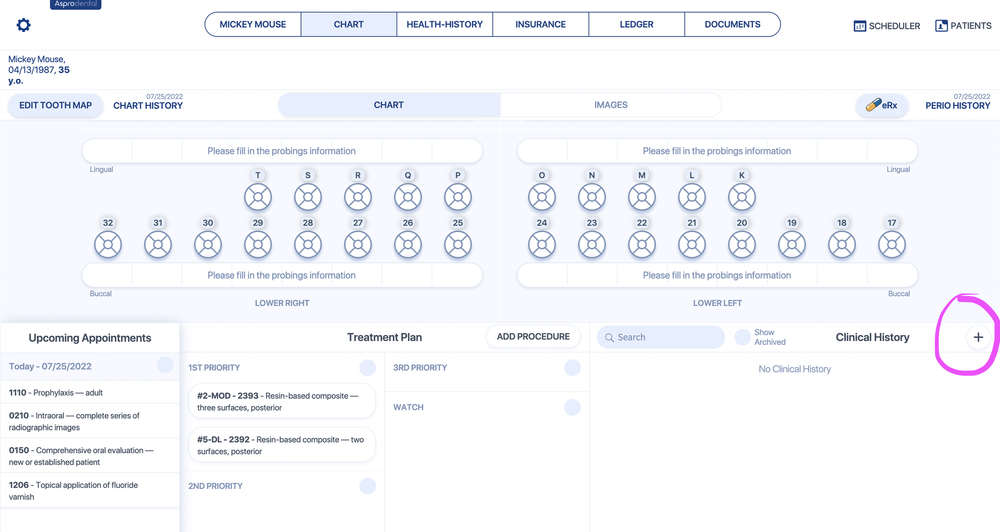 Make sure there is a Subject for the note, then click "Add Prescription"
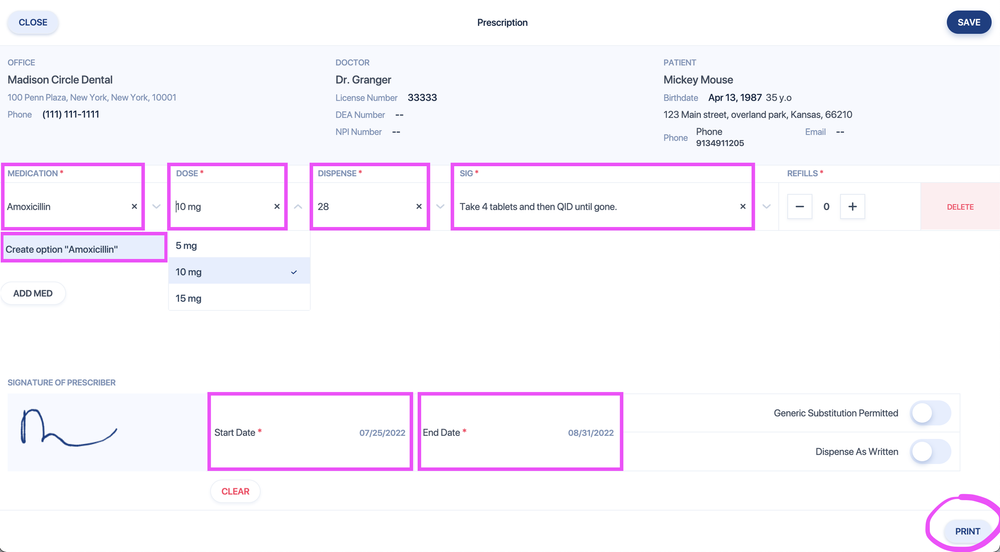
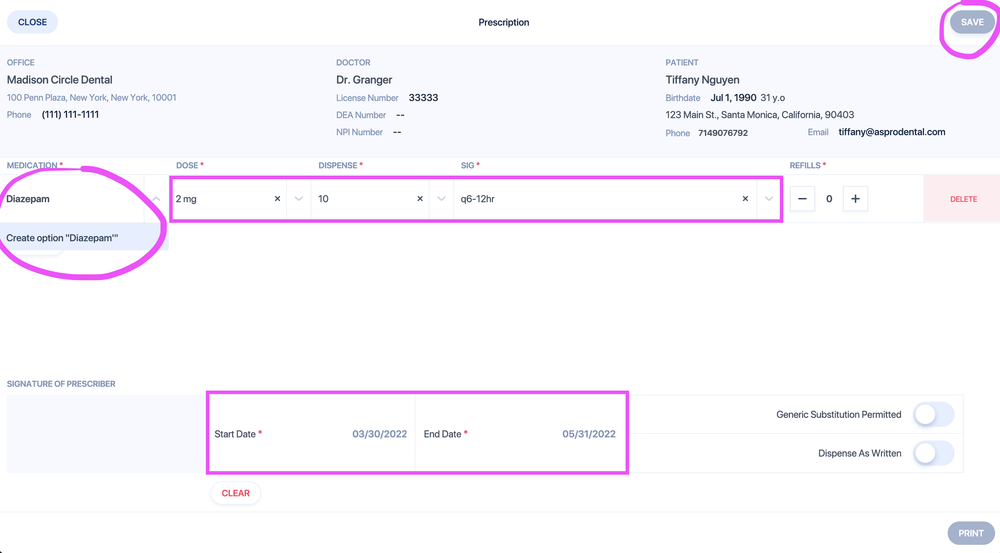
 Fill in the following required fields. You can click on "create option" if you're entering a value for the first time:
- Medication
- Dosage
- Quantity dispensed
- Instructions (SIG)
- Start Date
- End Date
Then click "Print"
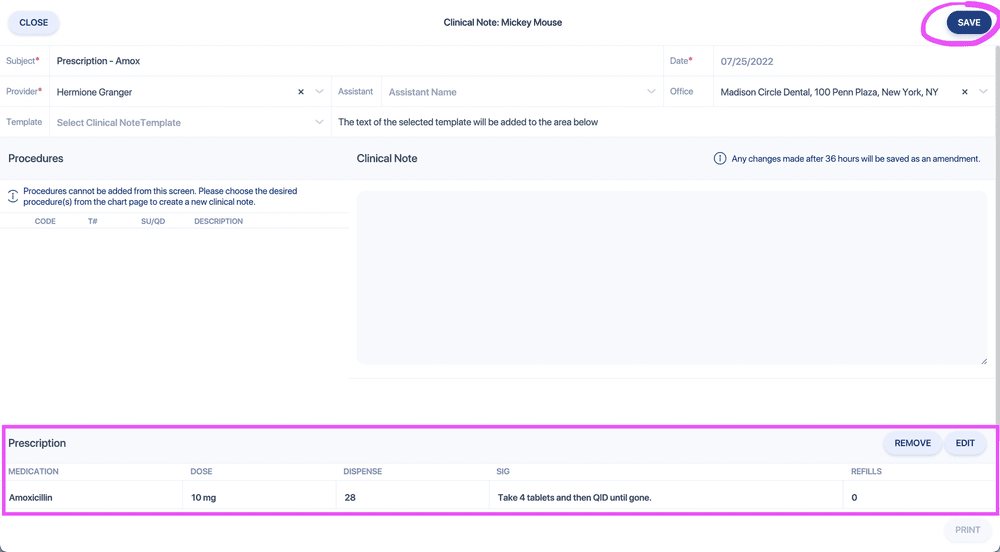
 After you print the prescription, make sure to Save the note so that you have a record of it.
SOTA (x-rays & imaging)
sota x-rays support phone: (714) 532-6100
Sota X-rays support email: support@sotacloud.com
Apteryx (x-rays & imaging)
Take x-rays/images
View x-rays/panos/intraoral pictures/etc. images
Move ALL the x-rays from one patient to another
- Access the x-ray database using the instructions from above
- Click "view" on the patient that you want to move the x-rays away from.
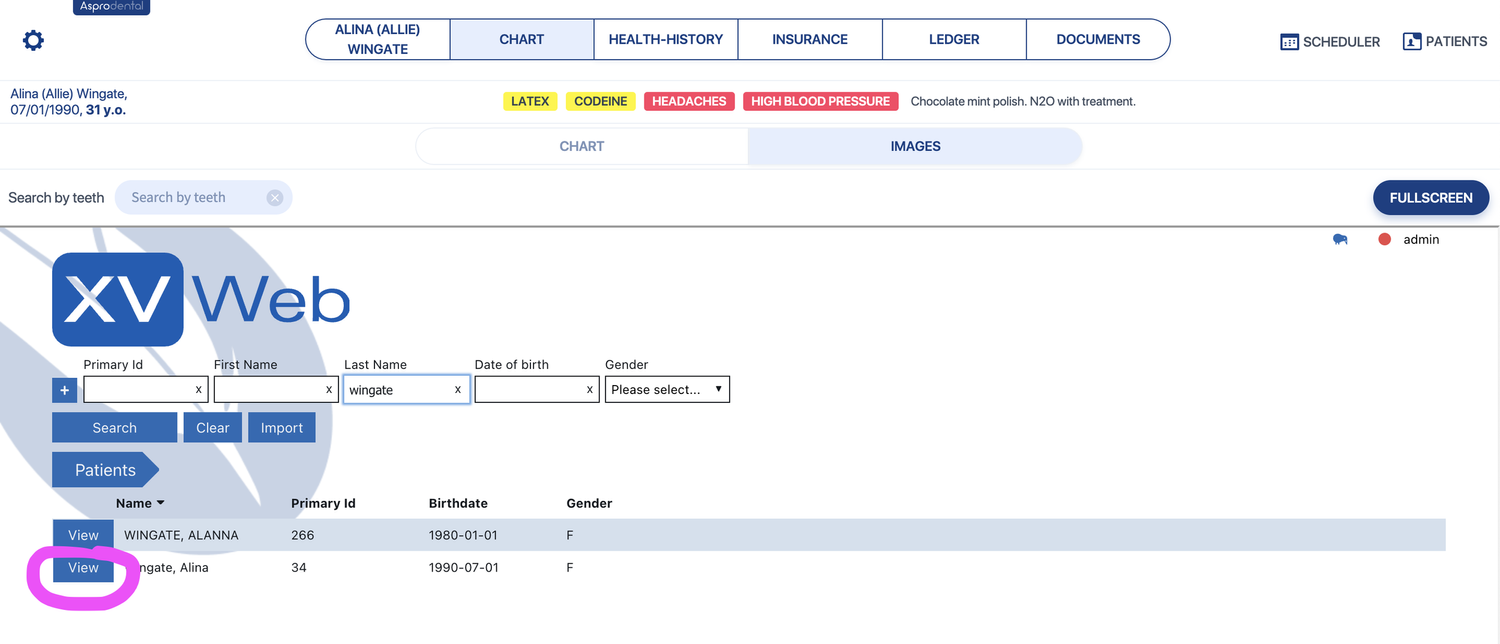
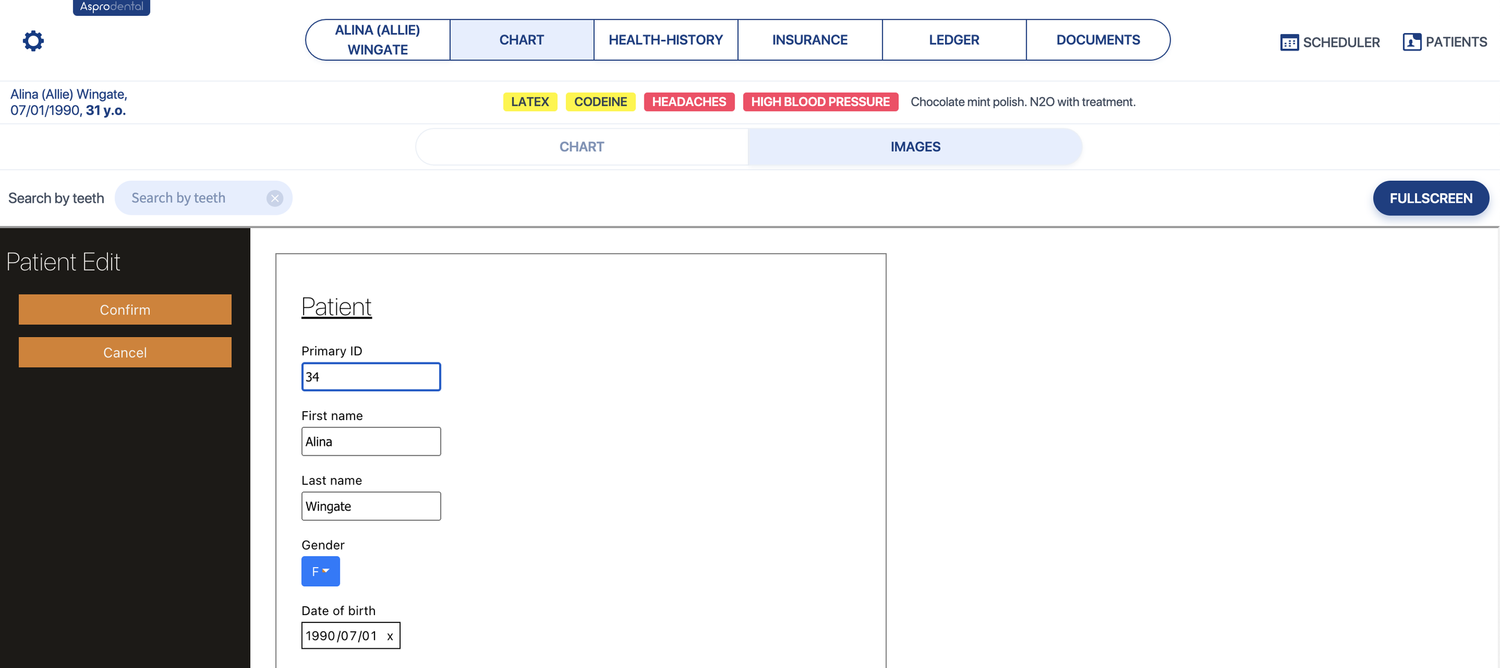
- Click the "edit" icon
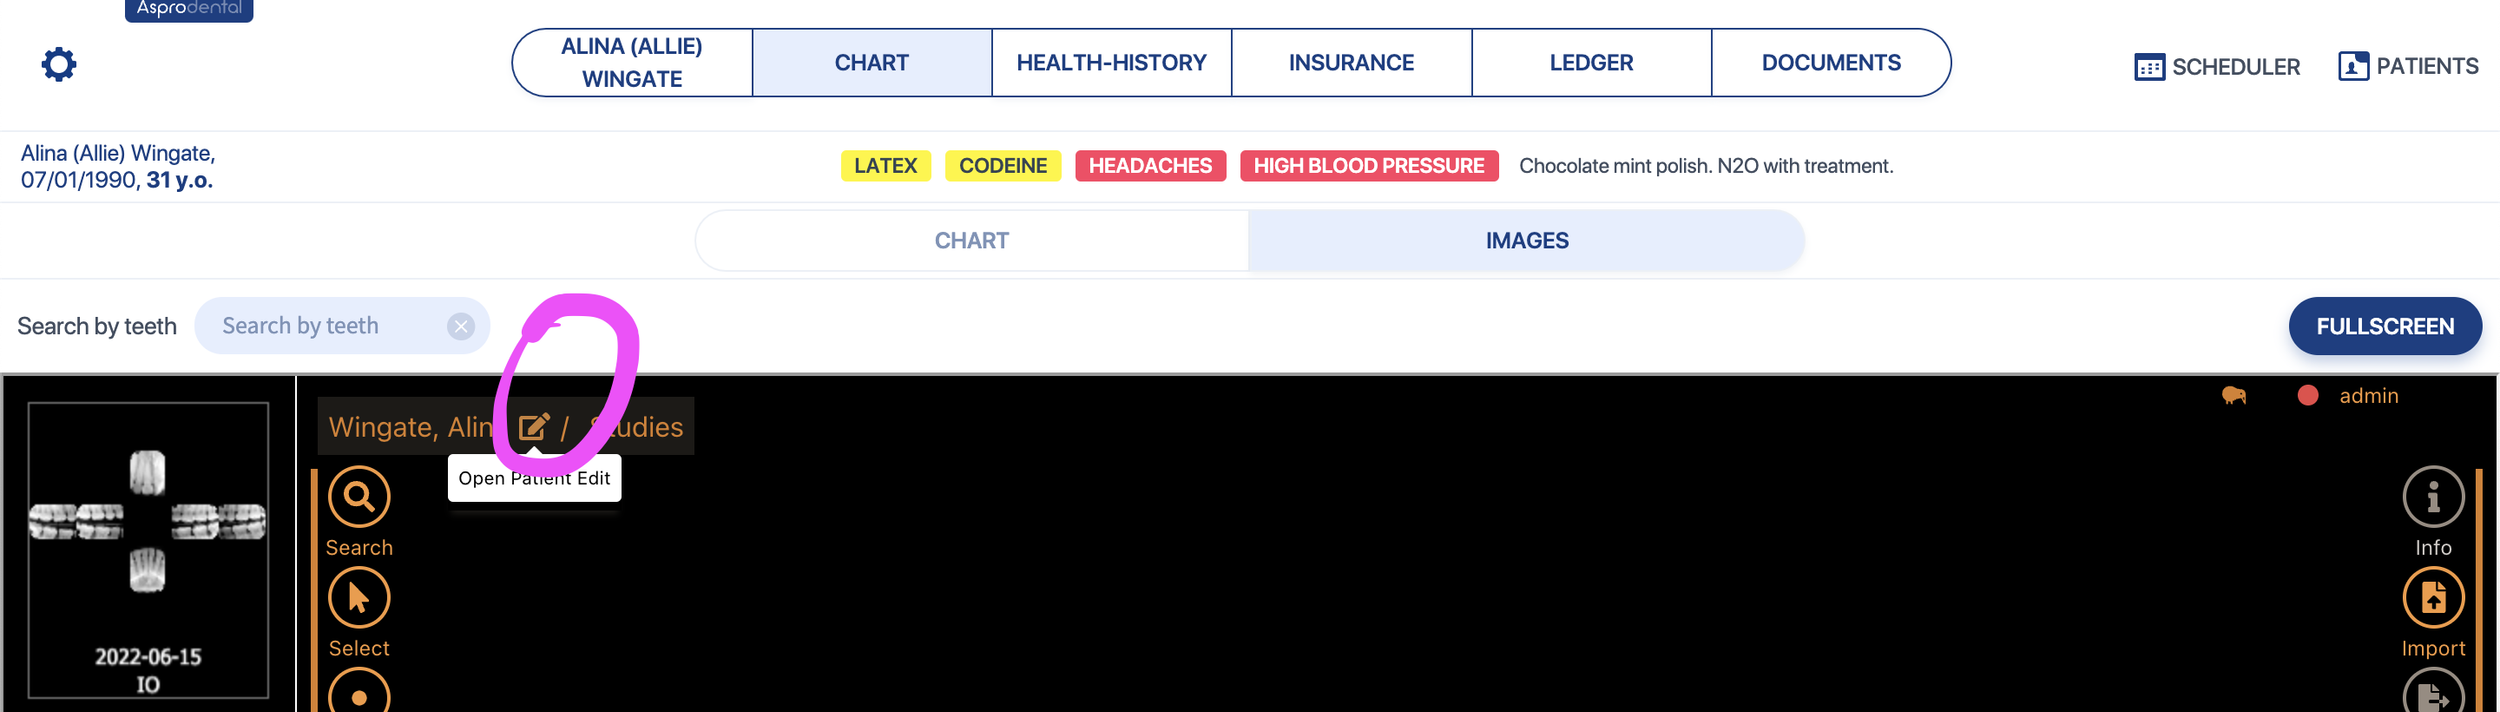
- Change the information to the patient who you want to move x-rays to.
Move a single x-ray or x-ray series from one patient to another
- Open the x-rays that you want to move
- Click the "Move" button
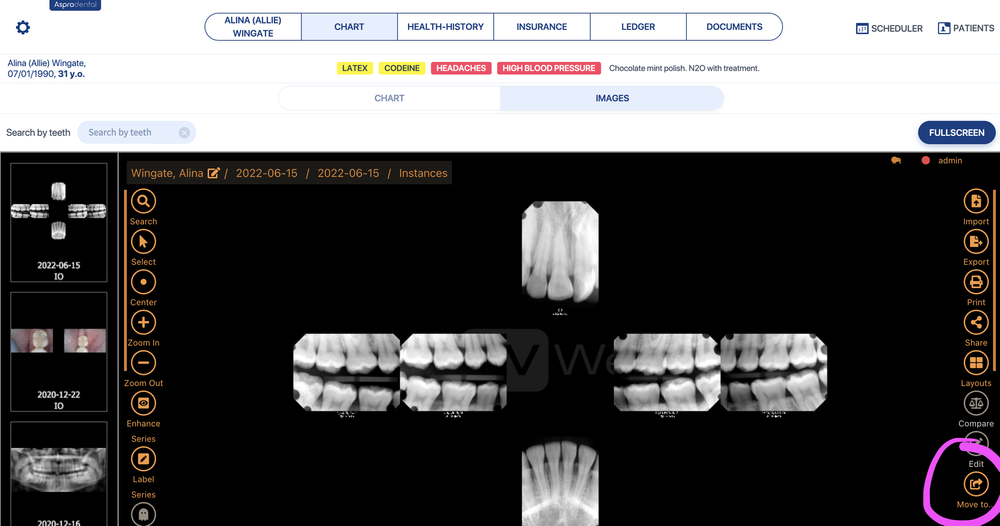
- If the patient has previously had x-rays taken: Put in the first and/or last name of the patient you want to move the ways to and click "search." Then Select the patient and click "Move"
If the patient does NOT have any x-rays on file yet: Fill in the information in the ORANGE box below to create a new x-ray profile.
Note that the date of birth is in the format YYYY/MM/DD
You can open Asprodental in a new tab and pull up that new patient's profile to see their ID number in the website URL
Import x-rays for a patient who does not have prior x-rays
Find "missing" x-rays
Each x-ray is "linked" to the patient's name, birthday, gender, and ID number at the time that the x-ray is captured. When the patient's information changes in Asprodental, any new x-rays will be linked to the new information, while old x-rays still contain the old information and can get hidden.
To fix this, we'll locate the old x-rays and update the information to reflect the new name/birthday/gender/ID number.
If you can see some x-rays on your patient's Images tab, but there are a few missing – please watch Video 1: Find the x-rays if only some are missing.
If you cannot see ANY x-rays on the patient's Images tab – please watch
Video 2: Find the x-rays if ALL of the patient's x-rays are missing.
Video 1: Find the x-rays if only some are missing.
This is typically the case when your patient has a duplicate x-ray profile and the Images tab only shows x-rays from one of the profiles. This video will show you how to merge the duplicate x-ray profiles.
Video 2: Find the x-rays if ALL of the patient's x-rays are missing.
This is typically the case if the patient's imported x-rays are under a different name/birthday/etc. It can happen if the patient's information was changed on their profile, but the x-rays are still linked to the old information.
This video will show you how to update the x-rays to the new information.
E-prescribe
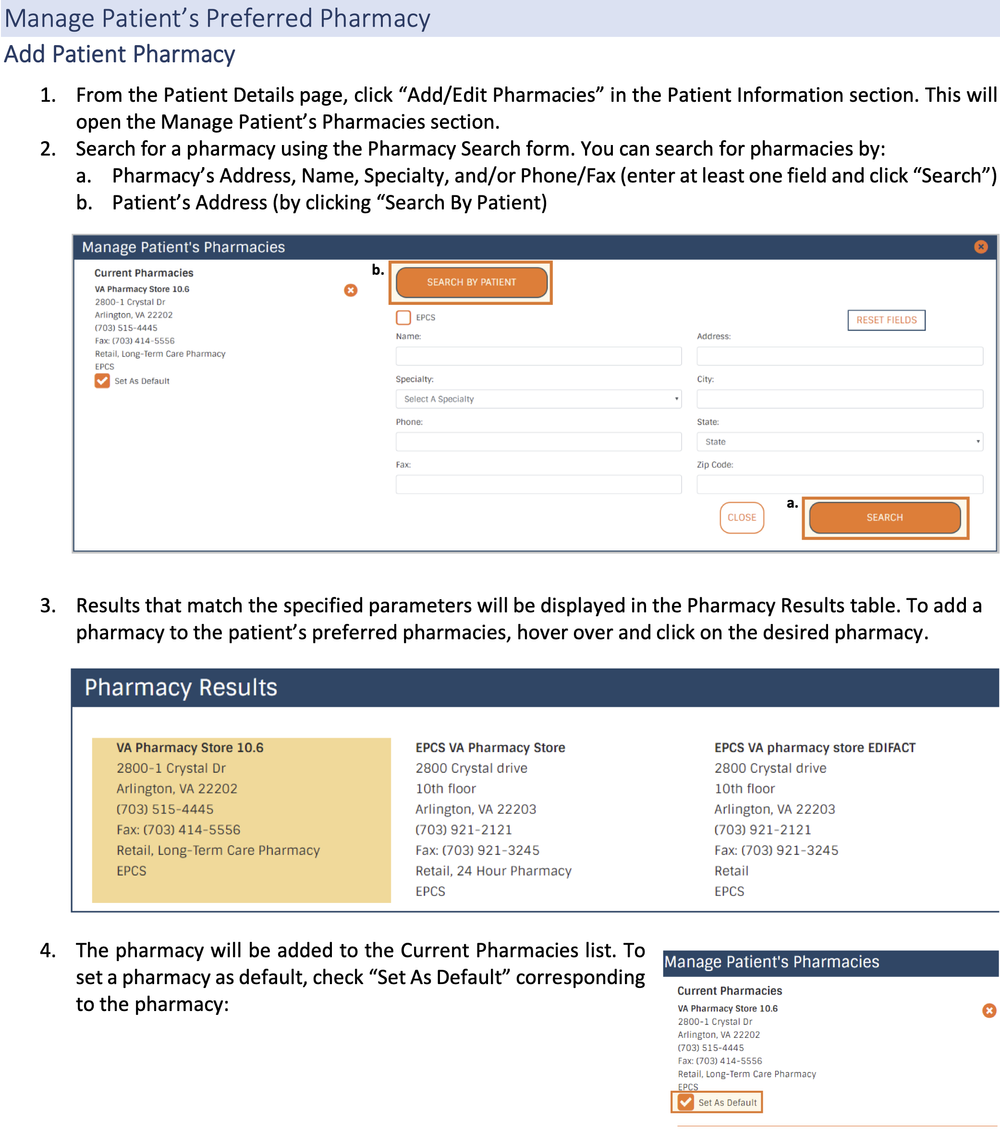
Add the patient's preferred pharmacy
Click on the e-Rx button from the patient's chart 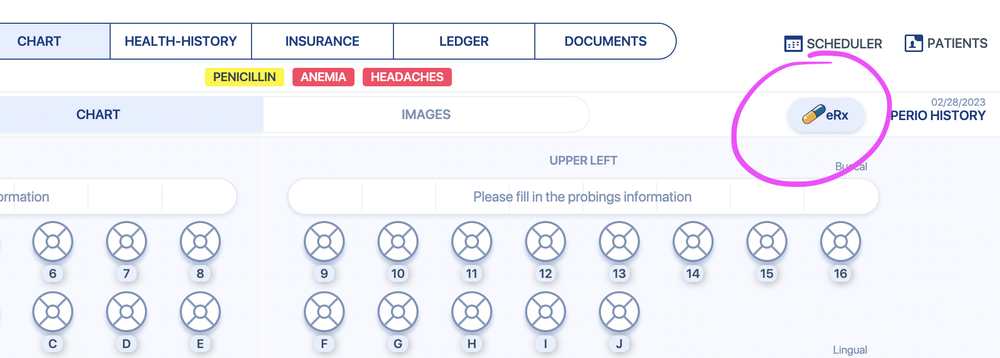
Write a medication prescription
Click on the e-Rx button from the patient's chart
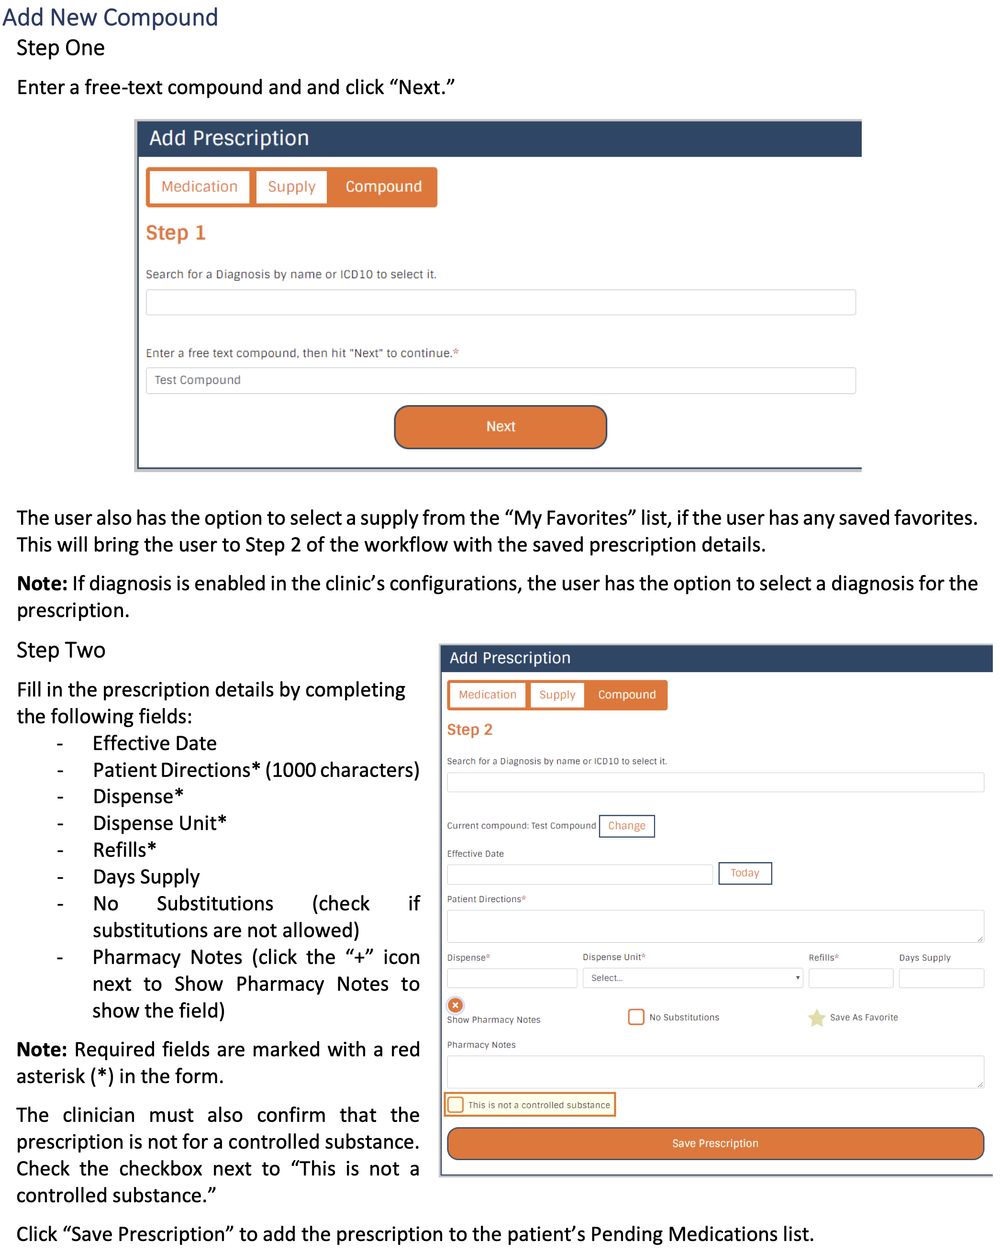
Write a compound prescription
Click on the e-Rx button from the patient's chart
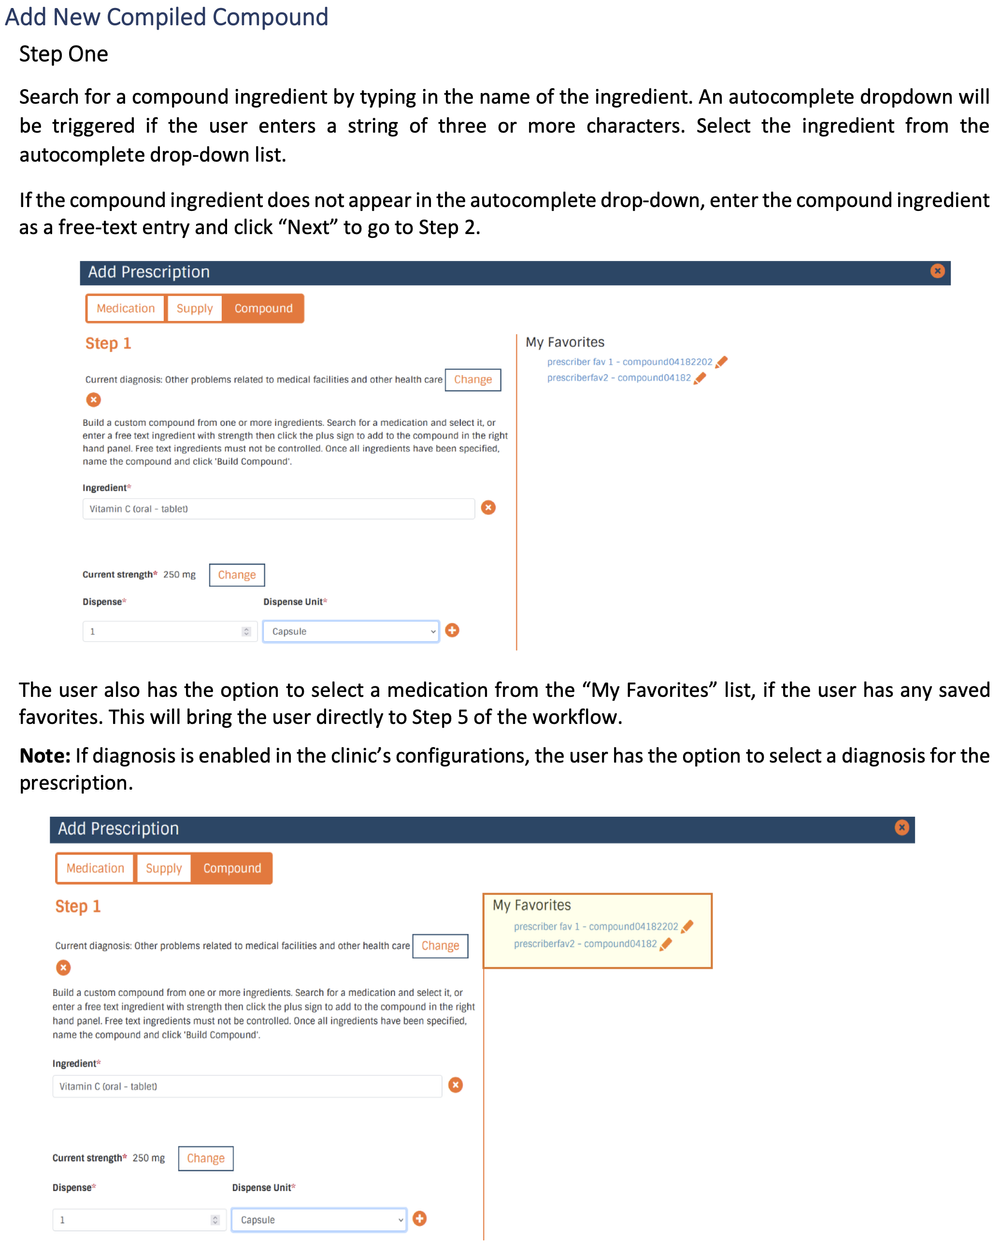
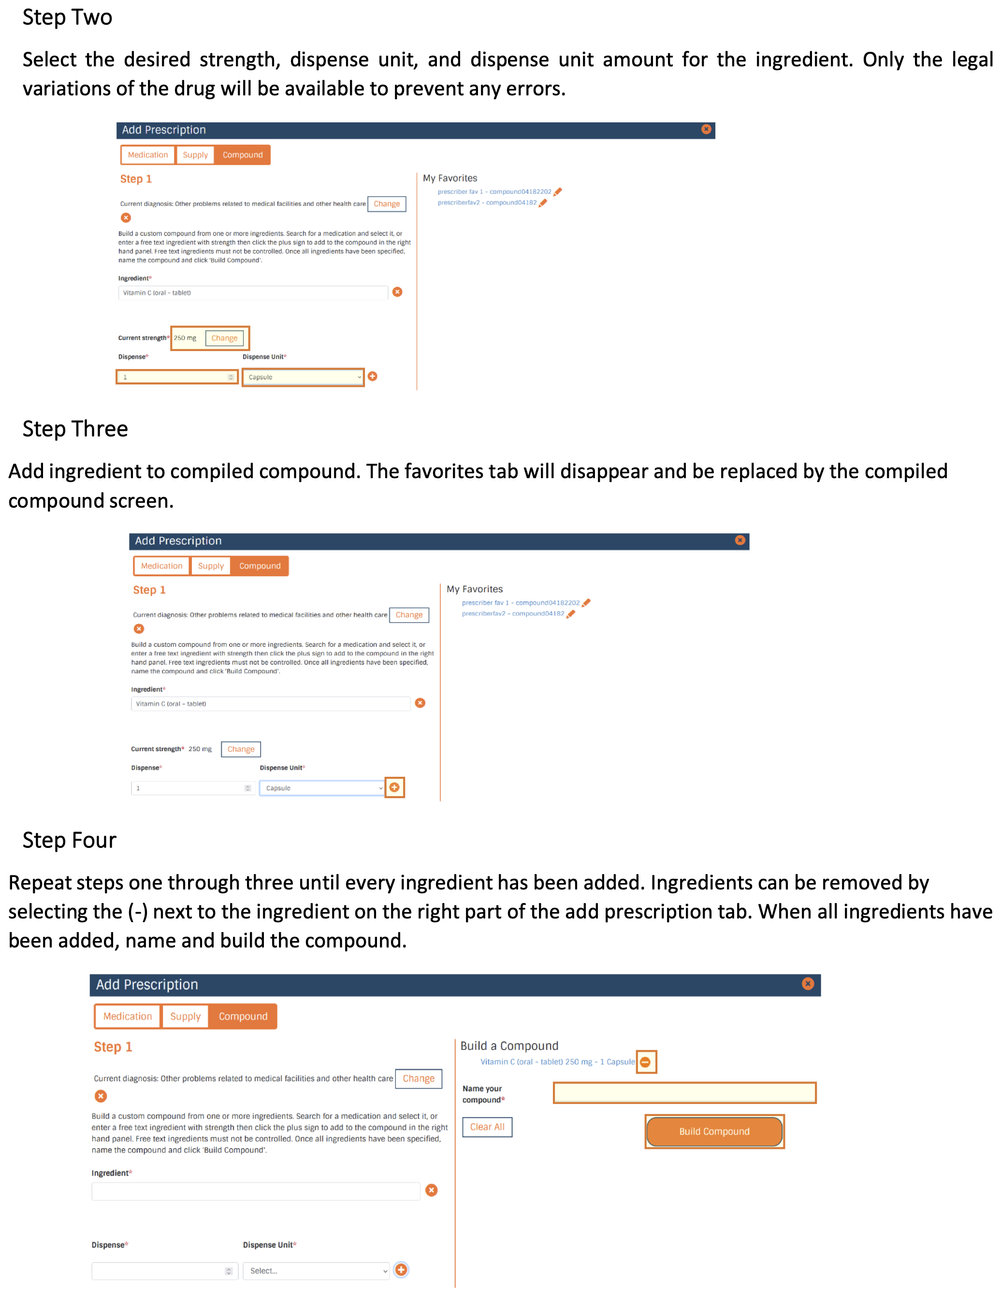
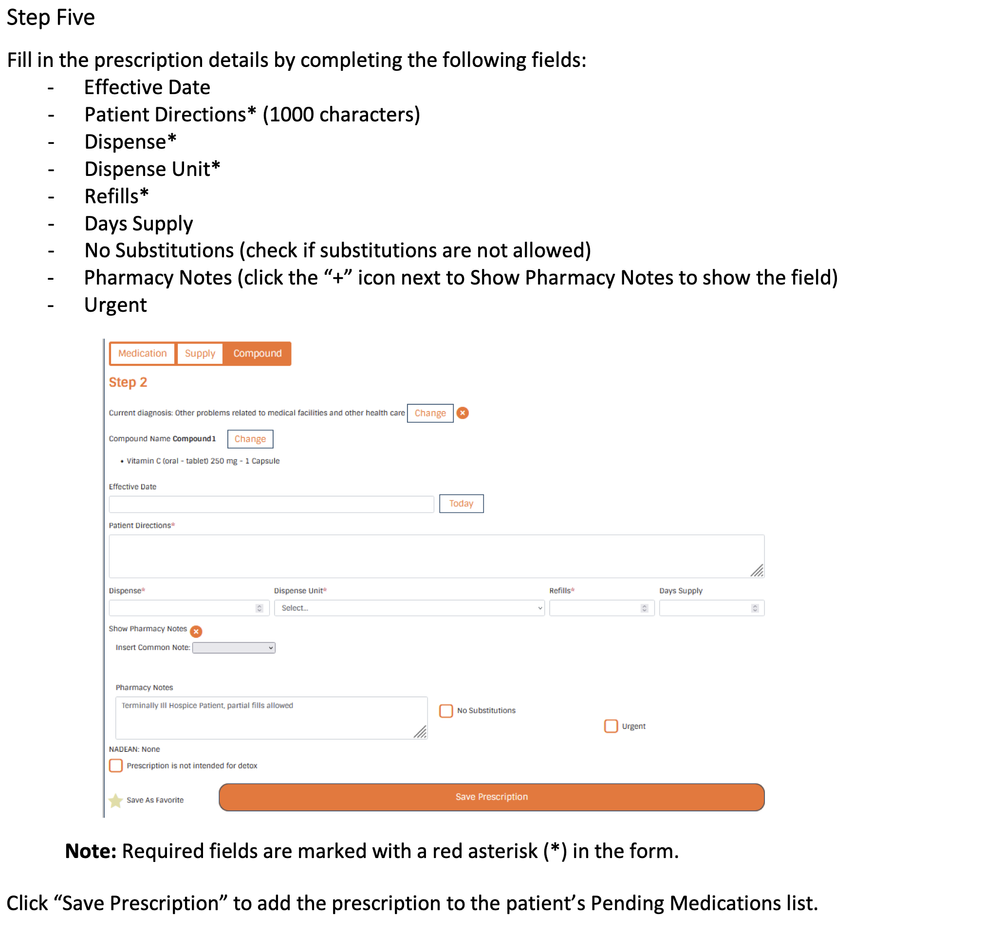
Write a compiled compound prescription
Click on the e-Rx button from the patient's chart
Change prescription pharmacy
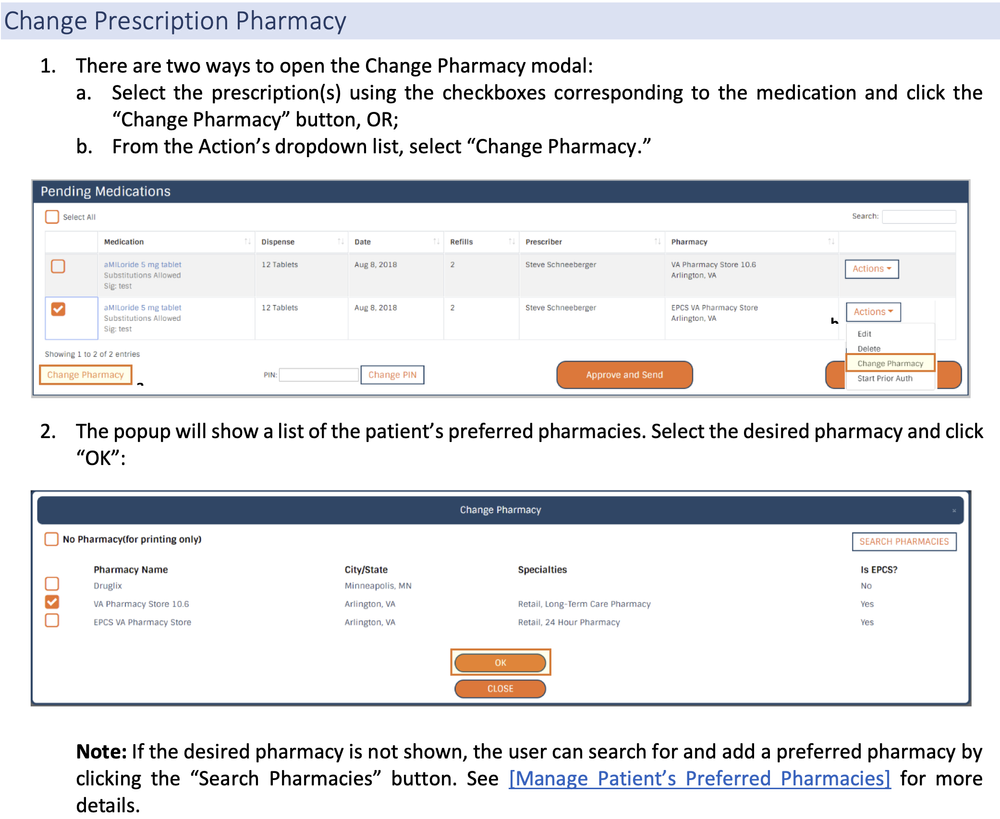
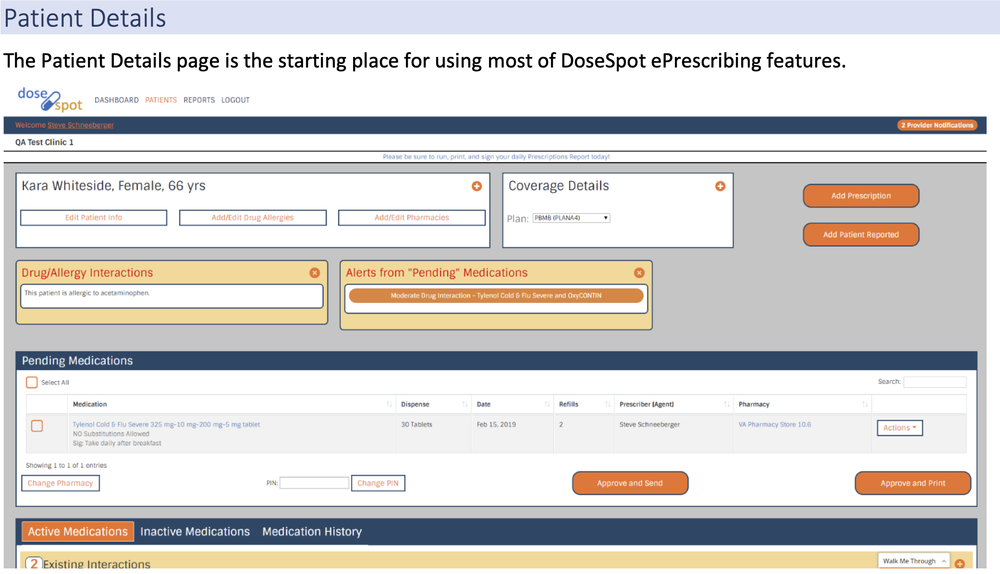
For more detailed instructions, please refer to the full USER GUIDE
Insurance
Send a claim
- From the ledger, click "Create Claim" to include all the procedures from the most recent date of service, or select the procedures you wish to send then click "Create Claim" to include only the selected ones.
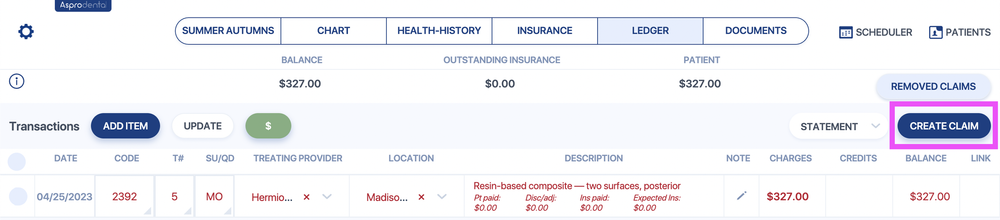
- Select the insurance you wish to send it to (primary or secondary) and change the treatment/billing provider as needed, then click "Send e-claim" to send it electronically.
You can also select the option to print the claim on paper.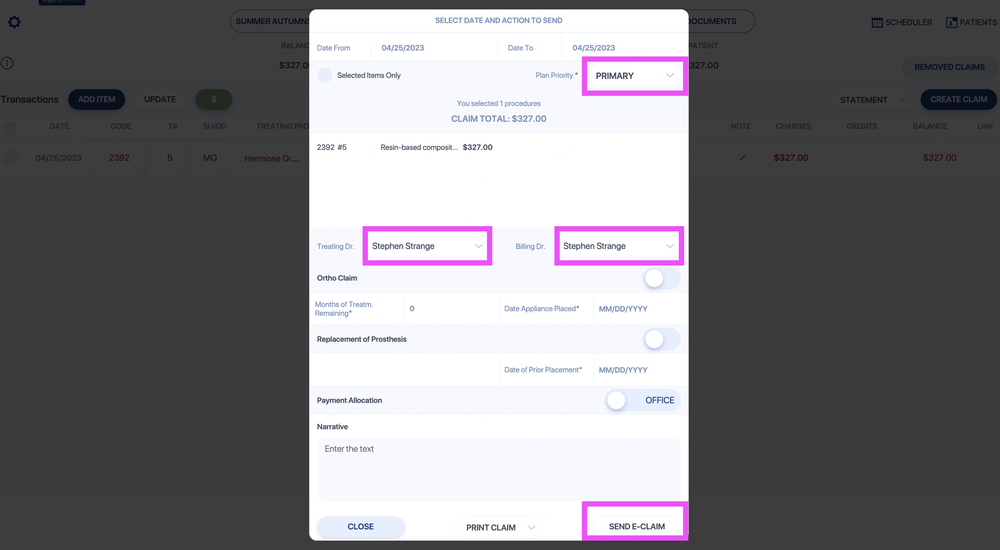
- If you are sending the claim electronically, a new tab will open. Log into your e-claims management using the username and password given to you during training. If you don't have the login information, please contact your trainer or Asprodental Support.

Enter an insurance payment
Send a pre-auth claim
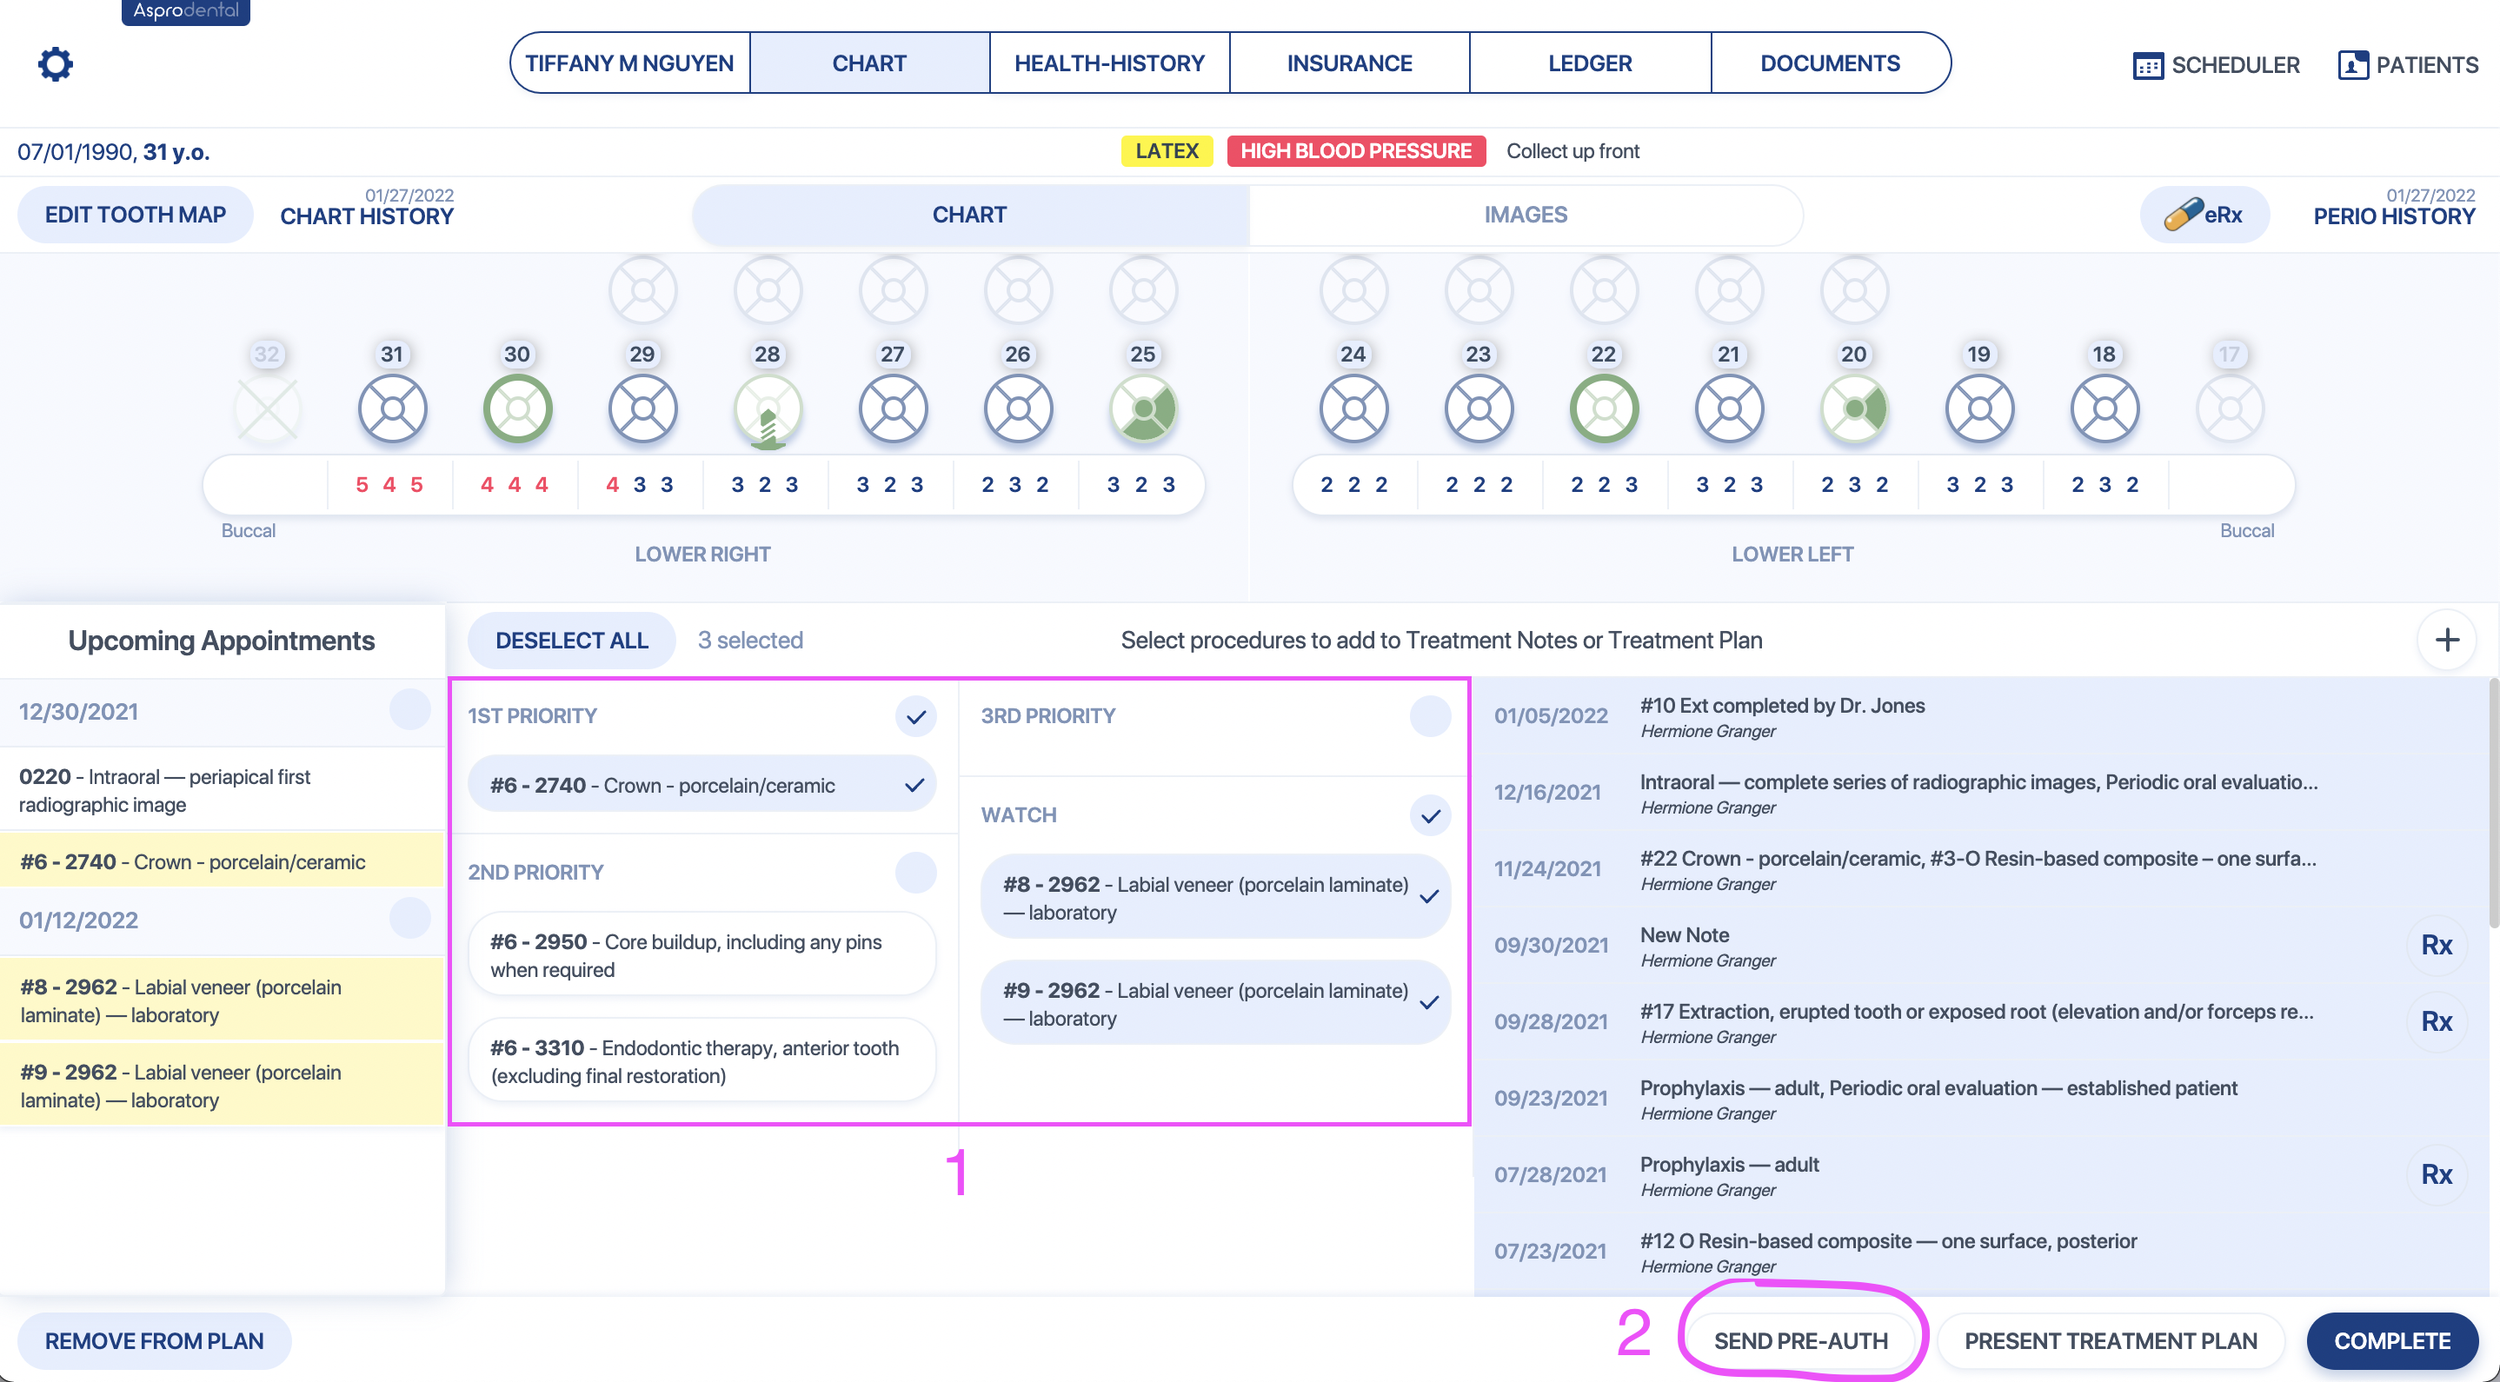
1. Select the procedures to send from the patient's treatmnet plan
2. Click "Send pre-auth"
3. Fill out the required fields and send the claim
Add insurance coverage if the patient is their own subscriber

Step by Step instructions
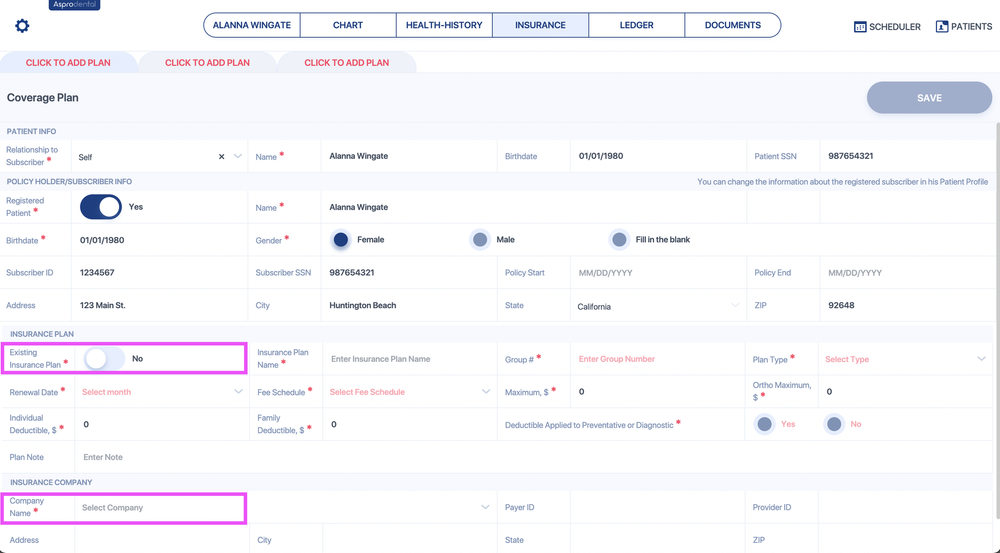
Start from a new tab that says "Click to add plan"
- Patient Info - Relationship to Subscriber: Select "SELF"
- Subscriber Info - Registered Patient: Leave toggle ON
- Subscriber Info - Name: The patient's information pulls from their profile. You cannot change their address, birthday, or SSN from here. Please do so from the profile, and it will automatically update here.
You can add the Subscriber ID# here. - Insurance Plan - Existing Insurance Plan: If the plan is already on file, keep this toggle ON. If the plan is new and not on file yet, turn this toggle OFF.
- Insurance Plan - Insurance Plan: Search for the insurance plan on file here. If the toggle in step 4 was turned off, then fill in the required fields to create a new insurance plan.
- Insurance Company - Company Name: Search for the insurance company. If the insurance company is not on file, you must create it from the Insurance Settings page.
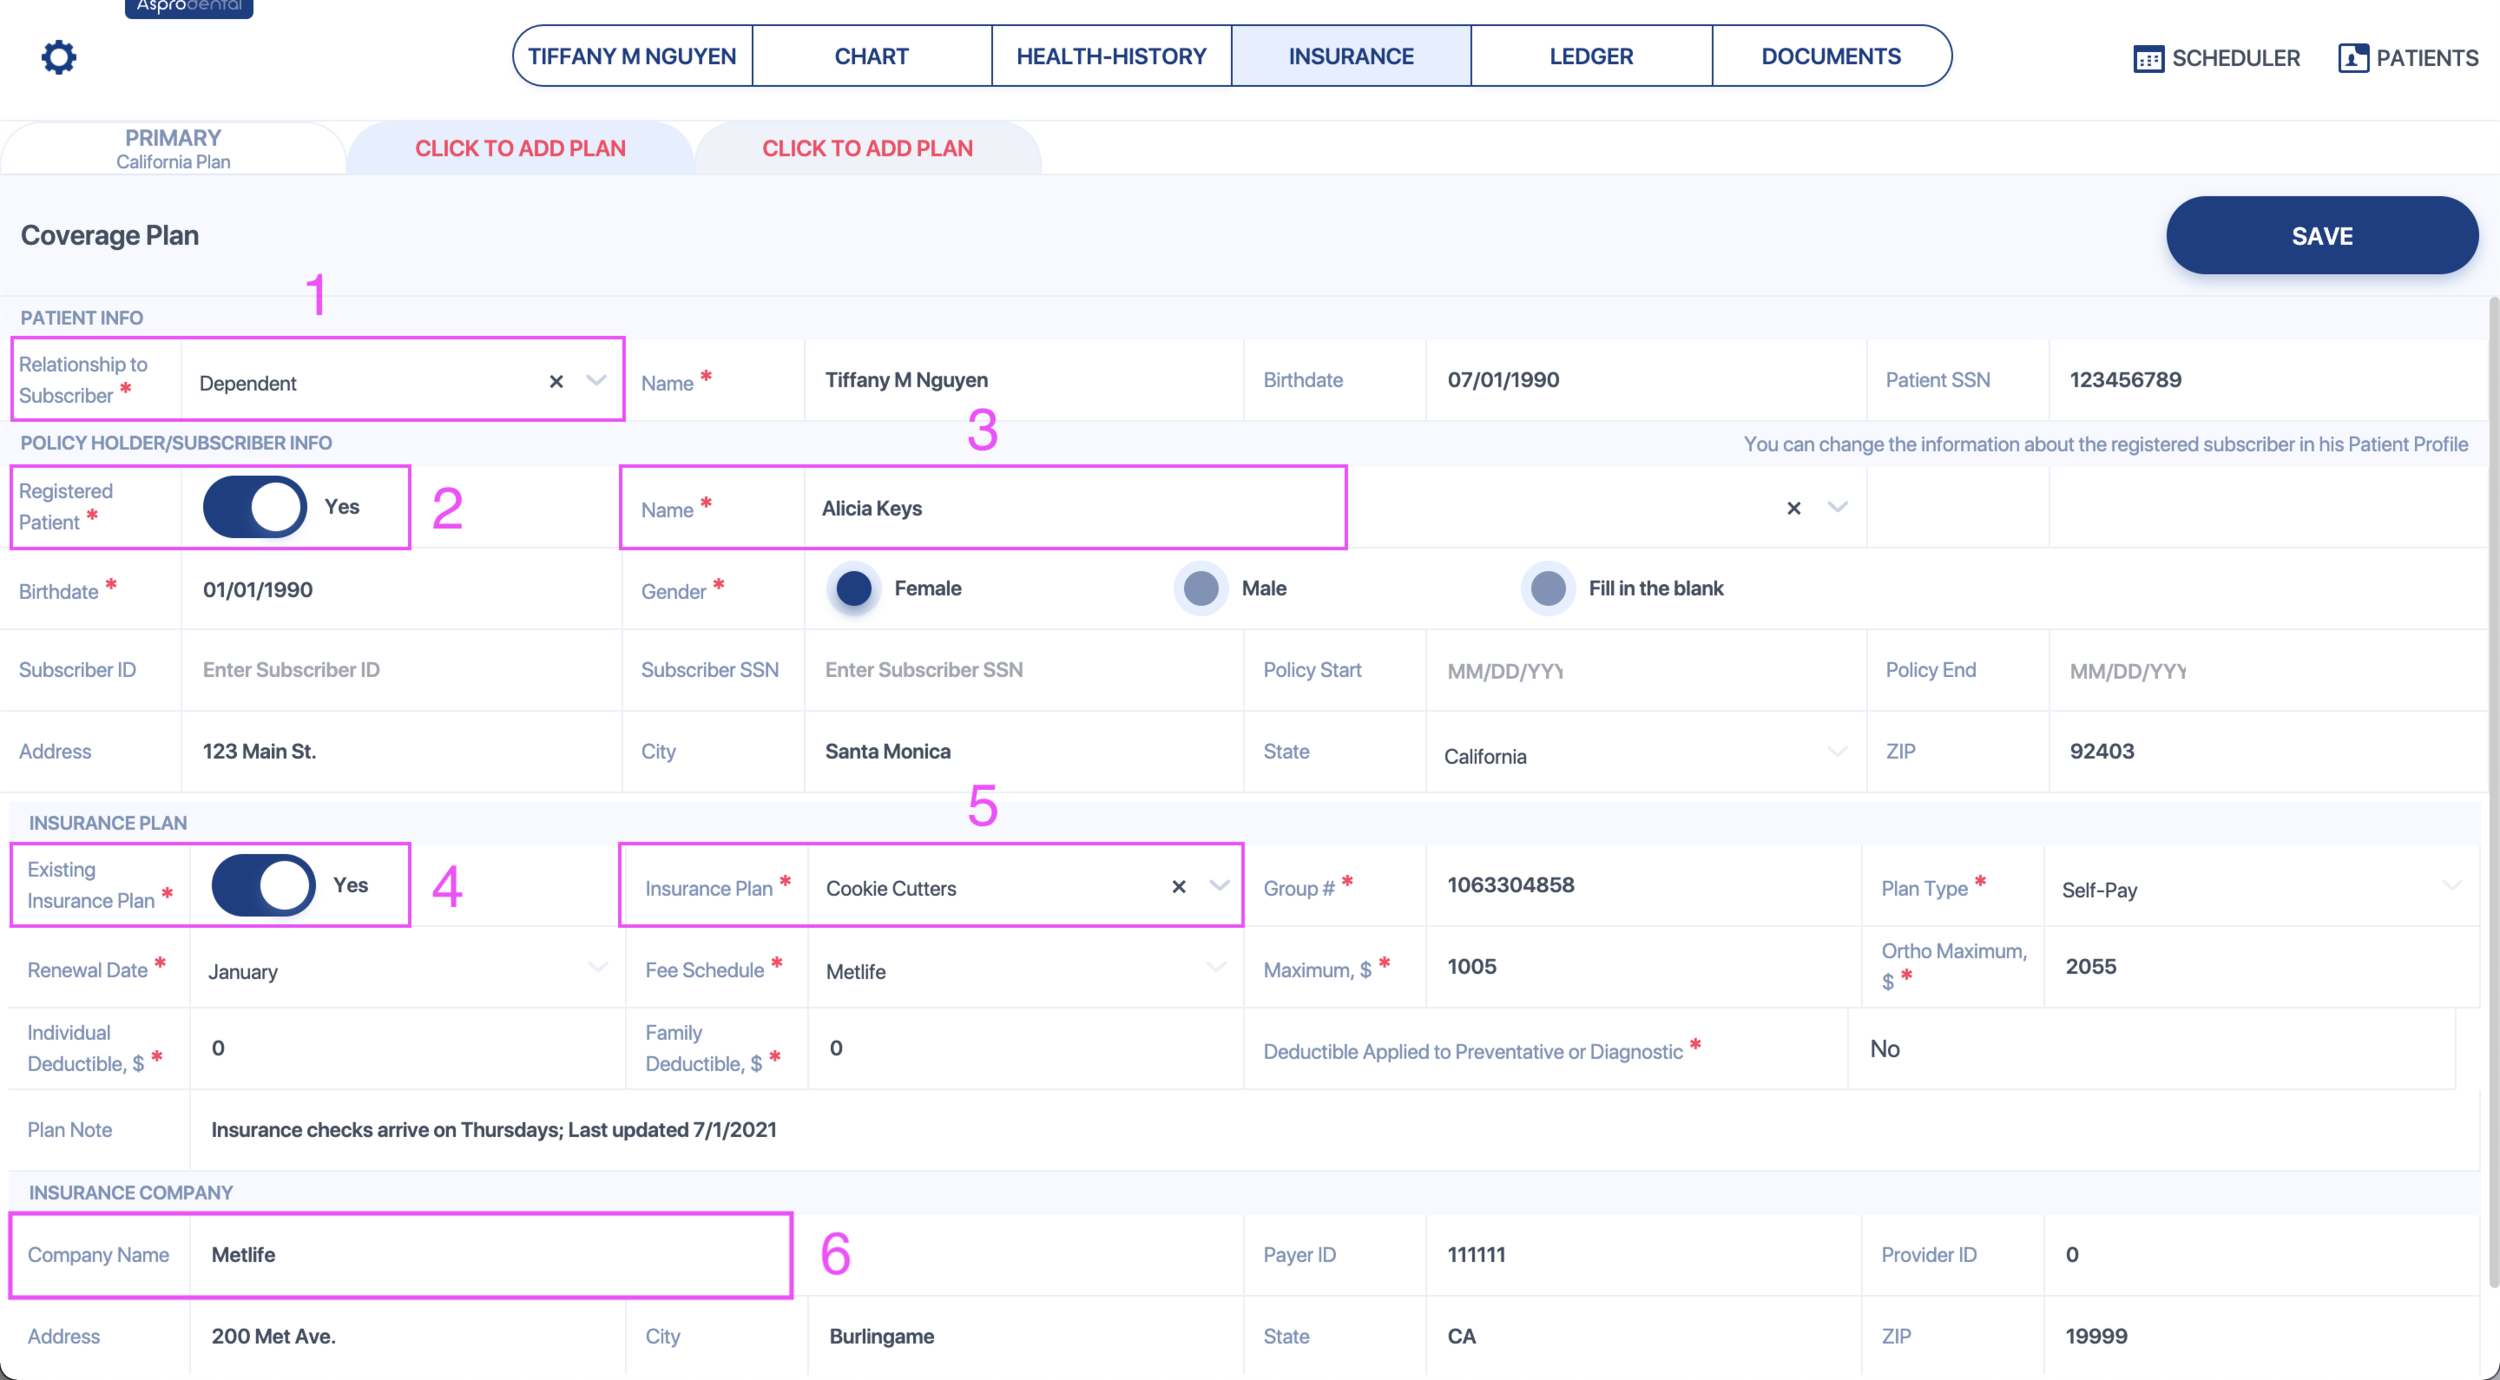
Add insurance coverage if the patient is a dependent
Step by Step instructions
Start from a new tab that says "Click to add plan"
- Patient Info - Relationship to Subscriber: Select "DEPENDENT" or "SPOUSE"
- Subscriber Info - Registered Patient: Leave toggle ON if the subscriber is a patient on file. Turn the toggle OFF if the subscriber is not a patient on file.
- Subscriber Info - Name: If the toggle from step 2 is ON, then the subscriber's information pulls from their profile. You cannot change their address, birthday, or SSN, do so from the profile. You can add the Subscriber ID# here.
If the toggle from step 2 is OFF, then you can type in all of the subscriber's information by hand (including address, birthday, SSN). - Insurance Plan - Existing Insurance Plan: If the plan is already on file, keep this toggle ON. If the plan is new and not on file yet, turn this toggle OFF.
- Insurance Plan - Insurance Plan: If the toggle in step 4 was left ON, then you can search for the insurance plan on file here.
If the toggle in step 4 was turned OFF, then fill in the required fields to create a new insurance plan. - Insurance Company - Company Name: Search for the insurance company. If the insurance company is not on file, you must create it from the Insurance Settings page.
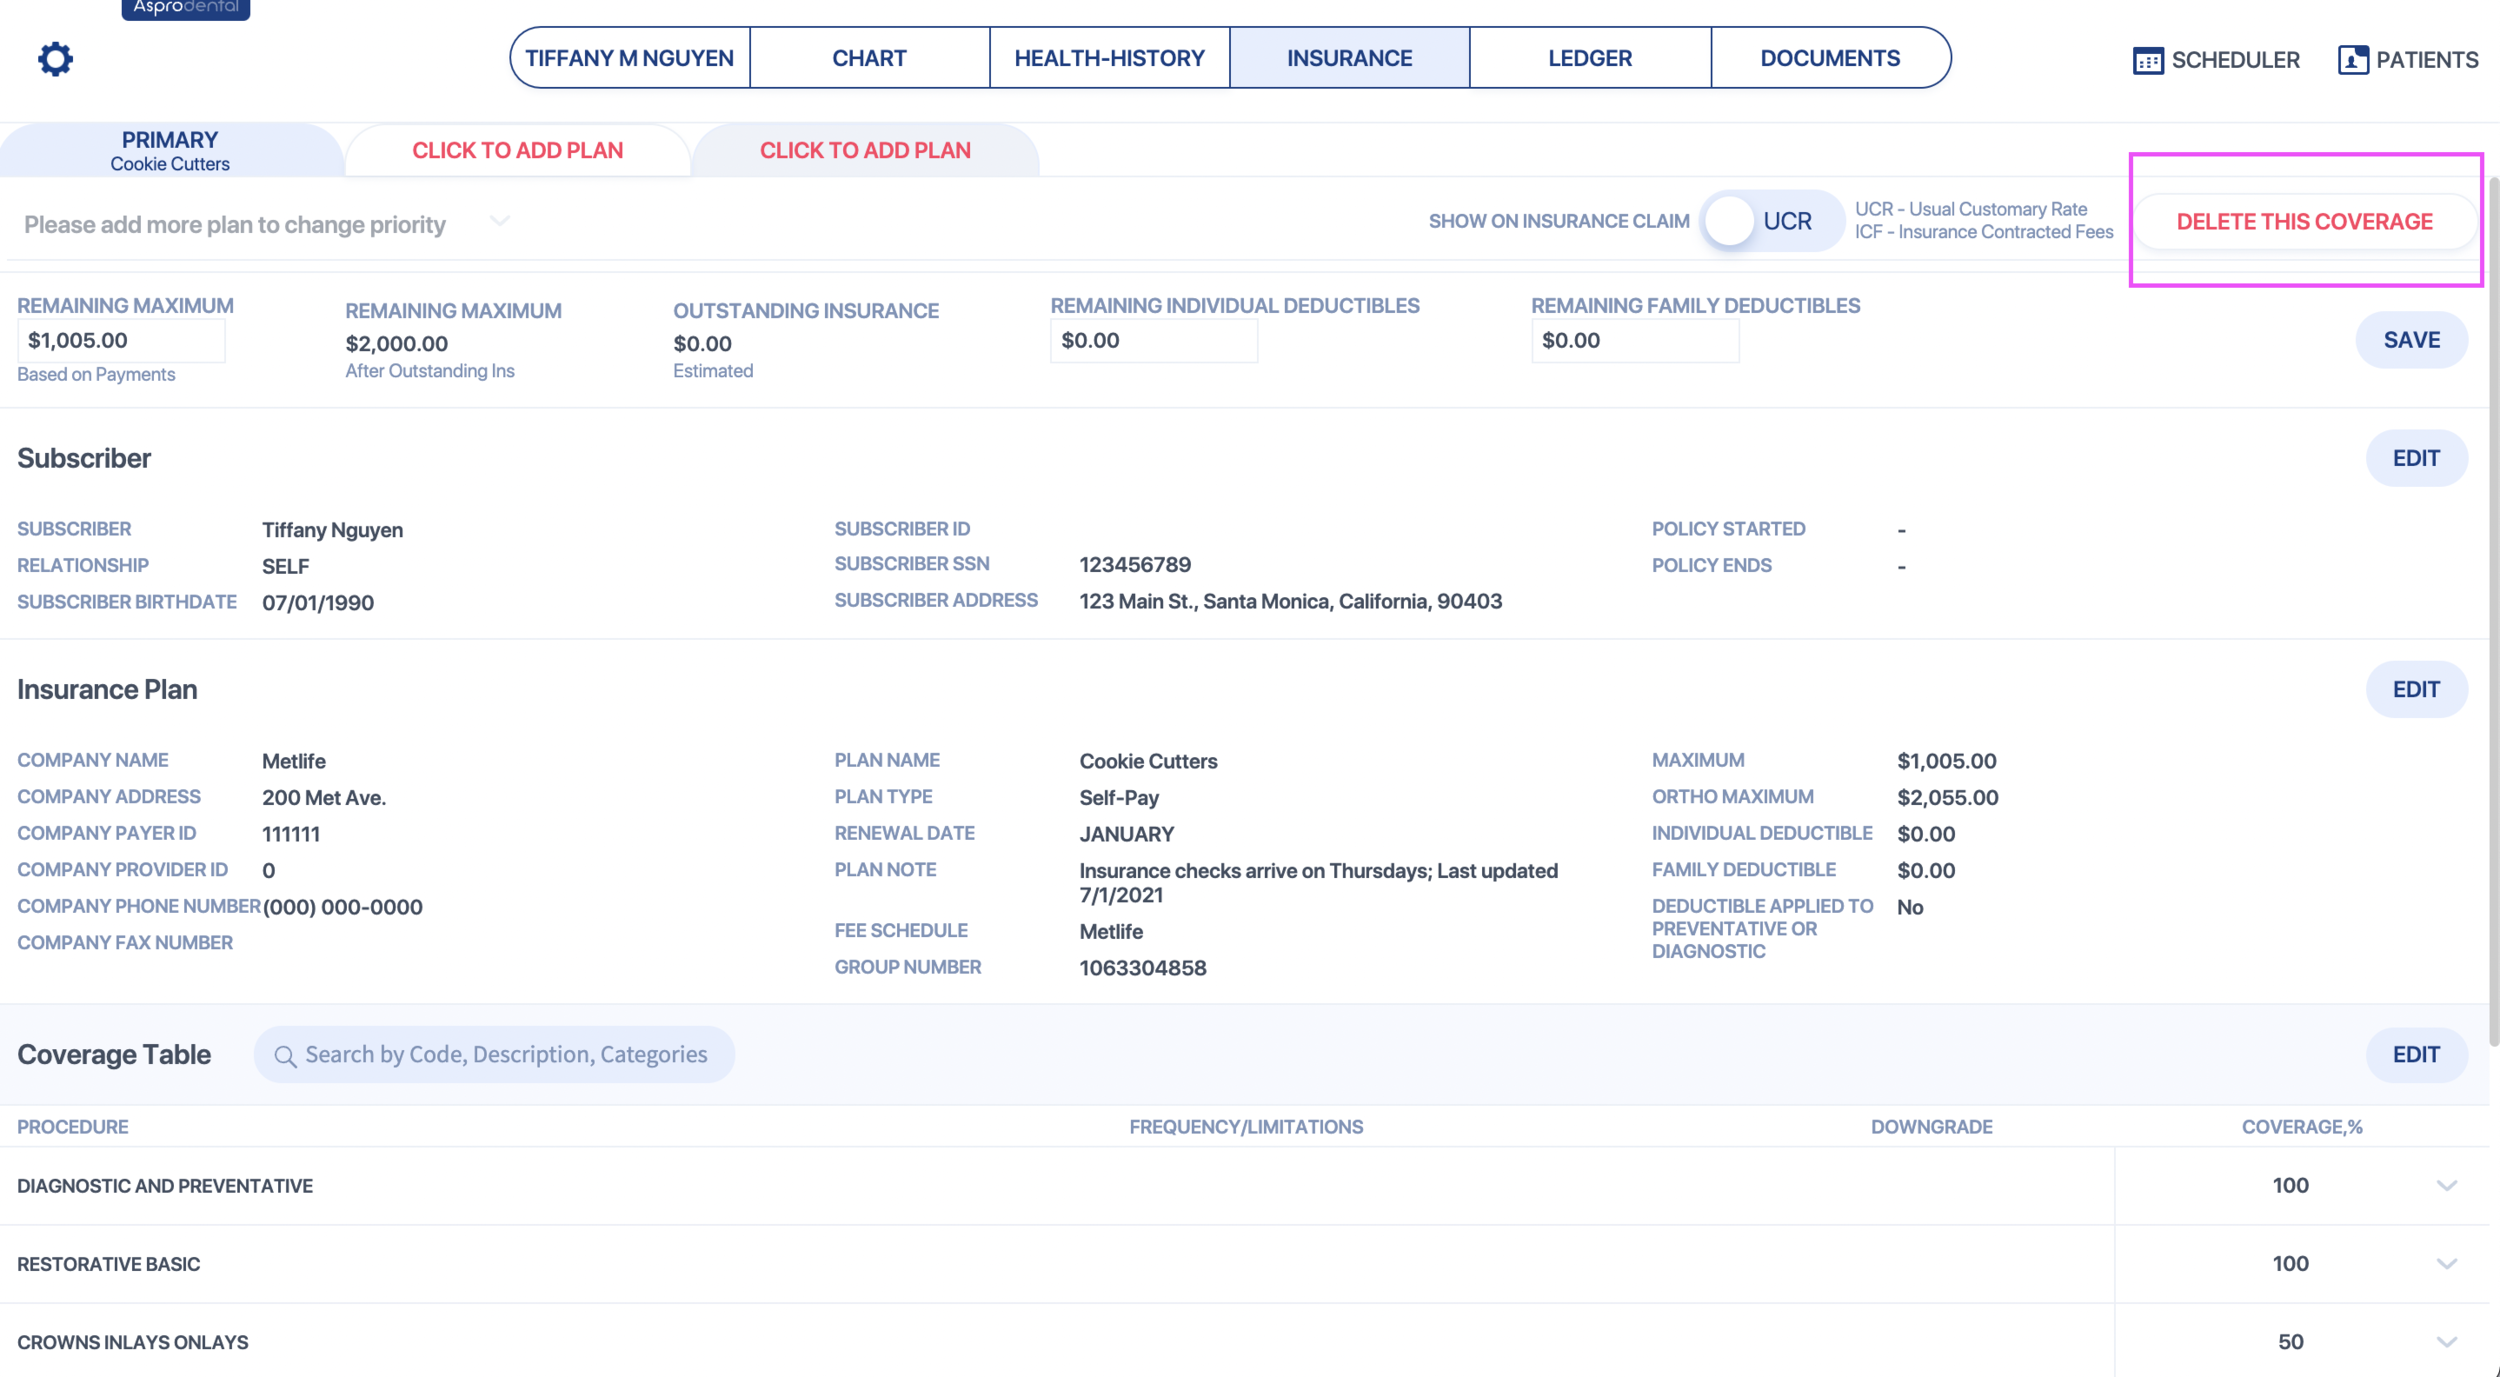
Change the patient's insurance subscriber information
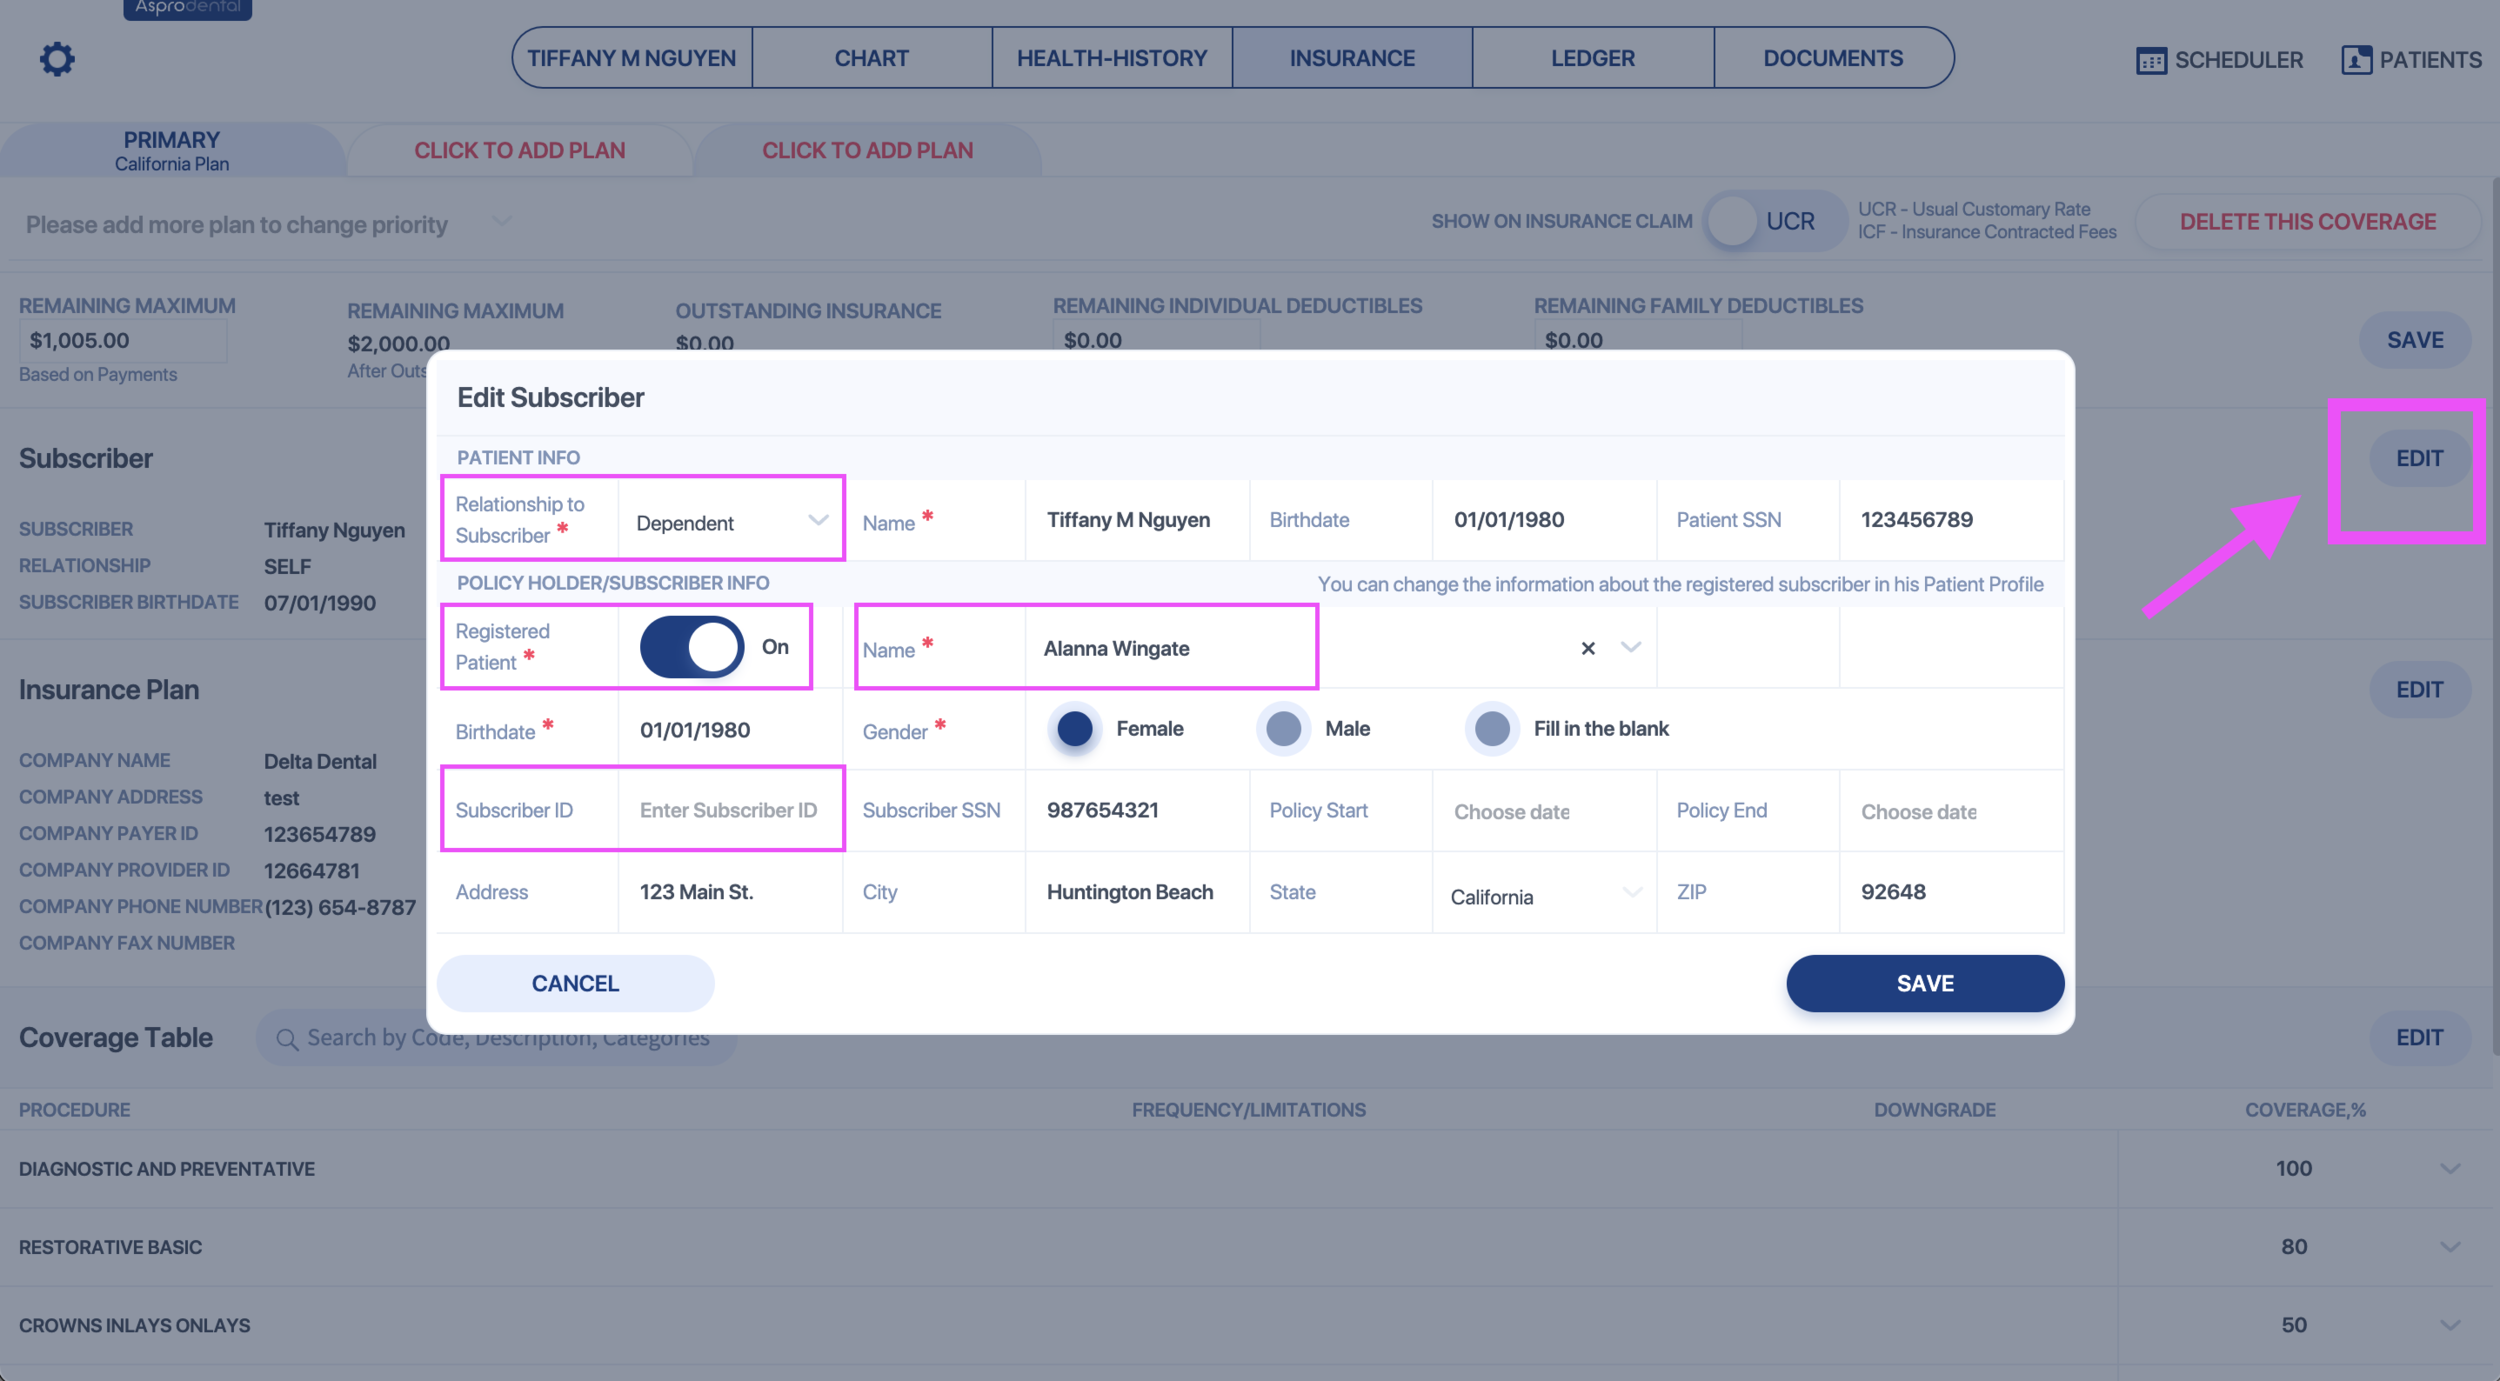
The first EDIT button on the right allows you to change the subscriber information.
Change the patient's insurance to a different plan
If the new insurance plan is on file, you can click EDIT from the patient's Insurance Plan section and search for the existing plan.
If the new insurance plan is not in the system yet, then you must delete the insurance plan coverage from the patient's account first.
Then add a new coverage by starting from a new tab that says "Click to add plan"
- Patient Info - Relationship to Subscriber: Select "SELF," "SPOUSE," or "DEPENDENT"
- Subscriber Info - Registered Patient: Leave toggle ON if the subscriber is a patient on file. Turn toggle OFF if the subscriber is not a patient on file.
- Subscriber Info - Name: If the toggle from step 2 is ON, then the patient's information pulls from their profile. You cannot change their address, birthday, or SSN from here. Please do so from the profile, and it will automatically update here. You can add the Subscriber ID# here.
If the toggle from step 2 is OFF, then you can type in all of the subscriber's information by hand. - Insurance Plan - Existing Insurance Plan: If the plan is already on file, keep this toggle ON. If the plan is new and not on file yet, turn this toggle OFF.
- Insurance Plan - Insurance Plan: If the toggle from step 4 is ON, then search for the insurance plan on file here.
If the toggle in step 4 was turned OFF, then fill in the required fields to create a new insurance plan. - Insurance Company - Company Name: Search for the insurance company. If the insurance company is not on file, you must create it from the Insurance Settings page.
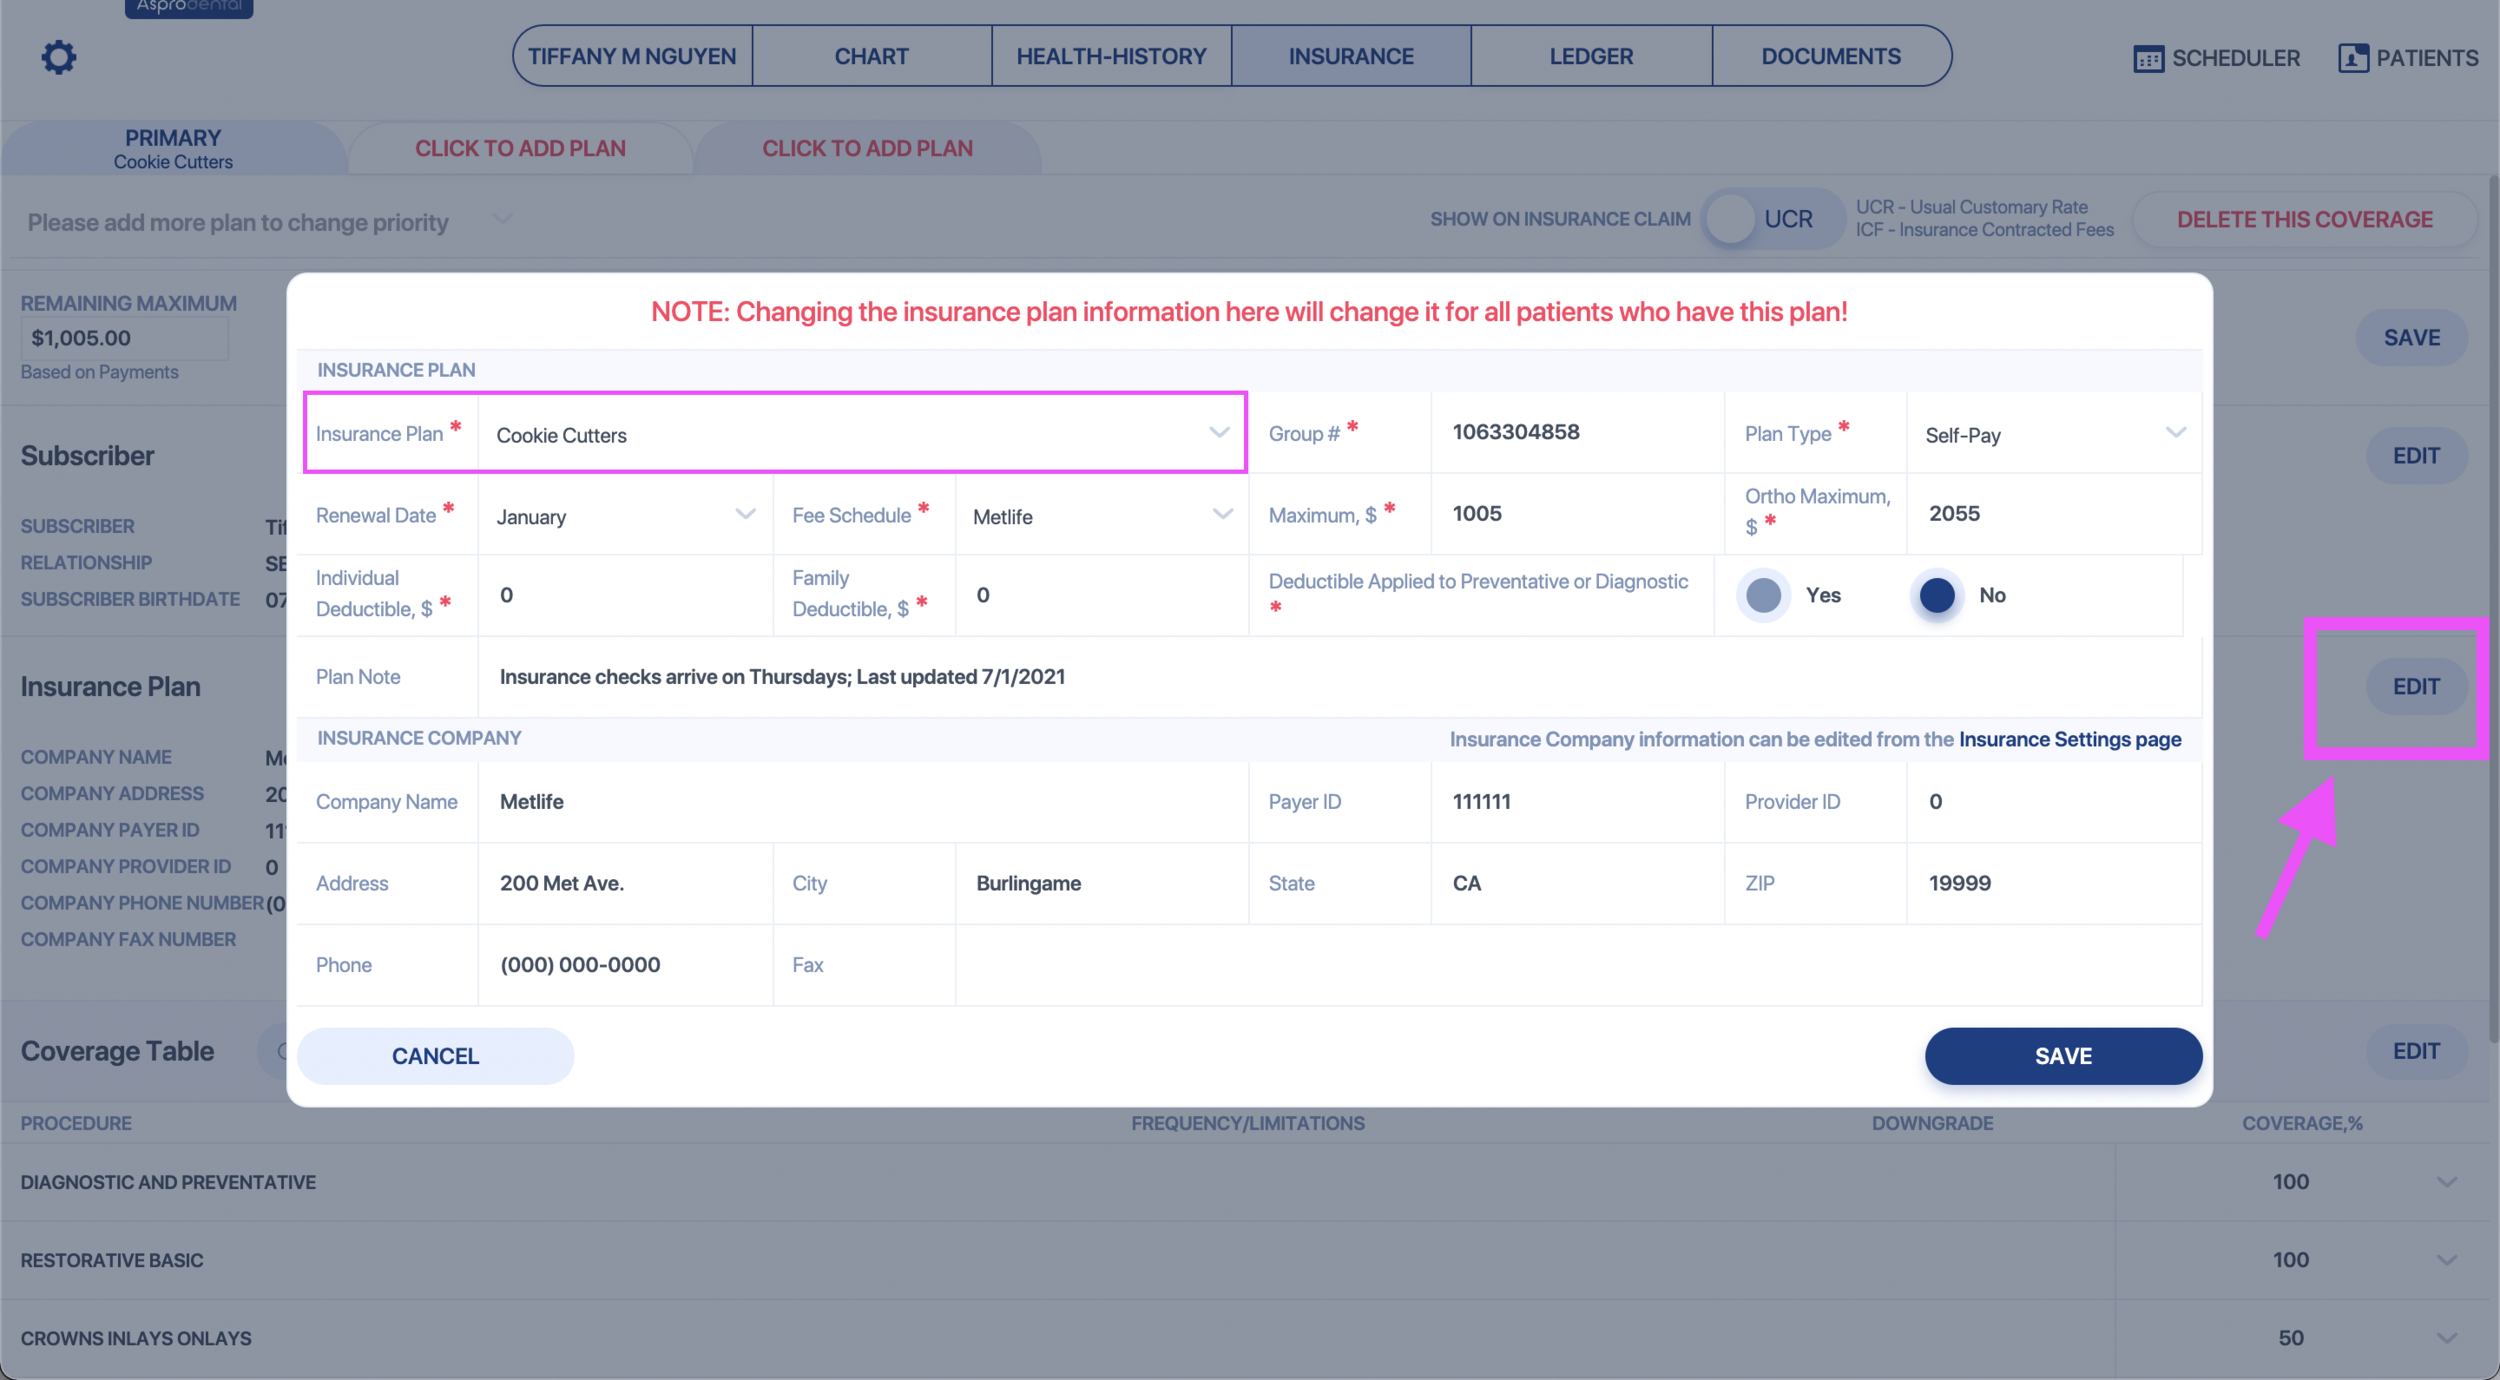
Edit an insurance plan's information
There are 2 ways to do this.
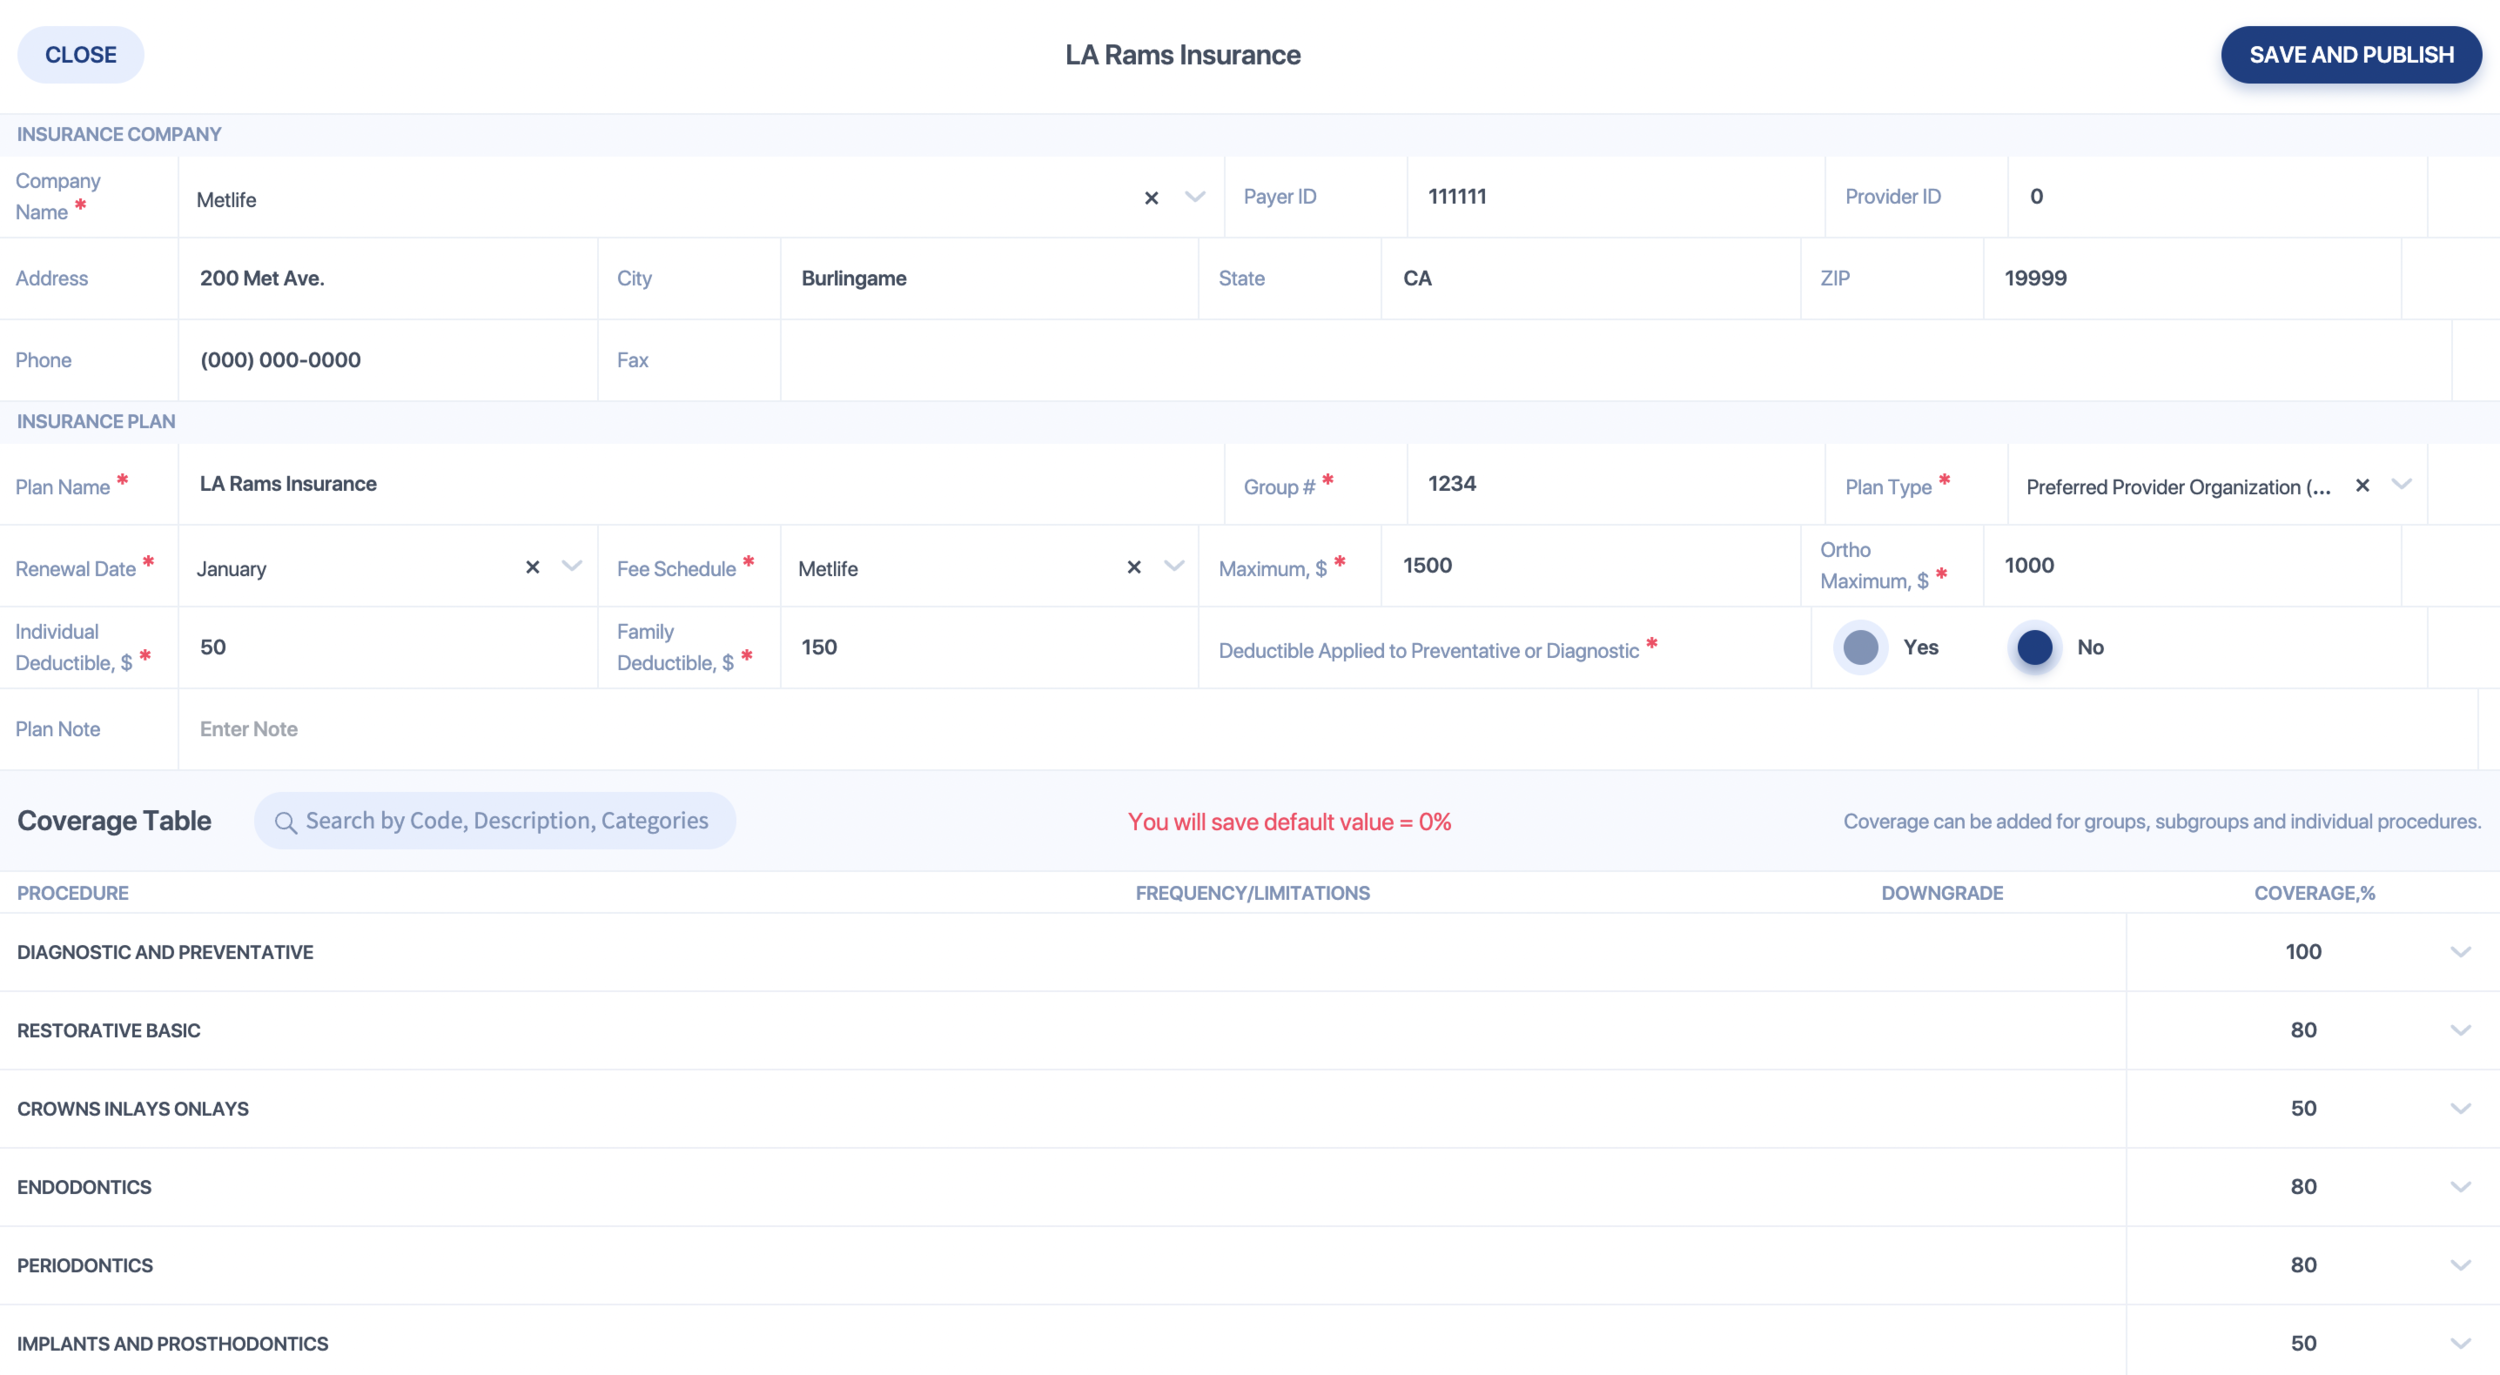
- From the patient's insurance tab: Click on the Insurance Plan EDIT button. From here, you can change the group number, maximum and deductibles, etc. All of these edits will reflect for all patient who have this insurance plan.
The only thing you can't change from here is the Insurance Company (example: Delta, Metlife, Cigna) that the plan is under. If that's what you need to change, then please do so from the Insurance Settings tab. Instructions are below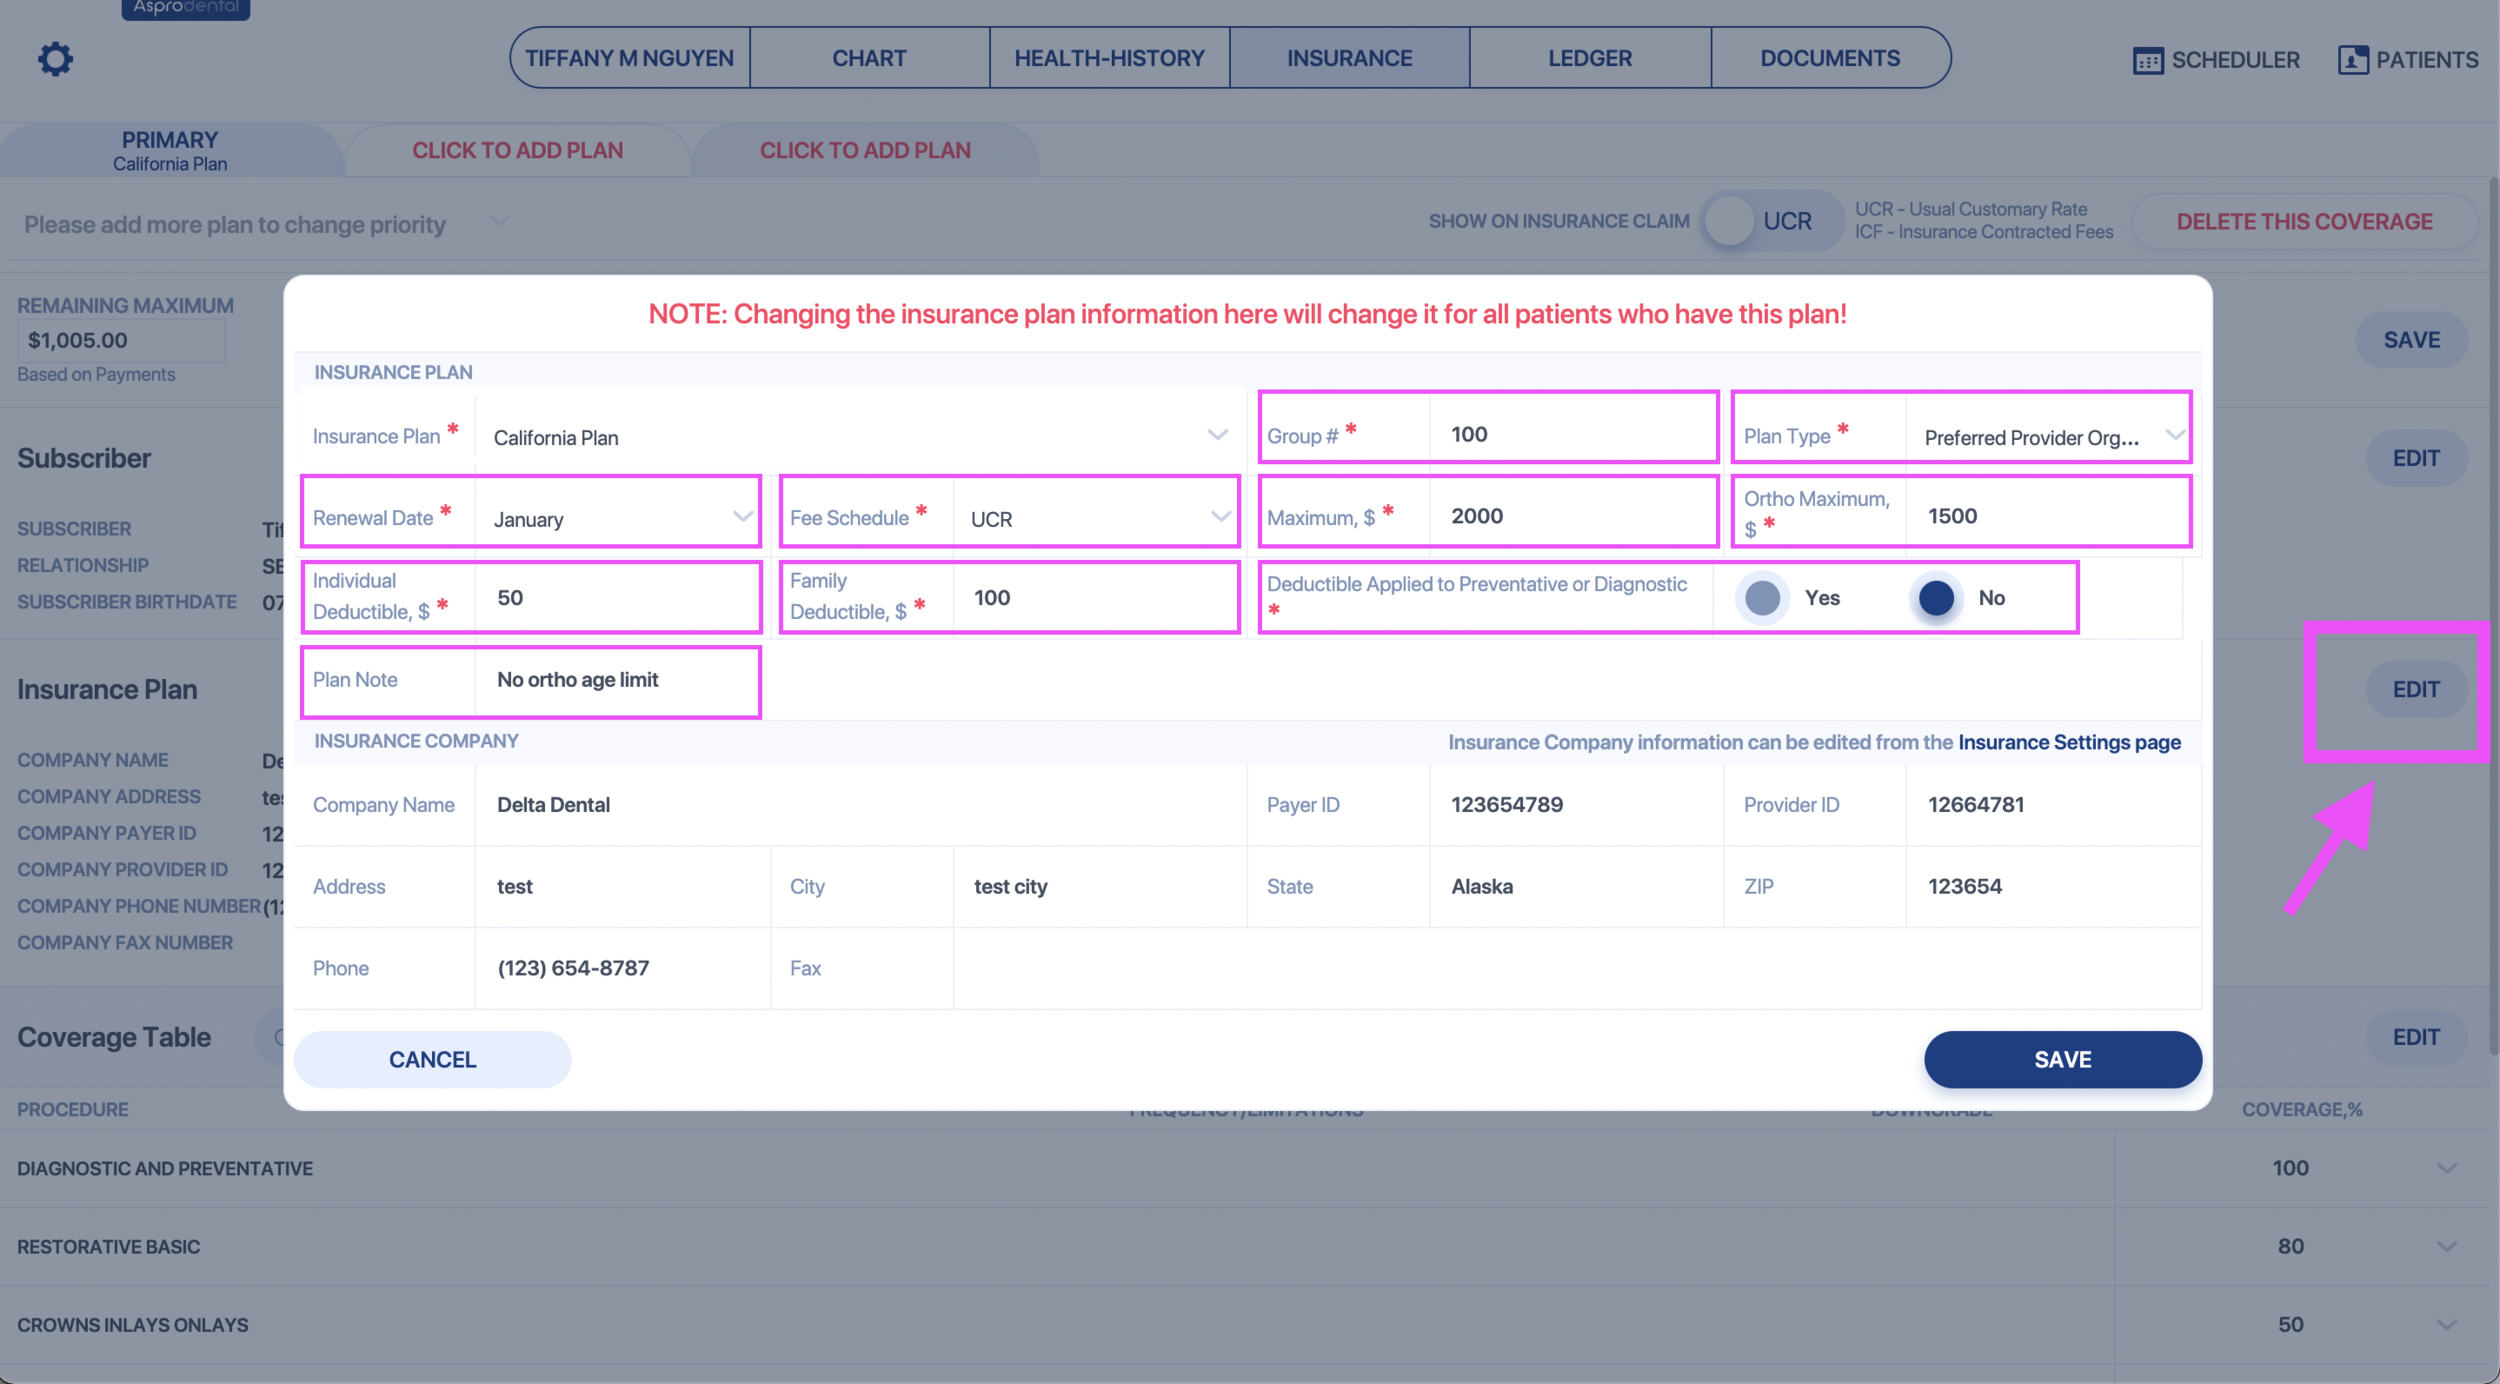
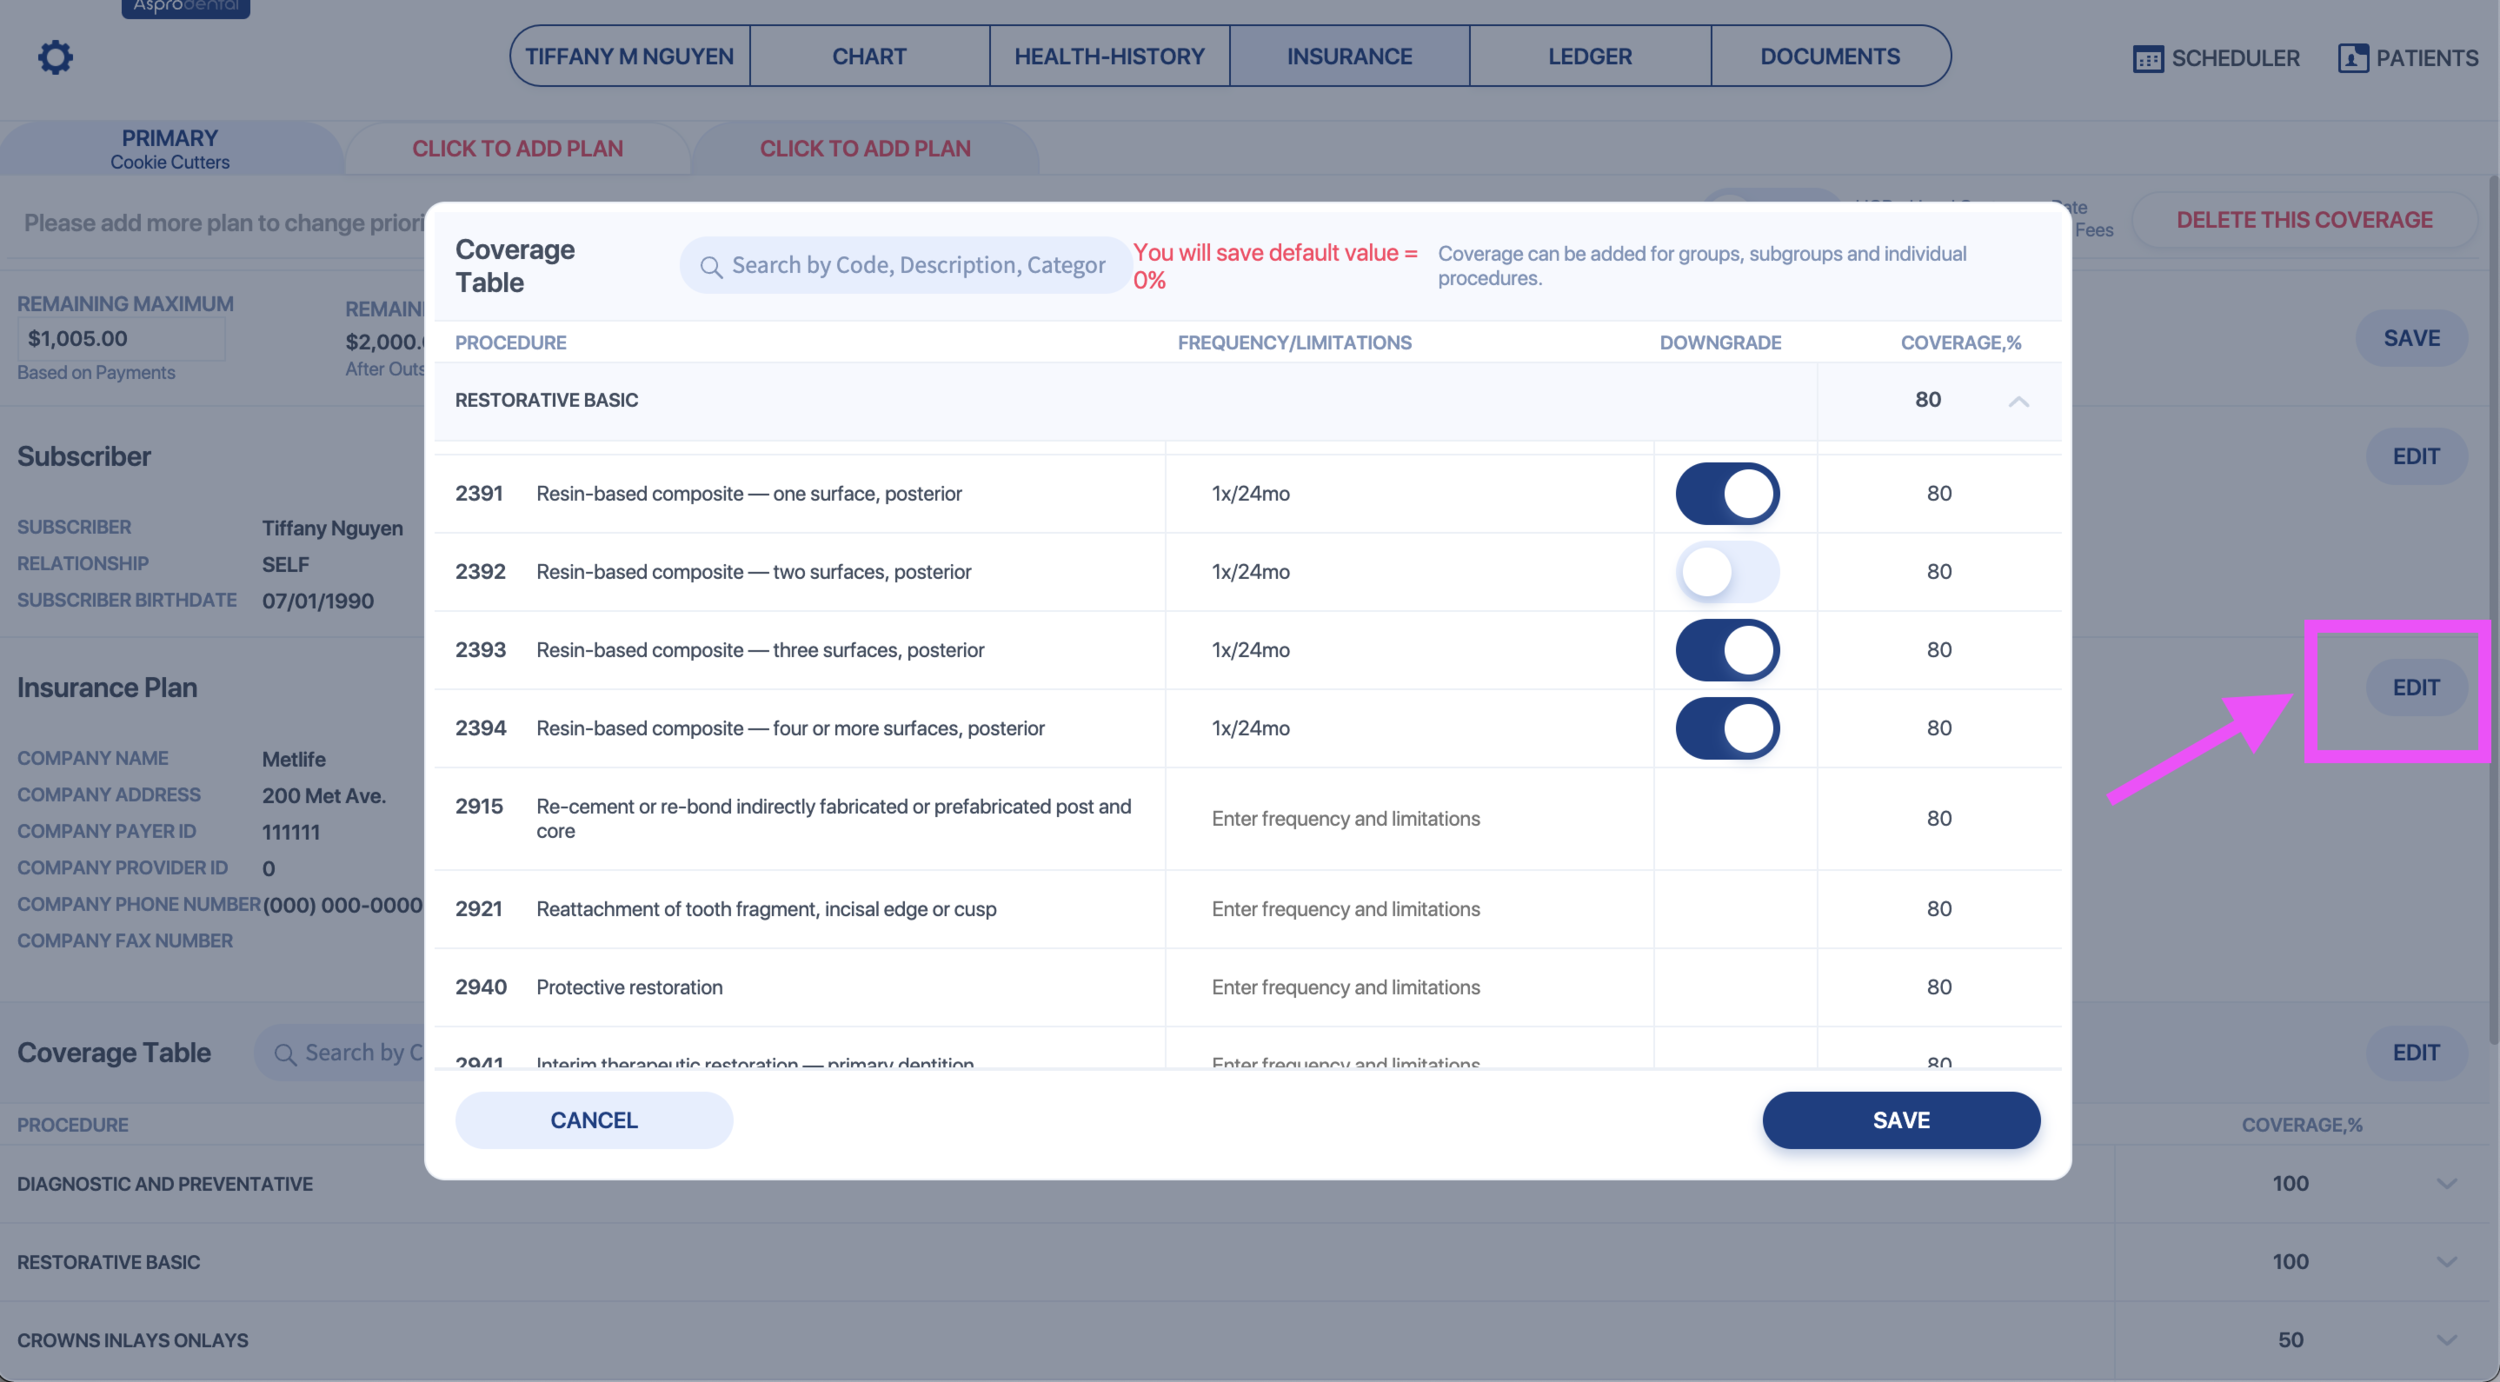
Click on the Coverage Table EDIT button. From here, you can change the coverage percentages by group, by individual procedure, and add notes for frequencies.
- From the Insurance Settings page:
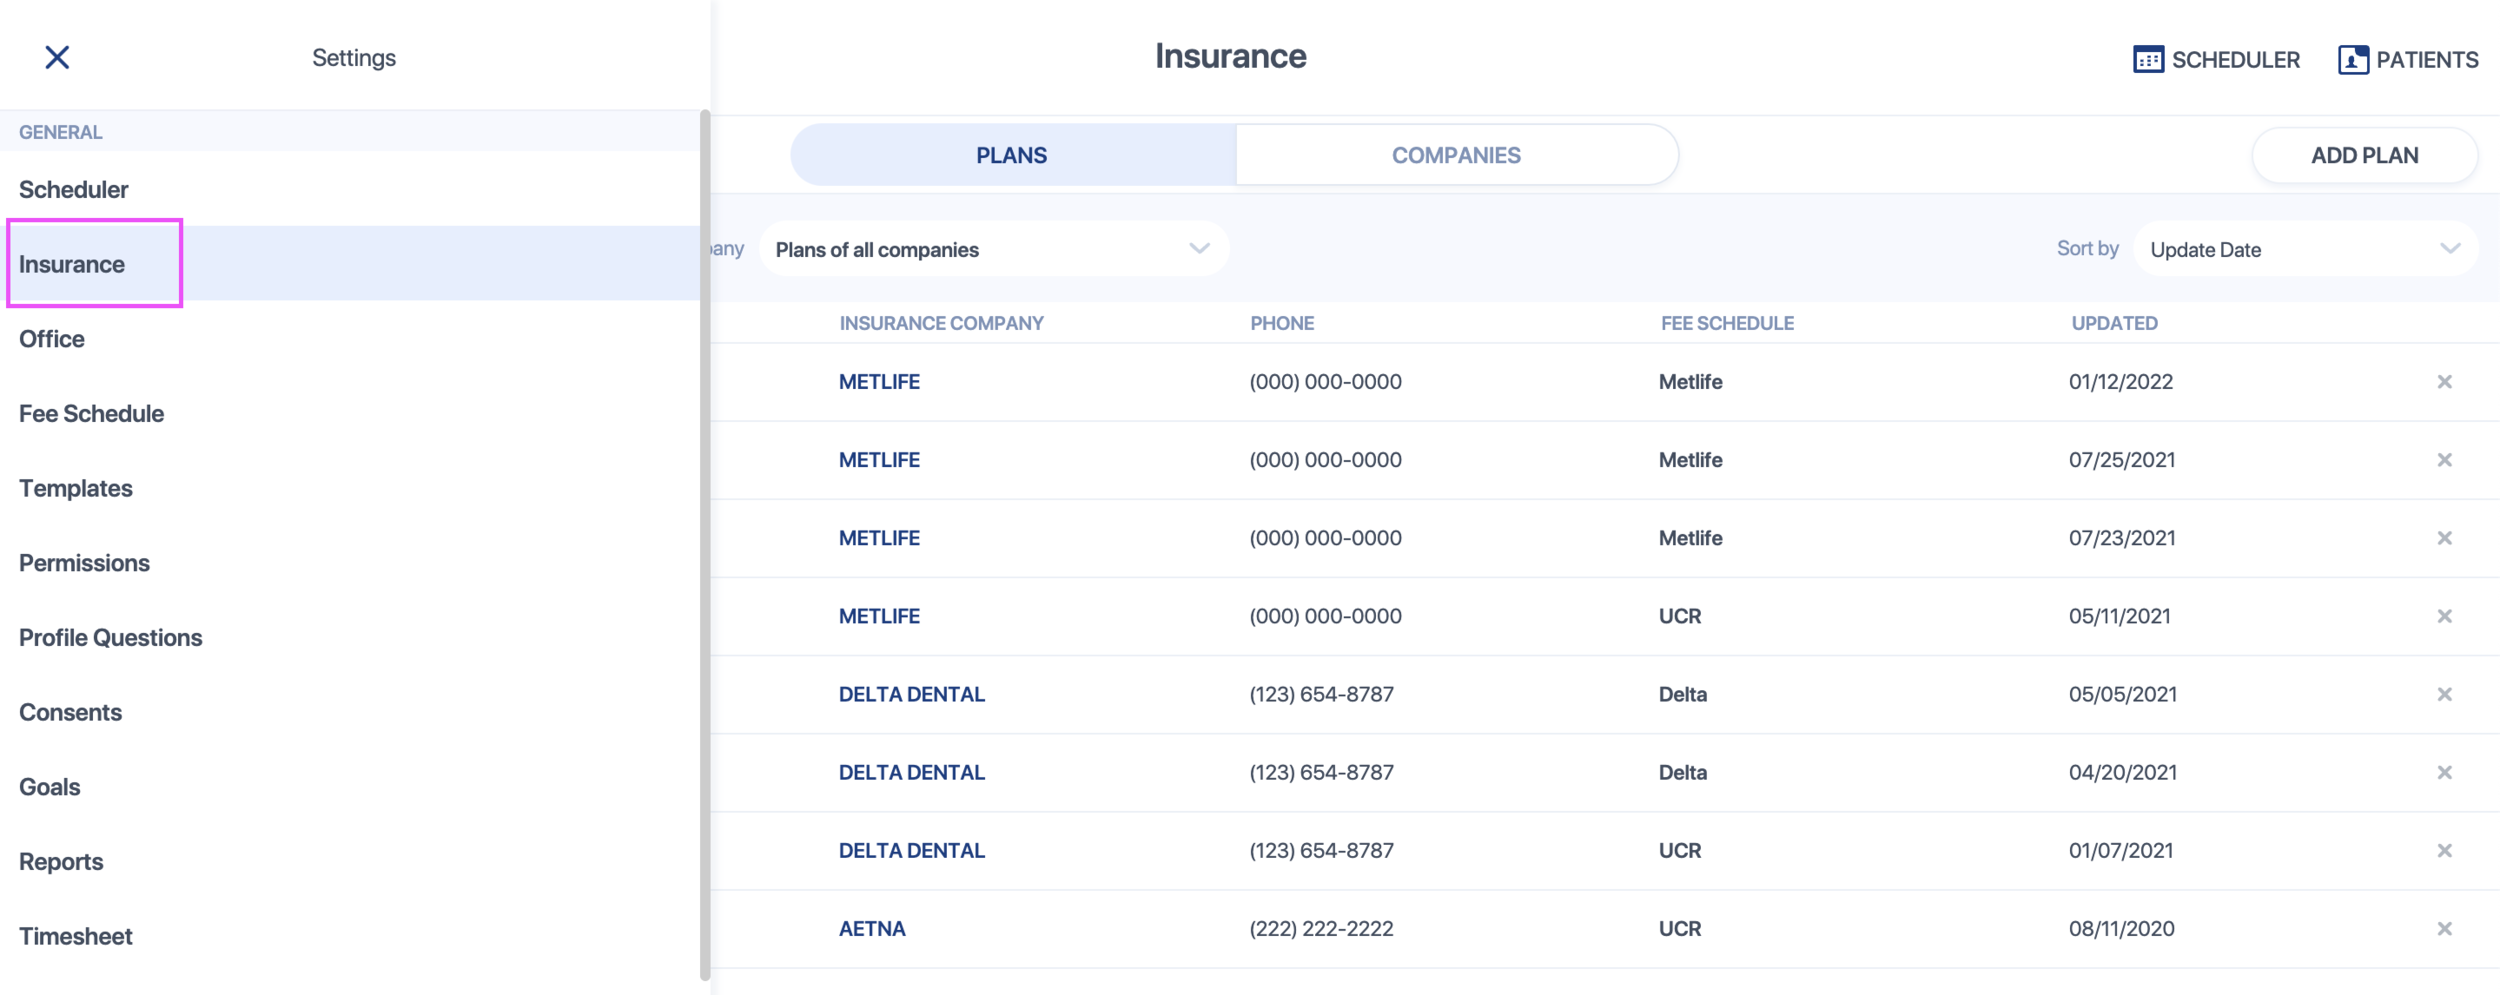
Select the insurance plan you wish to edit.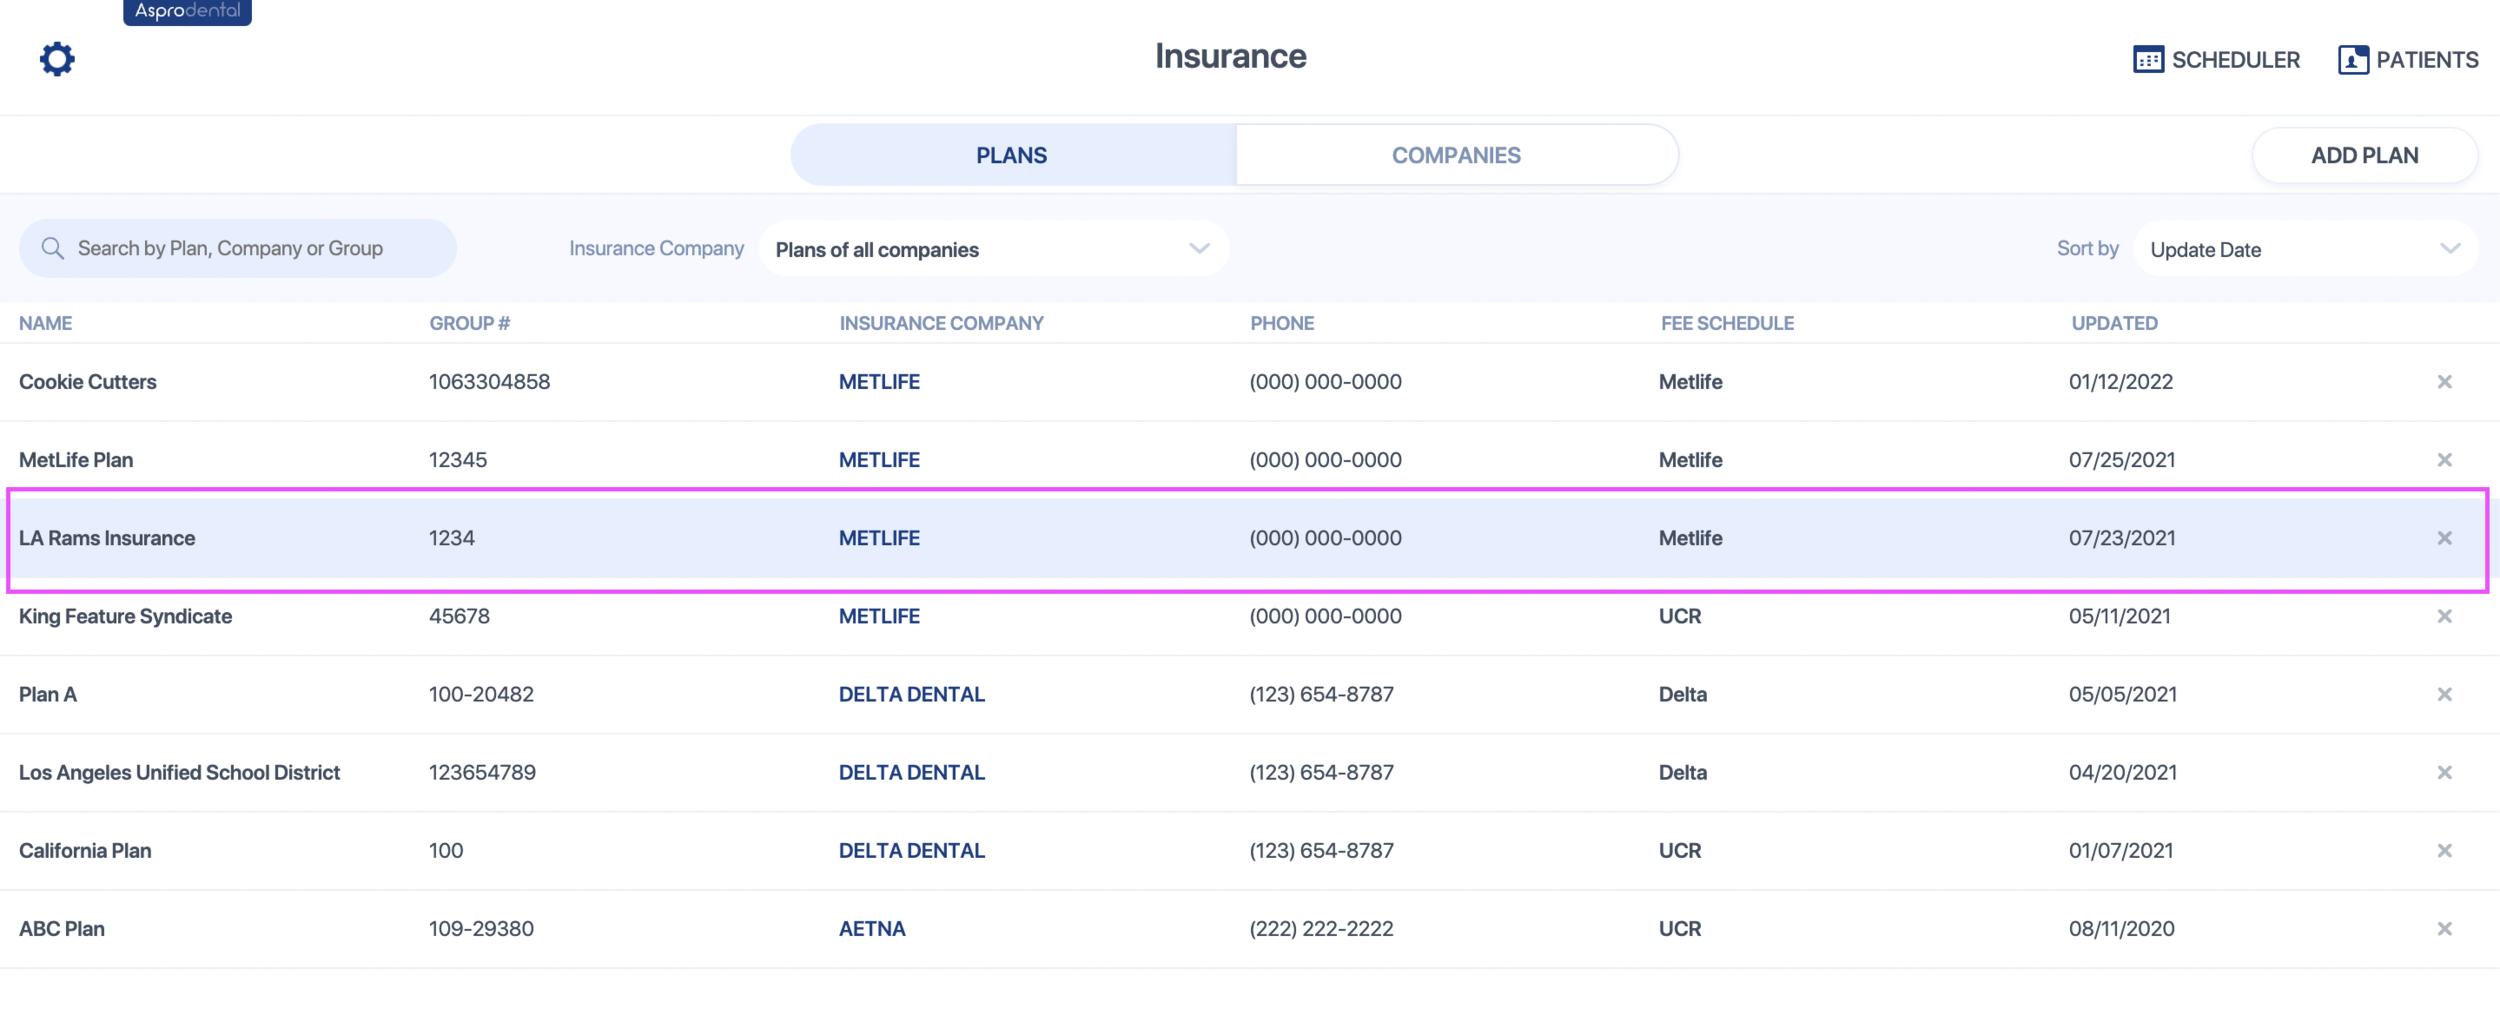
Click on EDIT.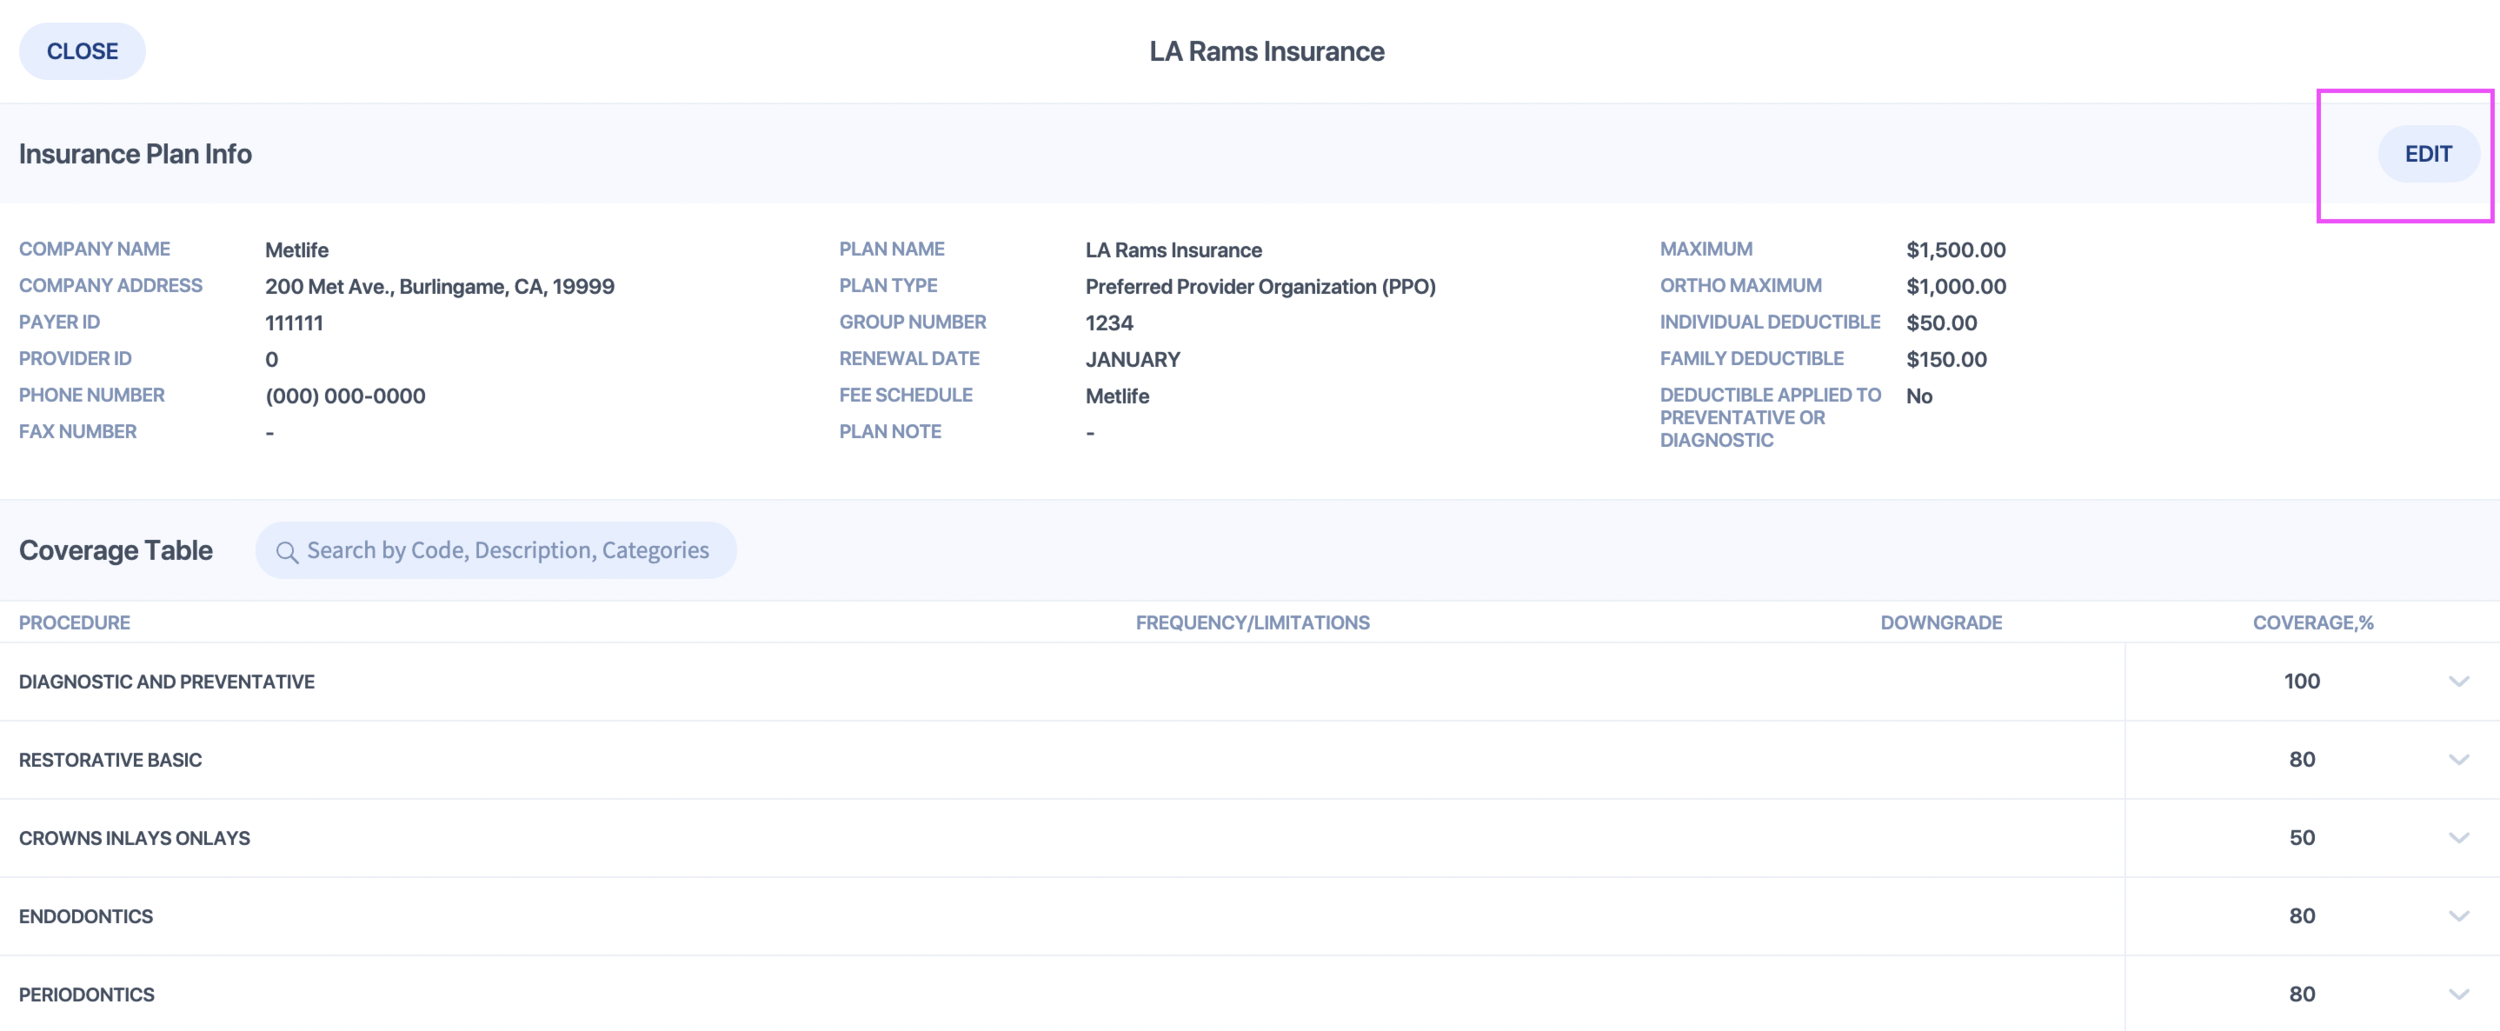
From here, you can edit the plan's maximum, deductibles, coverage percentages, etc. All of these edits will reflect for all patient who have this insurance plan.
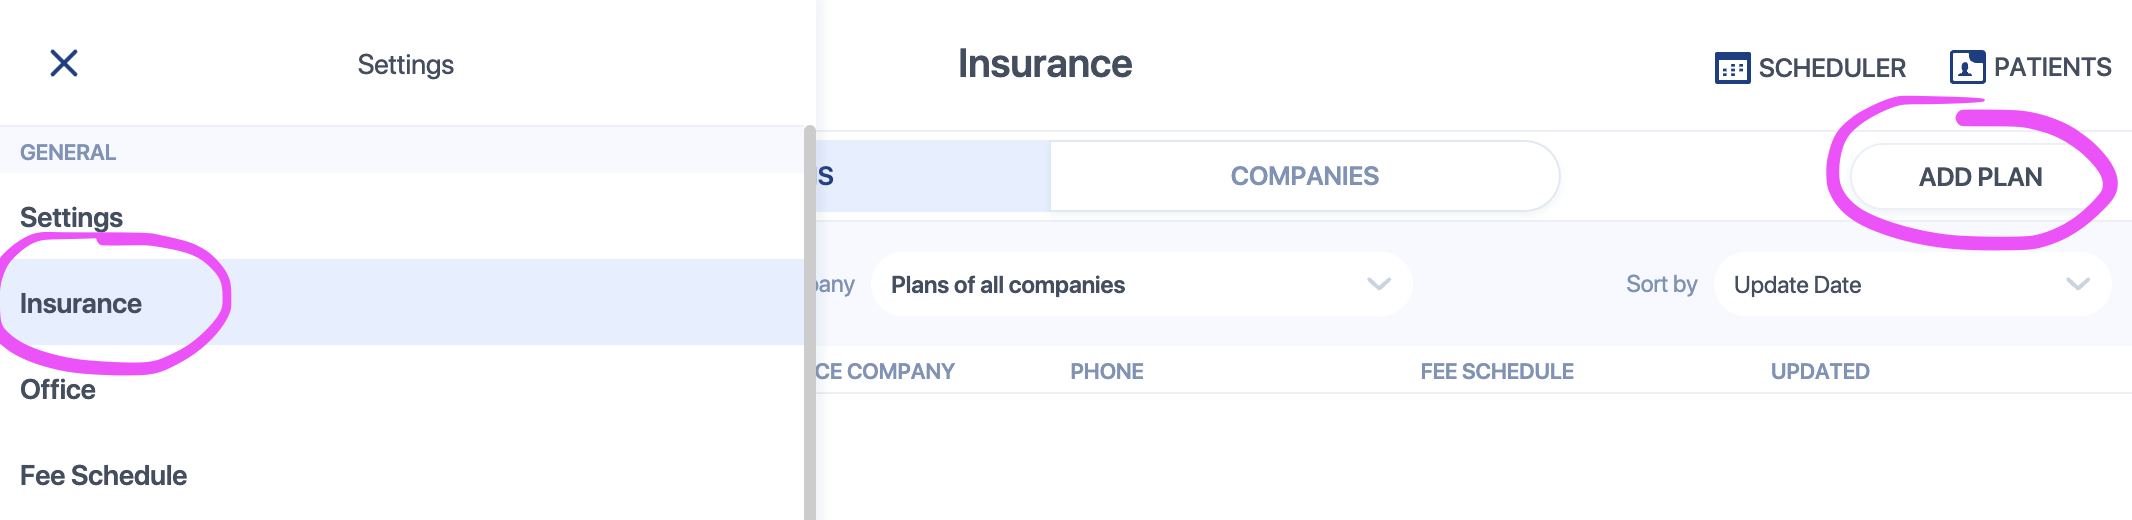
Add a brand new insurance plan
There are 2 ways to add a new insurance plan into the system.
Please note, that you can only add a new insurance plan if you already have the insurance company (Delta, Cigna, Aetna, etc.) on file. If you need to add a new insurance company , this needs to be done from the Insurance Settings page.
- The first method is from the patient's insurance tab.
 Turn the "existing insurance plan" toggle OFF and fill in all the required fields. Select the insurance company (if the insurance company is not in the system, you'll need to add it from the Insurance Settings page first)
 - The second method is through the Insurance Settings page
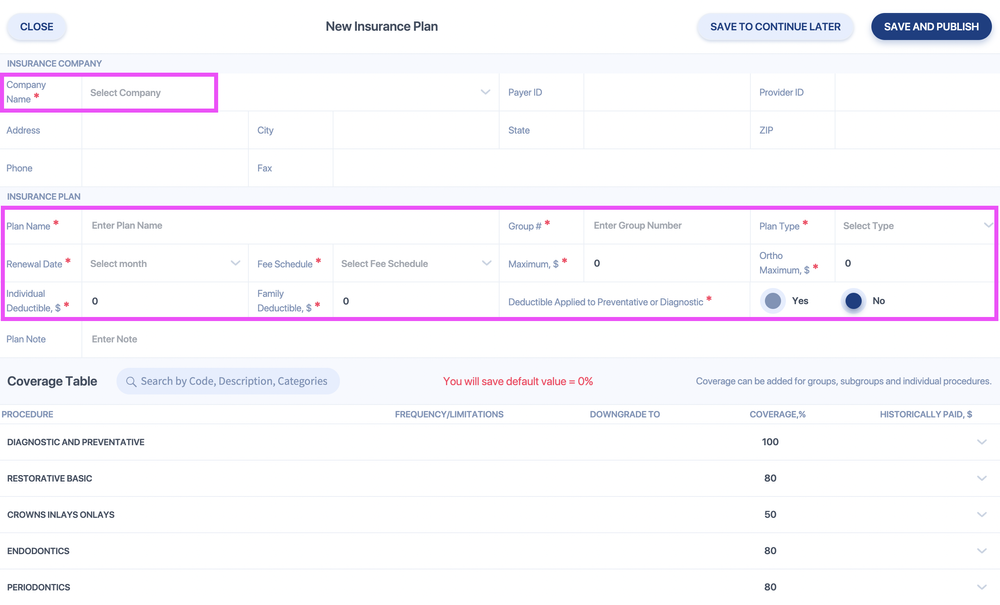
 Select the insurance company (if the insurance company is not in the system, you'll need to add it from the Insurance Settings page first) and fill in all of the required fields for the plan information.
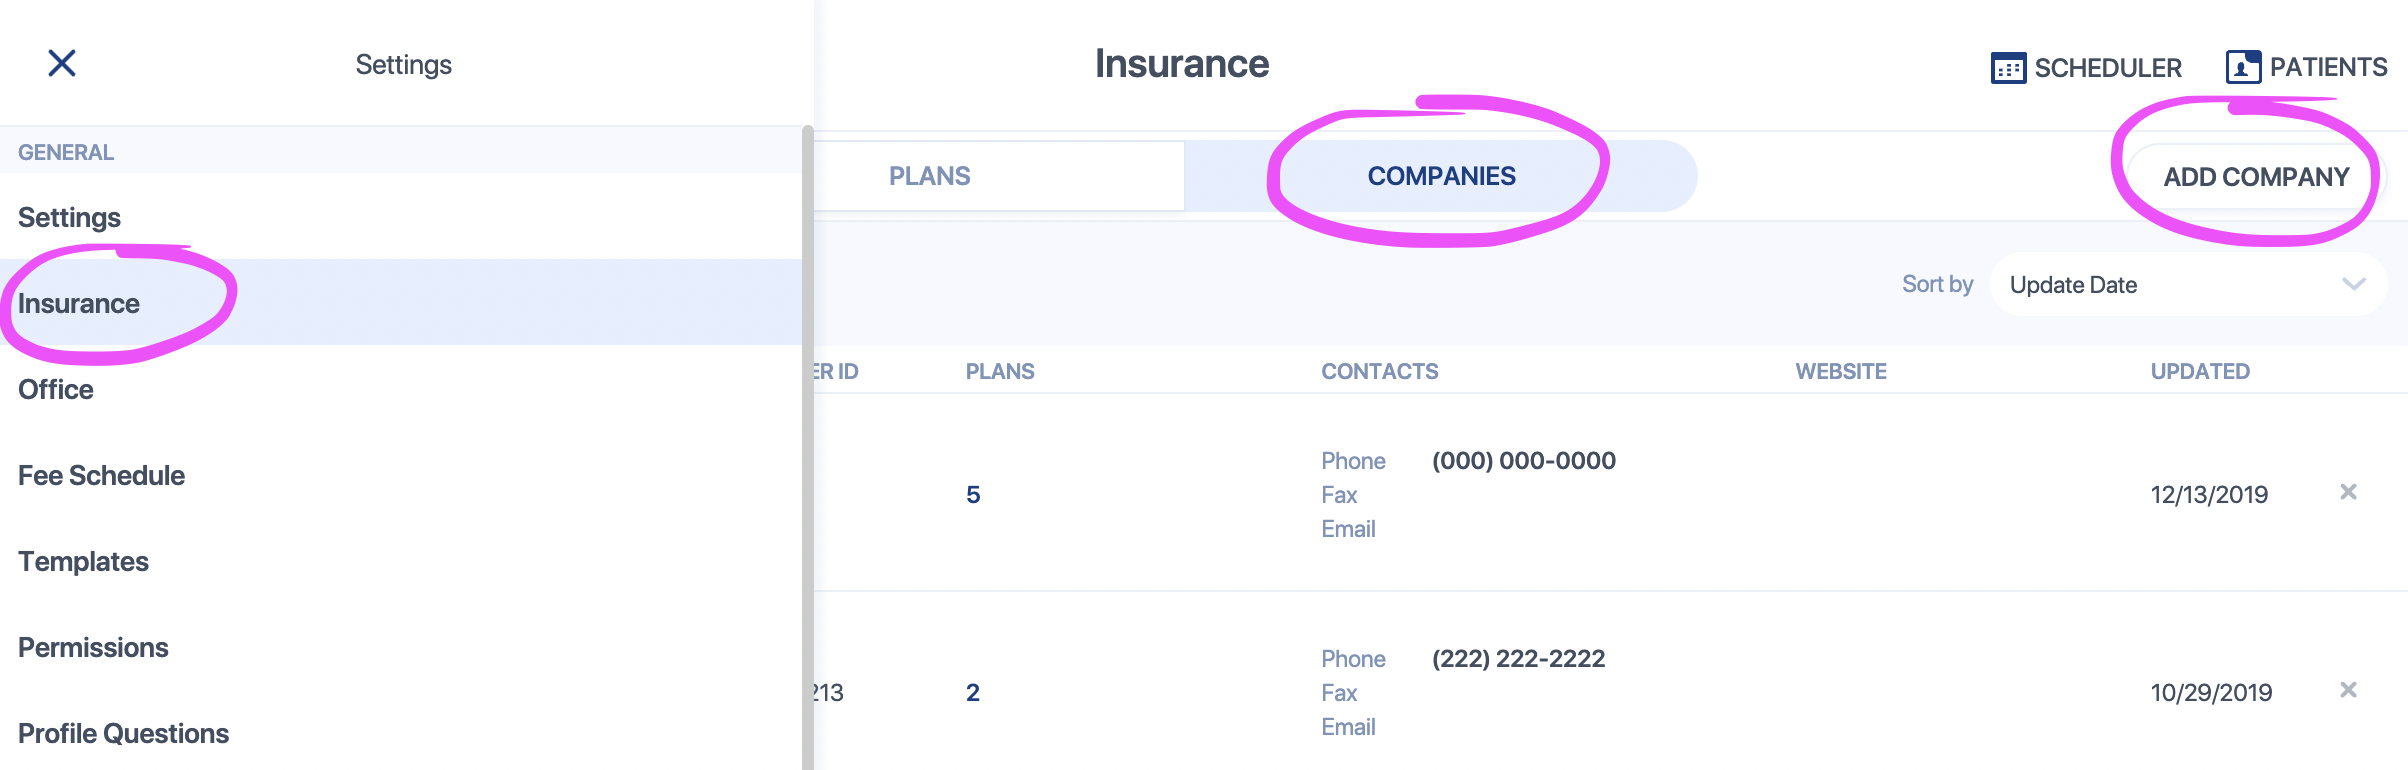
Add a brand new insurance company
Go to Settings > Insurance > select the Companies tab > Add Company and fill in all the required fields
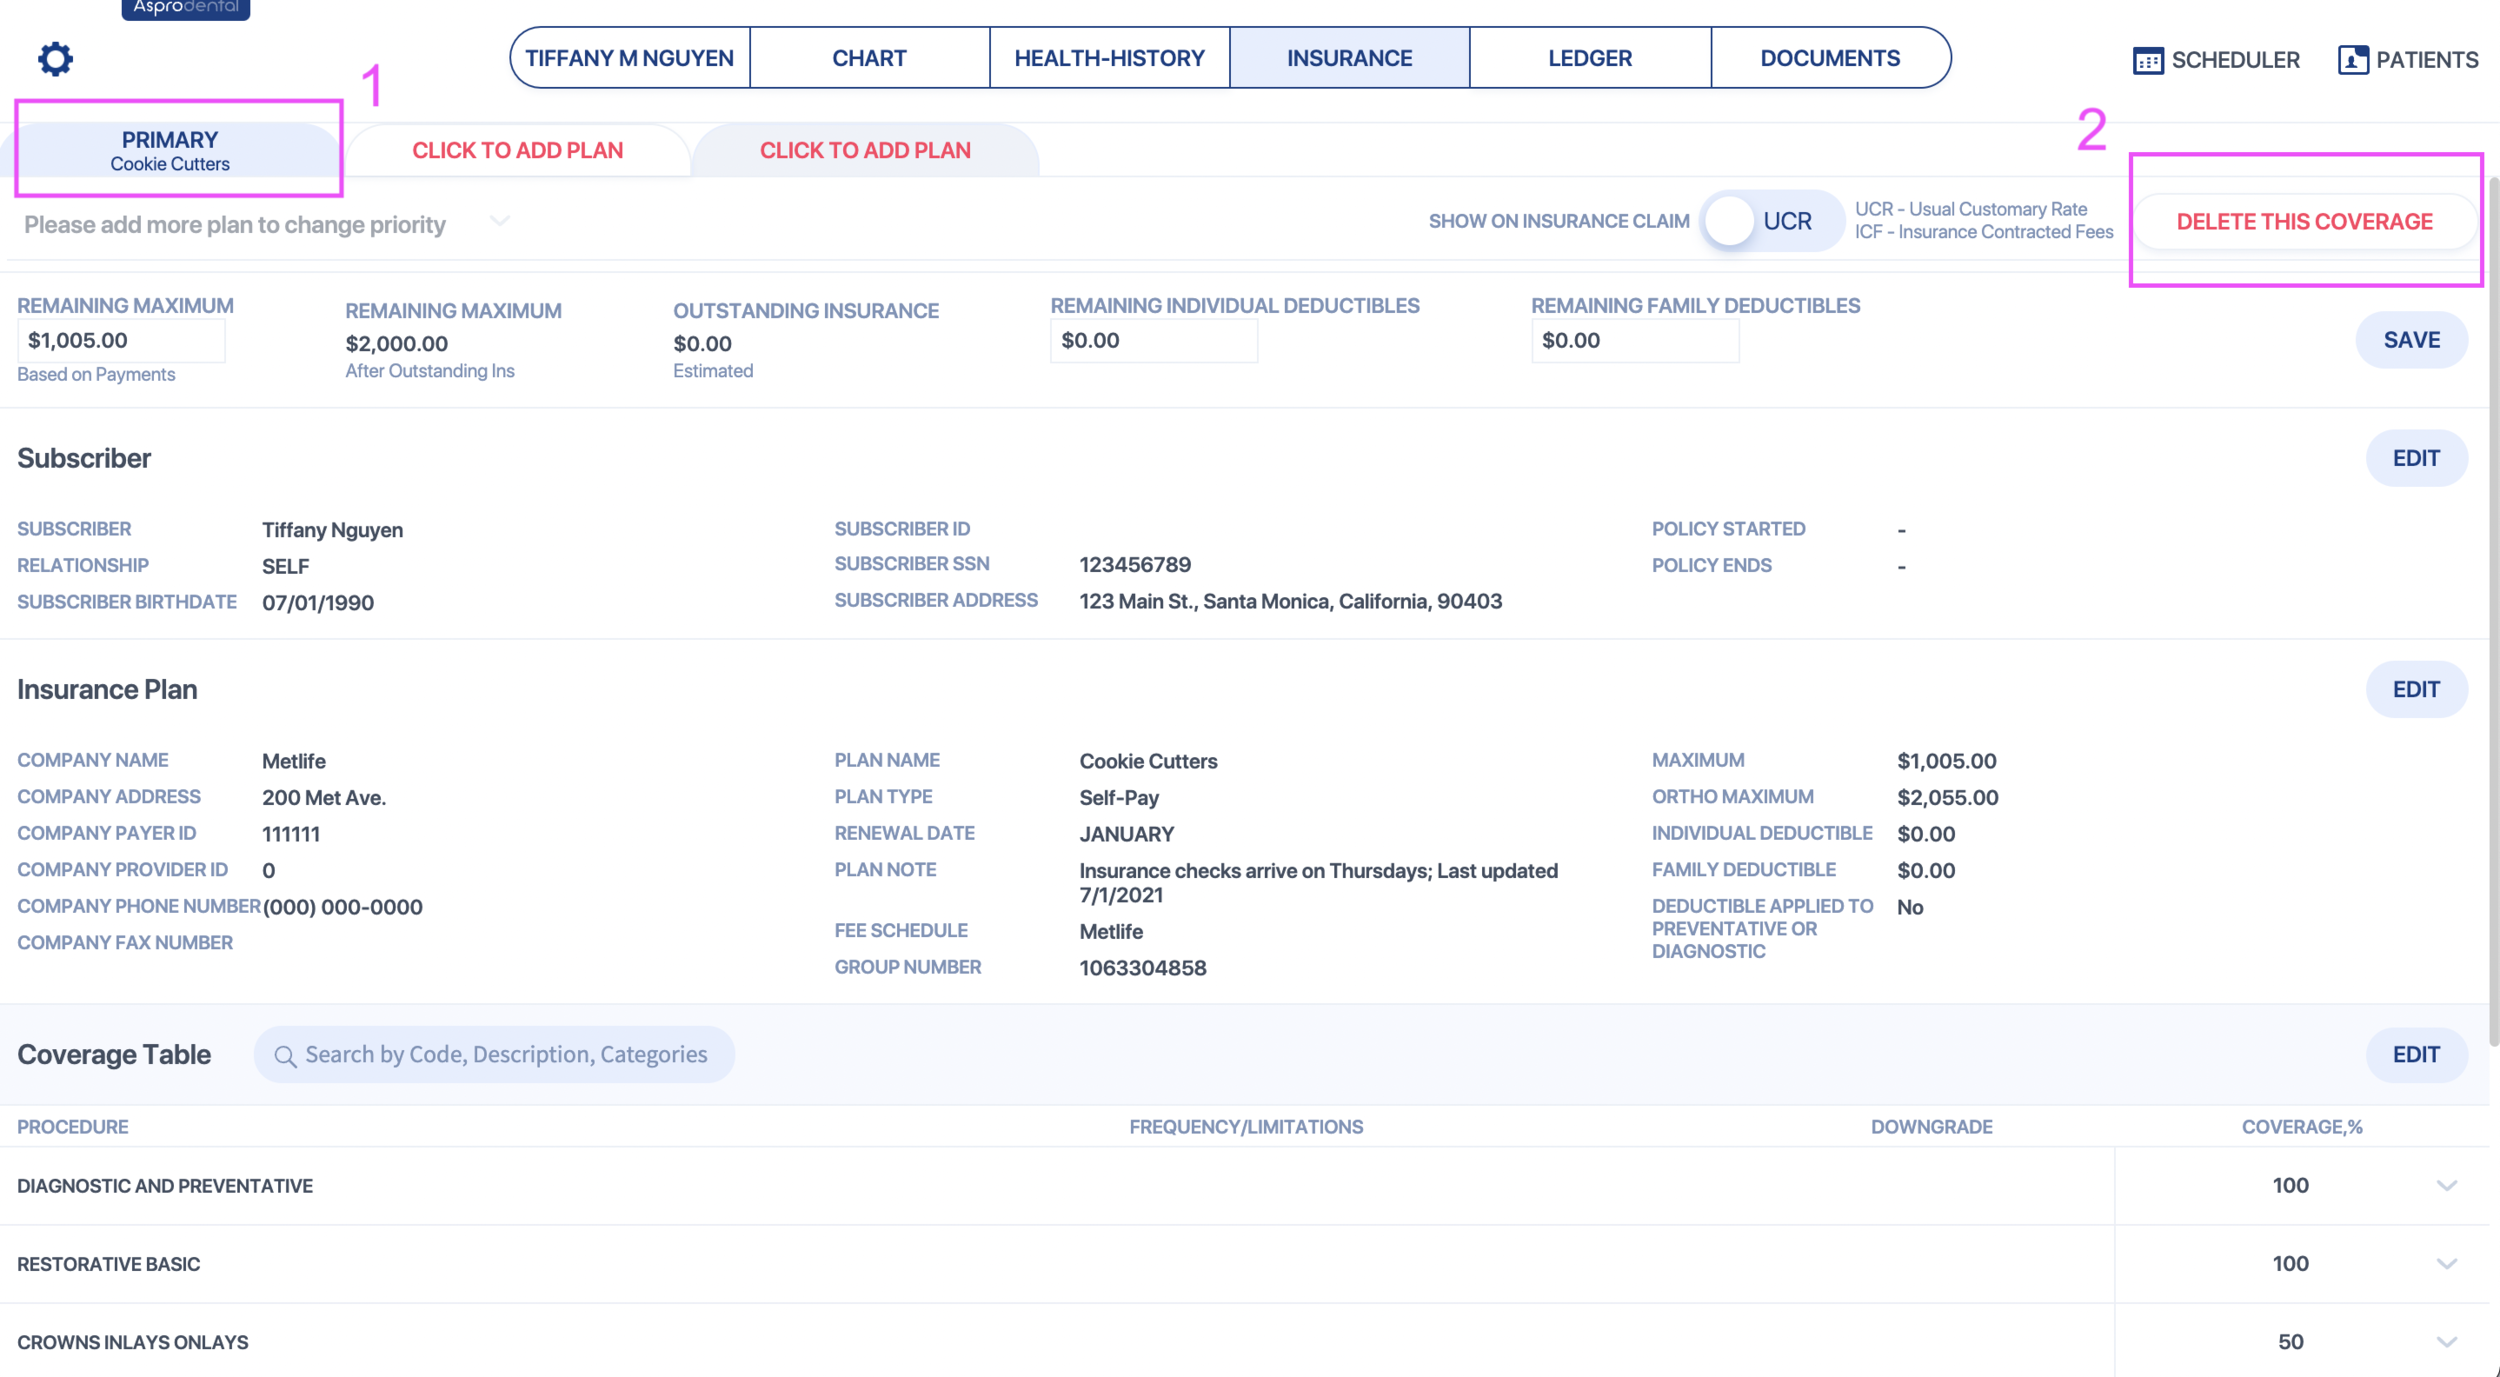
Delete a patient's insurance coverage
Go to the insurance coverage that you wish to delete. Click "Delete Coverage"
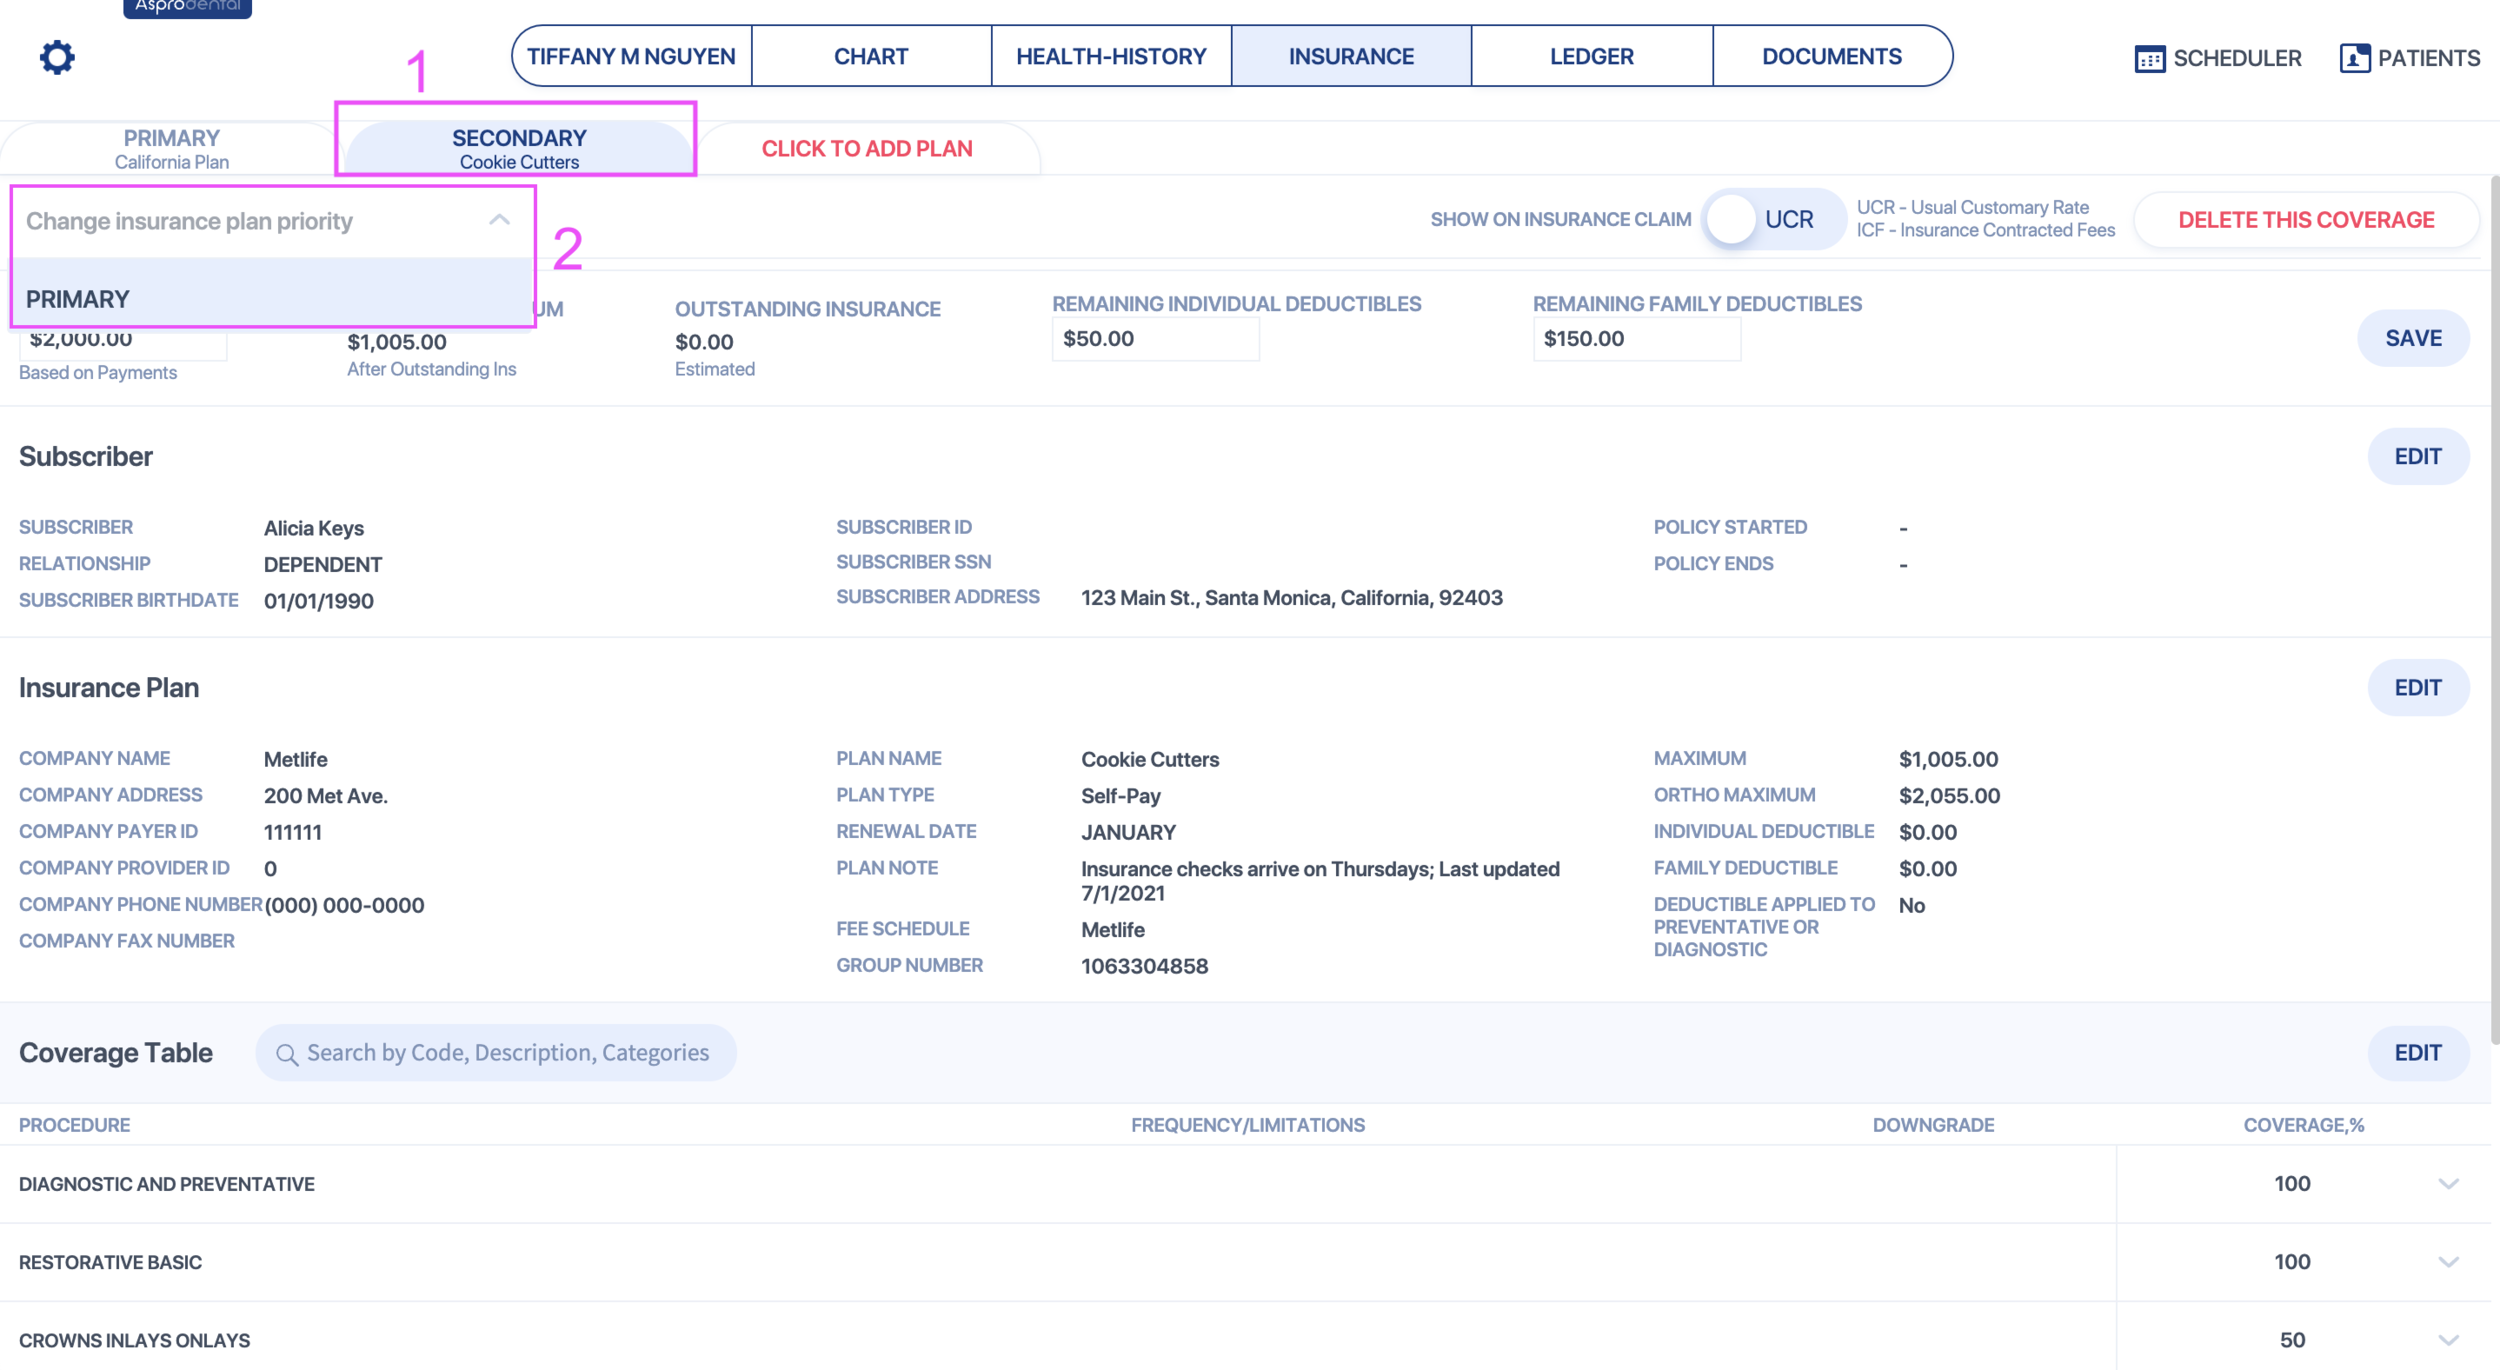
Switch an insurance coverage between first/second/third priority
- Go to the insurance coverage that you wish to change.
- Click "Change plan priority"
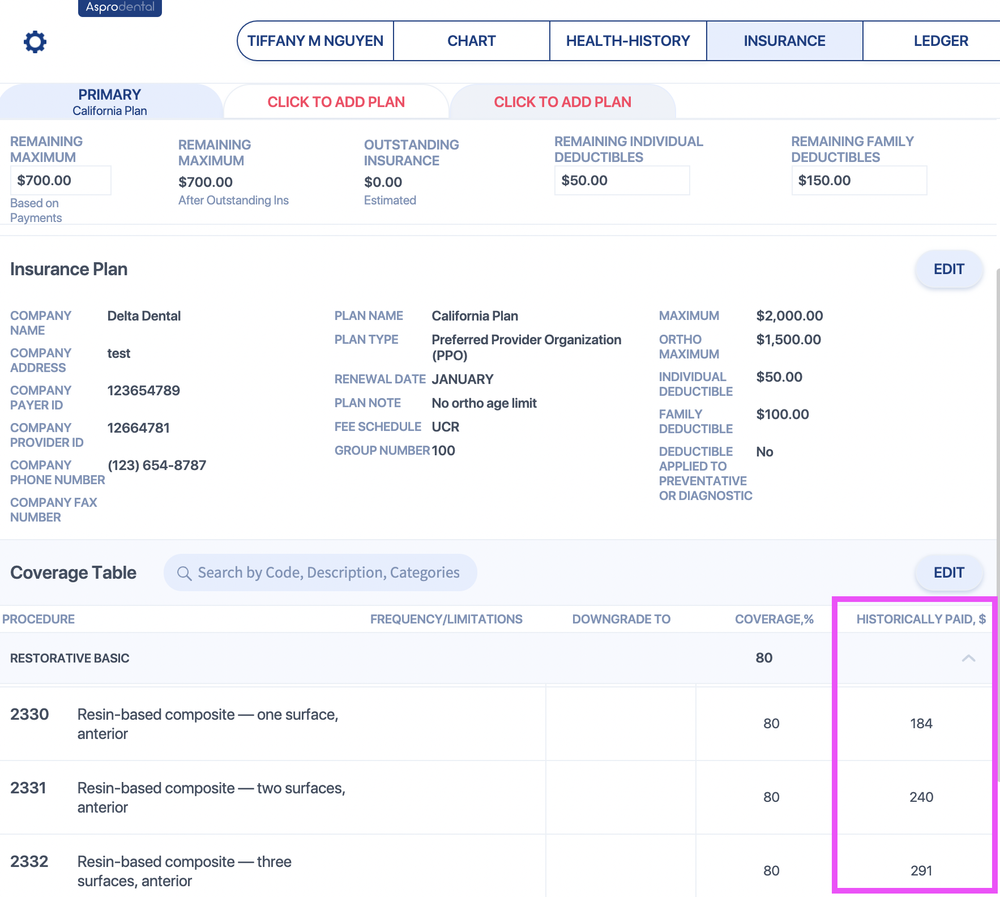
Historically paid (bluebook)
When linking an insurance payment to a claim, you can click on the "update historically paid table" checkbox to keep track of what that insurance plan pays for that procedure code.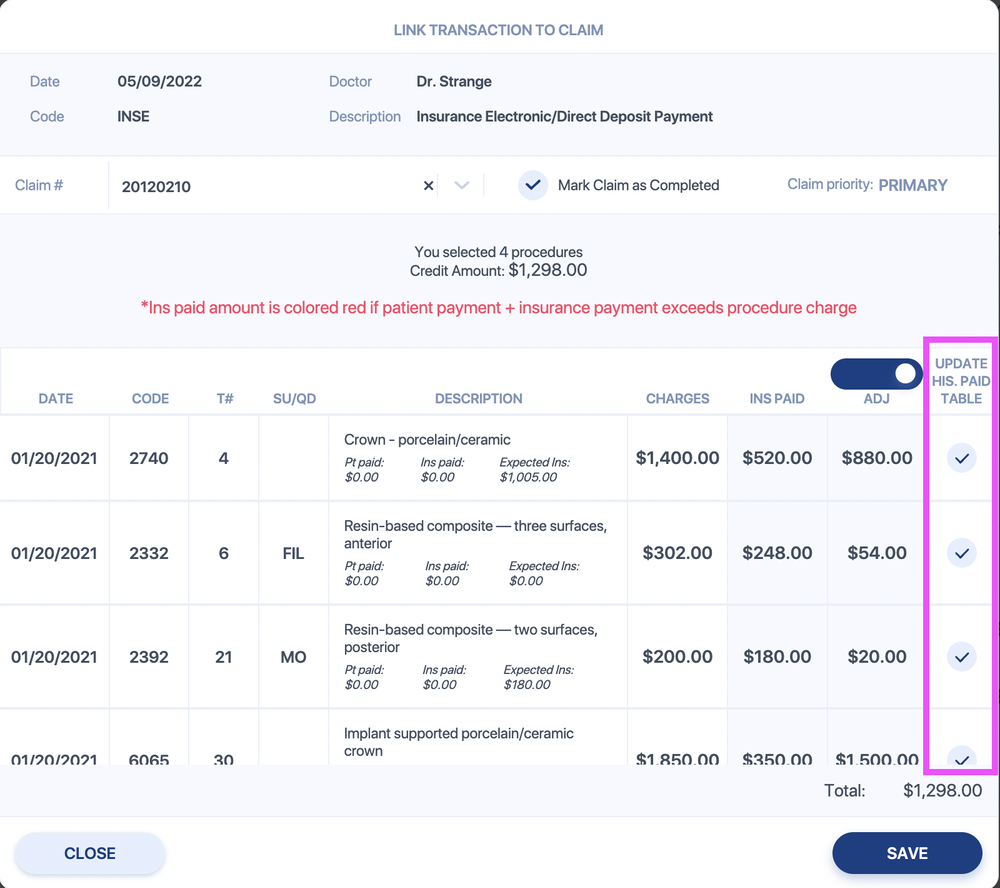 The historically paid table can be viewed from the patient's insurance tab, or from the Settings > Insurance > Plans page.
Next time you present a treatment plan for that patient (or another patient who has the same insurance plan), Asprodental will automatically calculate the coverage based on what was historically paid.
Downgraded procedures
From the patient's insurance tab, or from Settings > Insurance > Plans, you can edit the coverage table to denote which procedures are downgraded.
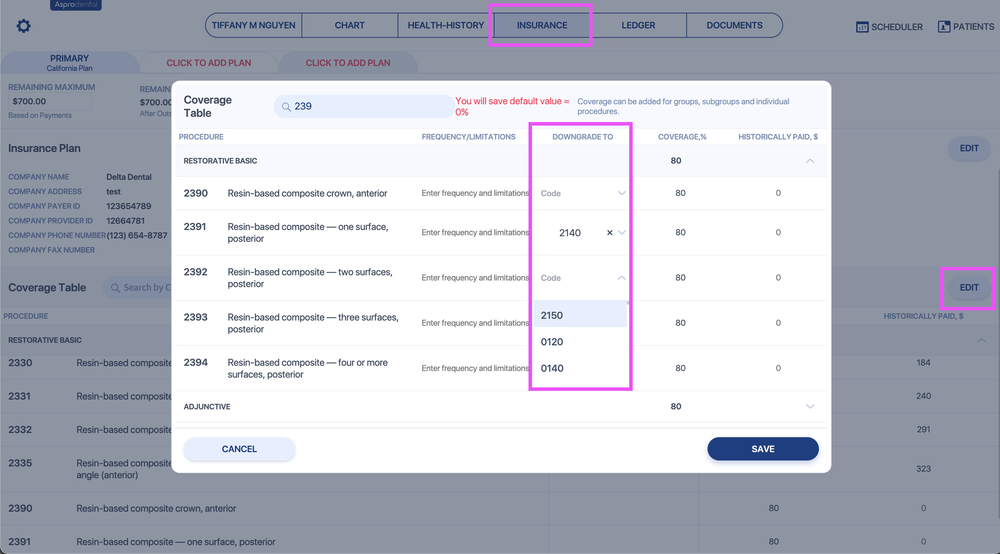 Next time you present a treatment plan for a patient with that insurance plan, Asprodental will automatically calculate the coverage based on the fee of the procedure that the code downgrades to.
For example, the patient's insurance pays 80% on fillings. A composite filling is $300 and an amalgam one is $200. If the filling is downgraded, the insurance will cover 80% of $200.
If you need to contact the clearinghouse (Vyne) directly, please call (463) 218-7407 or use the link below:
Ledgers & Statements
Enter a patient payment on the ledger
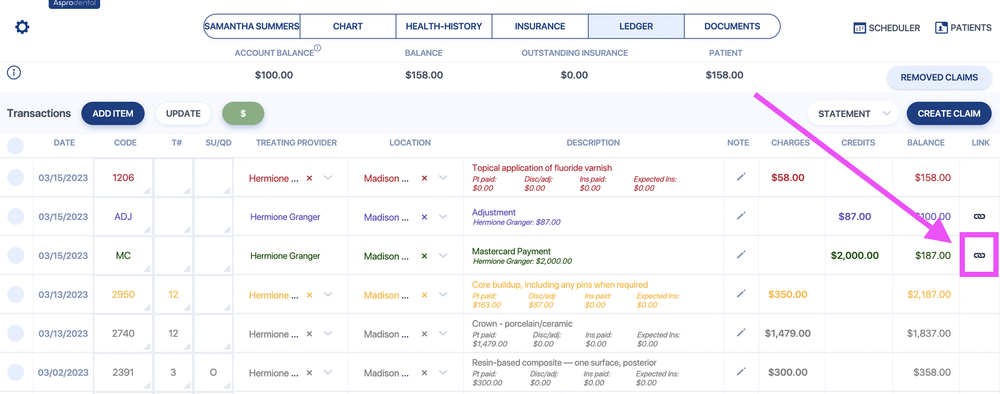
Unlink a payment/adj or link it to another procedure(s)
- Click on the linkage button
- To unlink a procedure, zero out the "Patient Paid" amount for that procedure.
To link another procedure, click "Add Procedure" to link it to a different procedure.
If the credit was only partially linked before, you won't need to zero out a procedure in order to add another one.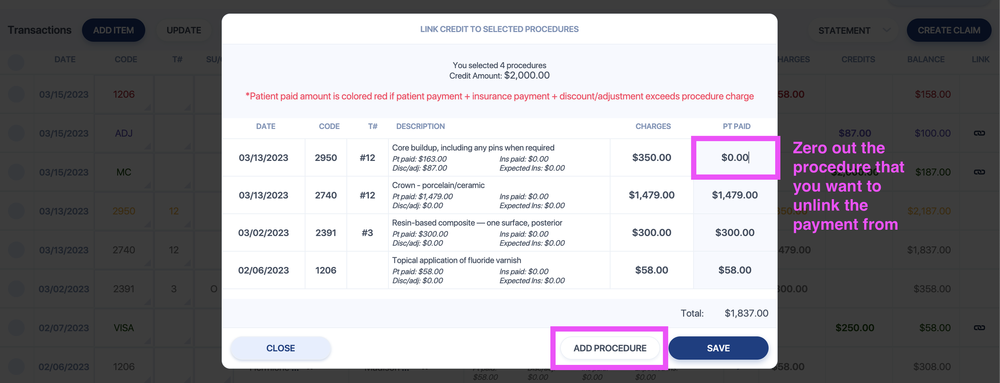
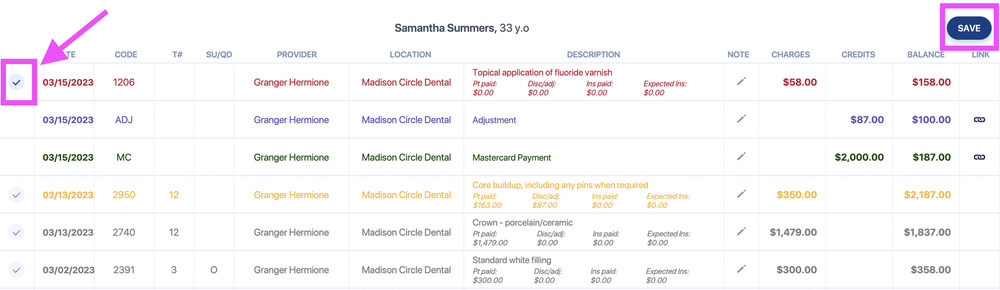
- Select the procedure you want to apply the credit to
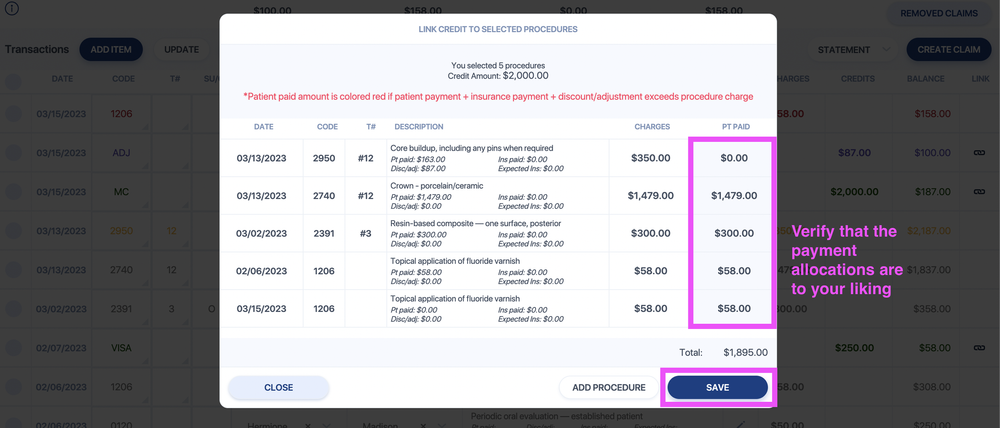
- Verify that the payment allocation is to your liking, then Save
Send a statement to an individual patient
Send batch statements to patients in accounts receivable
Administrative
Add a new code (procedure/payment/adjustment code)
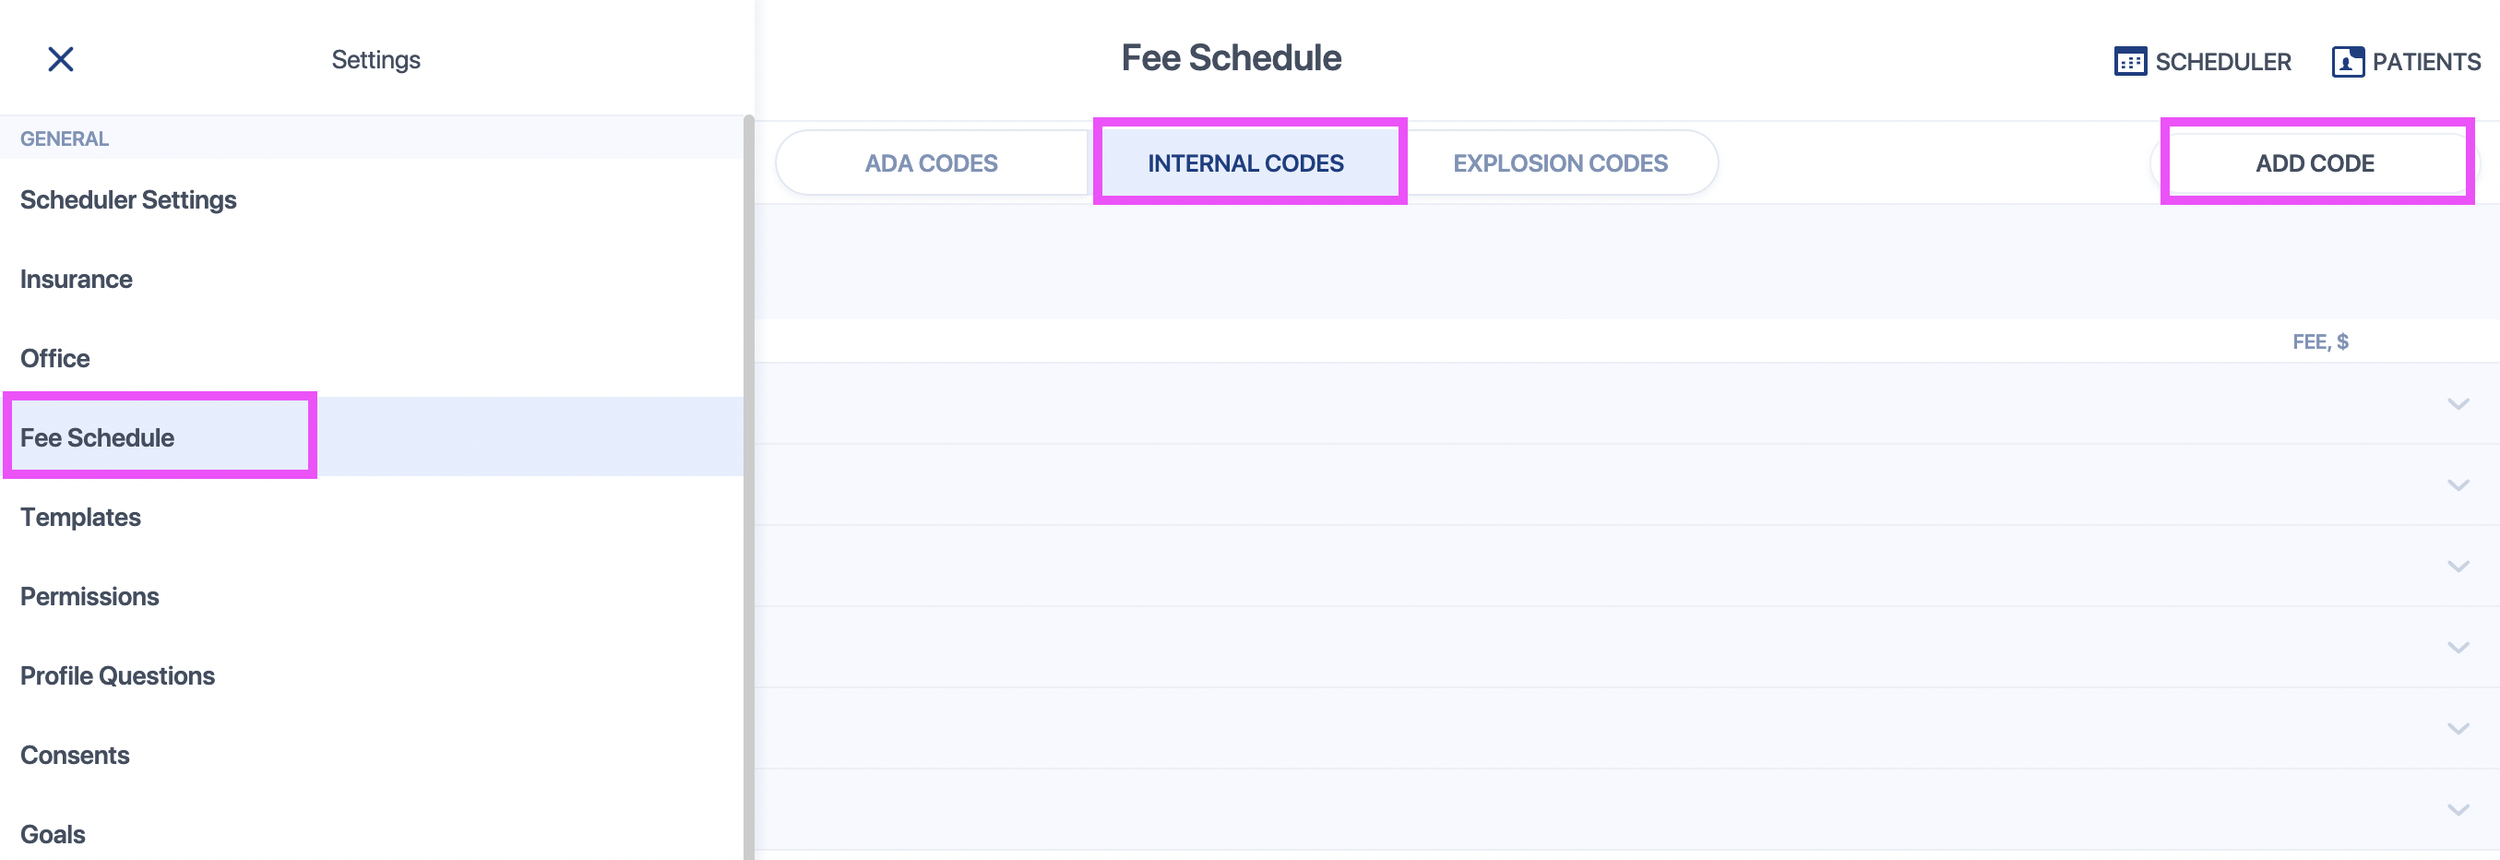
- Go to the Fee Schedule settings
- Go to the "Internal Codes" tab
- Click "Add New Code
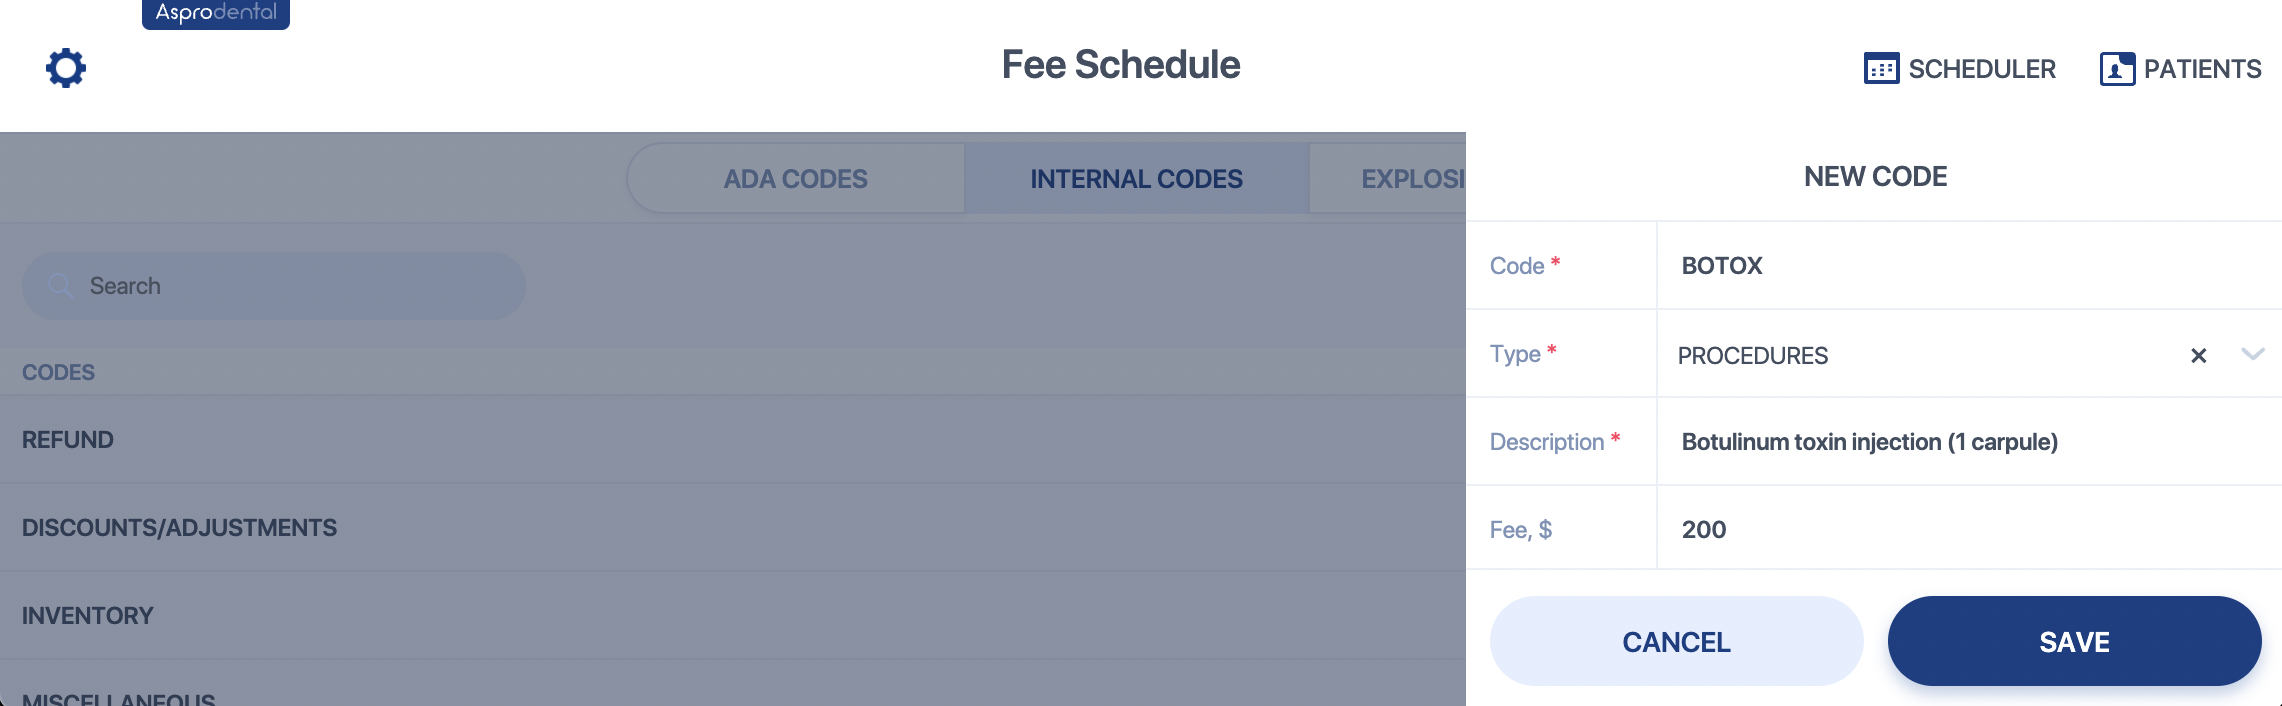
Fill out the required fields.
Code: A shorthand code that's easy for you to remember and type. There is a 20 character limit on the code.
Type: Choose the appropriate type of code.
Description: The full description of your code.
Fee: Set a fee, or leave blank if the fee is variable.
Create/edit explosion codes (super codes)
This is how you can create an explosion code that will input multiple procedure codes.
- Go to Settings > Fee Schedule > Explosion Codes
"Appointment" explosion codes can be used on the schedule, whereas "Treatment plan" explosion codes can be used in the chart. - You can click "Add Code" to create a new one, or select an existing explosion code to edit it

- Create your code
 Code: A shorthand code that you can type into appointments
Description: For internal use only ADA Codes and Internal Codes: Select the codes that you wish to include
To use an appointment explosion code, type the code into an appointment and pres "return" or "enter" on your keyboard to see it expand into the procedures you selected.

Patient-friendly ADA descriptions
Settings > Fee Schedules > Description
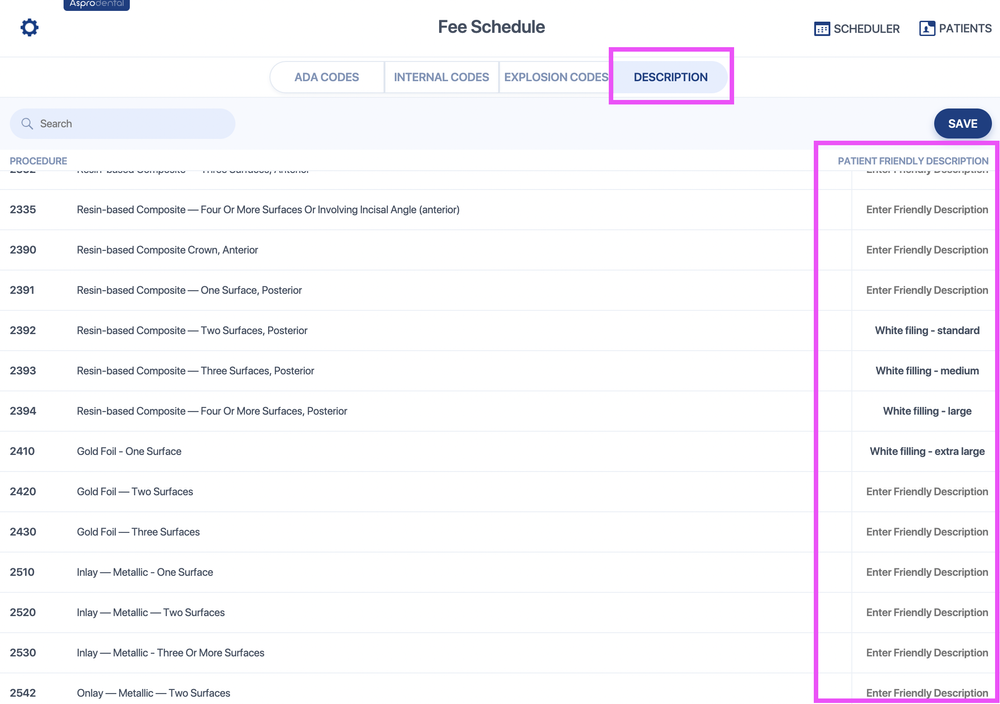 The patient-friendly descriptions that you add will be shown on treatment plans and statements.
Create a new user login
Go to Settings > Users > Add User
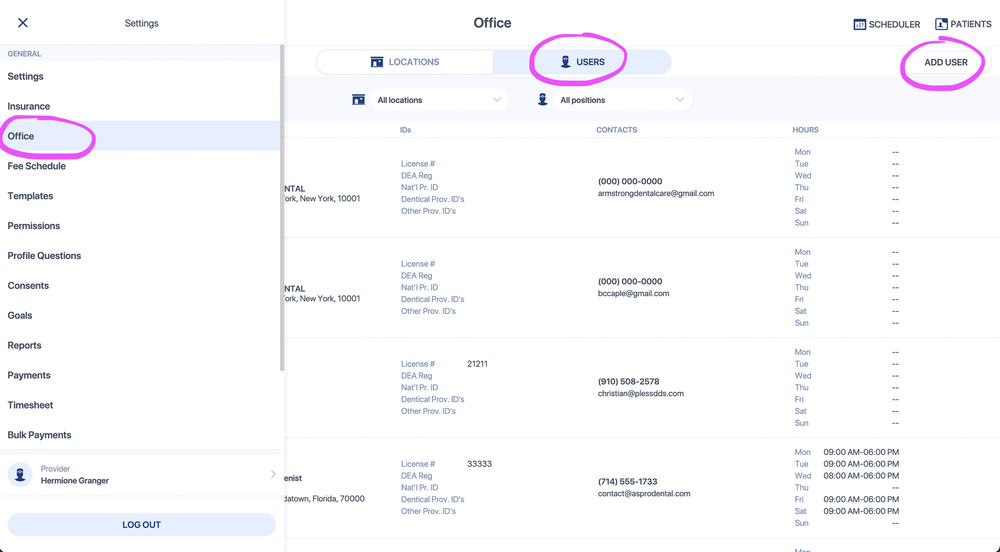
- Fill out the user's information
Your new user will receive an email to set their password. Please ask them to check their spam folder if it does not show up.
The link is active for 30 minutes; if they click on the link after it expires, they can go to your Asprodental login page and click "forgot password" to request a new link. - If they are a provider, turn the Provider toggle ON and fill out the provider information
If your new provider will be signing up for e-prescribe, please make sure the DEA and NPI fields are filled in. - Add a location and select the appropriate position
Permissions are set by position, but you can change the new user's permission in Settings > Permissions (the permissions page is only accessible to admins).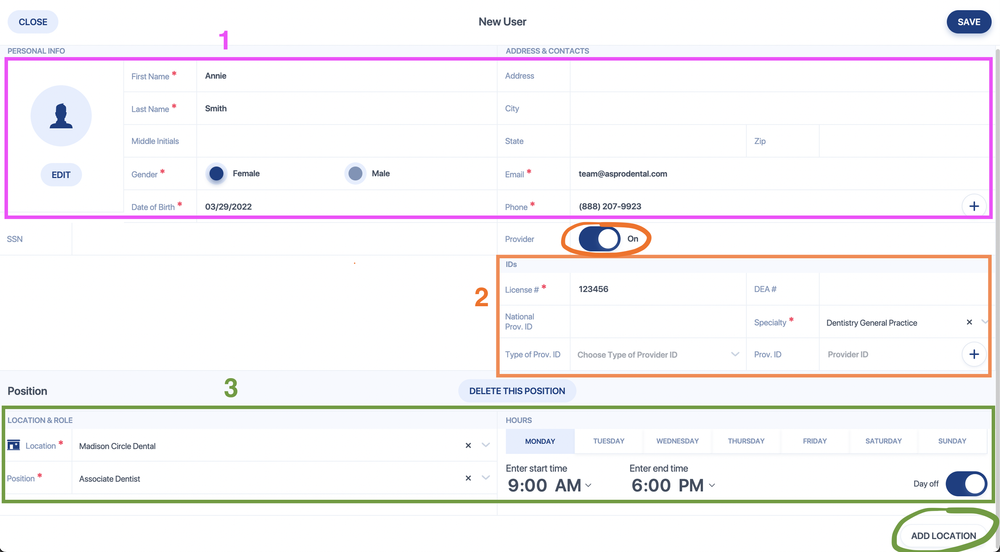
Restrict user logins
There are 2 ways to restrict a user from logging in. You can access login restrictions on each user's profile by going to Settings > Office > Users > Click on the user you wish to edit.
 A. Temporarily inactivate the user's login. This option is best for users who will be out of the office for an extended time, such as on vacation or leave.
B. Restrict the user to logging in only during their working hours. Turn on this toggle and set the working hours per day below. Use the "day off" toggle on the bottom right of the page if the user does not work on that day.
It is recommended to set the working hours with a 1-2 hour buffer in case the user gets to the office early or stays late.
For example, if their hours are 8am-5pm, you may consider setting the working hours as 7am-6pm.
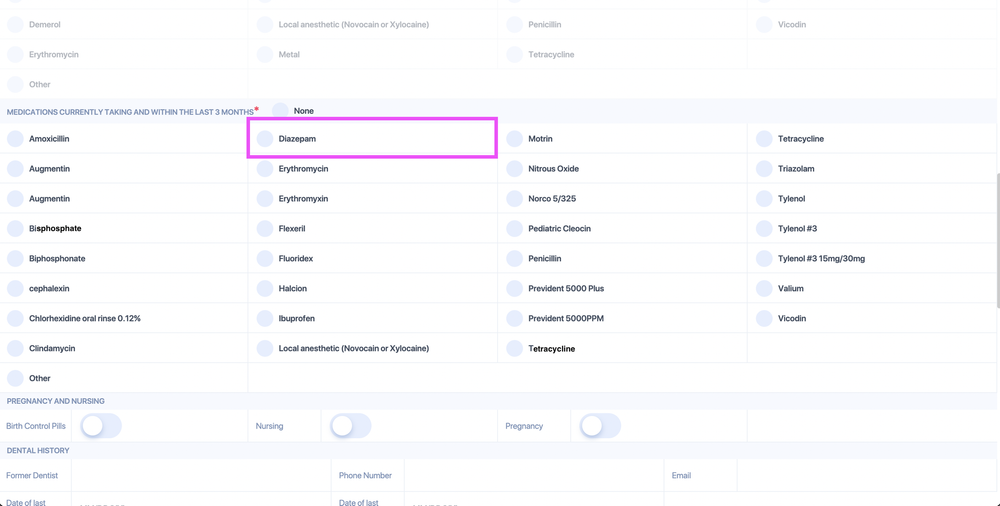
Add/remove a medication to the Health History form
These are the steps to add or remove a medication to the "Medications currently taking" section of the Health History form. The medications list is managed through the Asprodental prescriptions list (this is different from the e-prescribe history).
- Use a test patient (or yourself) to access the prescriptions list. Go to the patient's chart and click the + button to write a blank clinical note.
- Click "Add Prescription"
- Type in the medication you would like to show up on the Health History form, then click "create option" in the dropdown menu.
- Fill out the remaining required fields, then click "Save." If you wish to remove the medication, then click the little "x" next to it.

- You will be returned to the clinical note page. Click "Save" on the clinical note too.
- When you edit any patient's Health History page, you'll now see the medication that you added to the medications list:
Request to edit your clock in/out time
Request to add a new clock in/out timelog

Approve/deny timesheet changes
 *Note - this action requires admin privilages
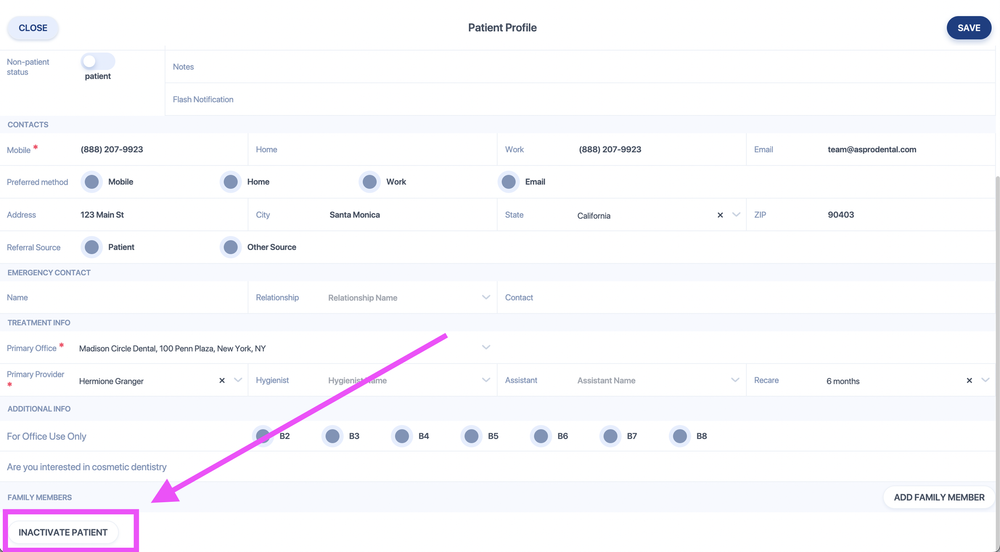
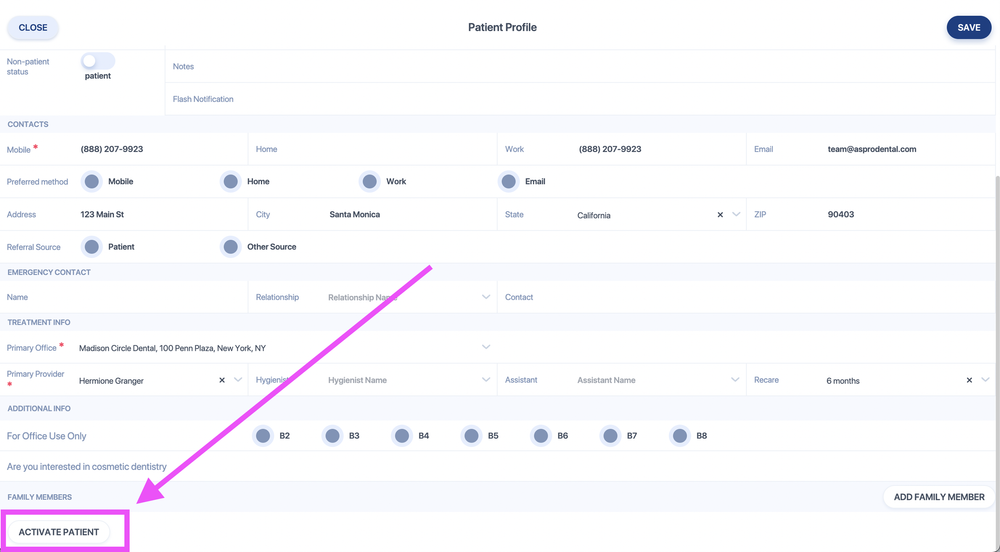
Inactivate a patient
- Edit the patient's profile
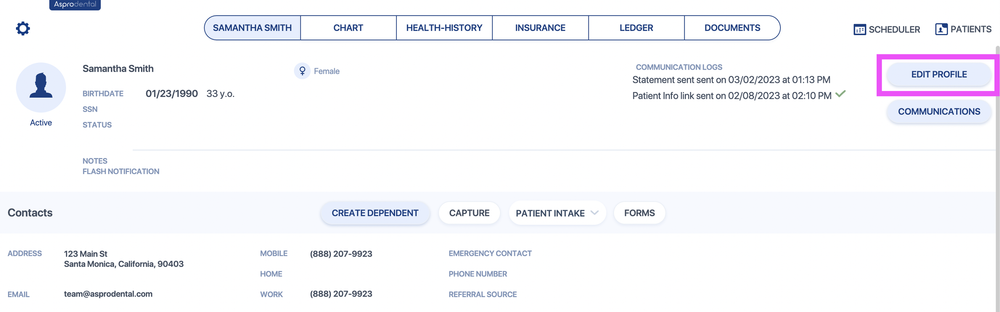
- Click "Inactivate Patient" and provide the reason for inactivation.
Activate a previously inactive patient
- Find the patient by searching through the inactive list

- Edit the patient's profile
- Click "Activate Patient"
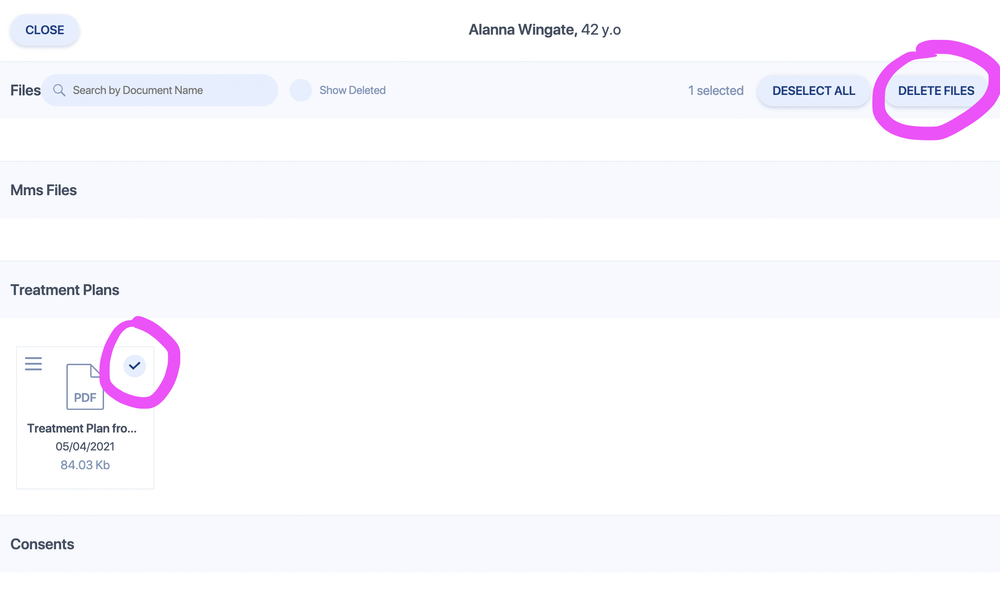
Delete a scanned document (or any document)
- Click "Edit"
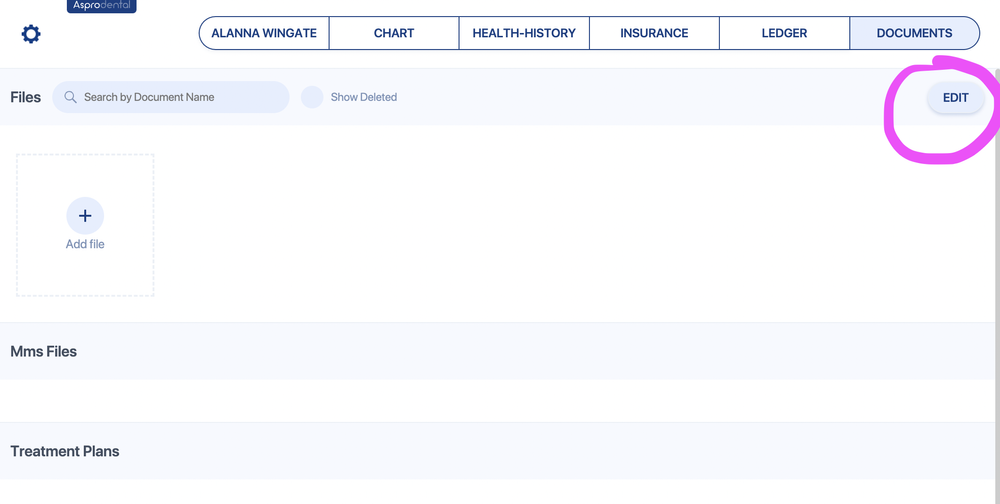
- Select the documents you wish to remove. Click "Delete Files"
Set office goals
You can reach this page by going to Settings > Goals.
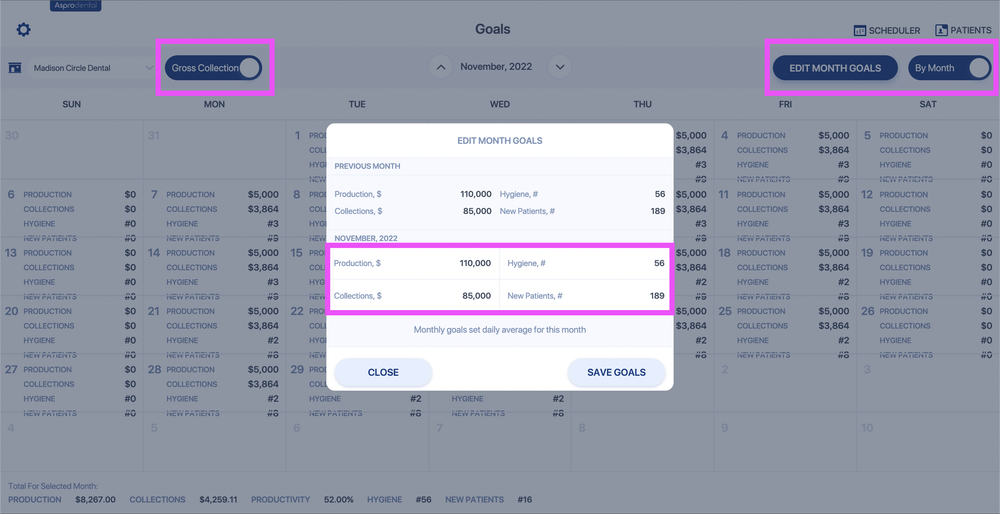
The toggle on the top left lets you calculate collections goals based on Gross Collections or Net Collections. Gross is total collections, while Net is collections with adjustments/discounts subtracted out.
Switch the toggle on the top right to "By Month" and click on the "Edit Month Goals" button to bring up this window. Fill in your production, collections, hygiene, and new patient goals for the month. The values will be evenly distributed across each day according to your working hours (these are set in Settings > Office > click on the location to edit the working hours).
If you'd like to adjust the goals for any particular day, turn the top right toggle to "By Day" and click on each day to edit individually.
Payments Processing
Set up your clover
- Connect the device to your office wifi network
- Make sure you have the Cloud Pay app installed
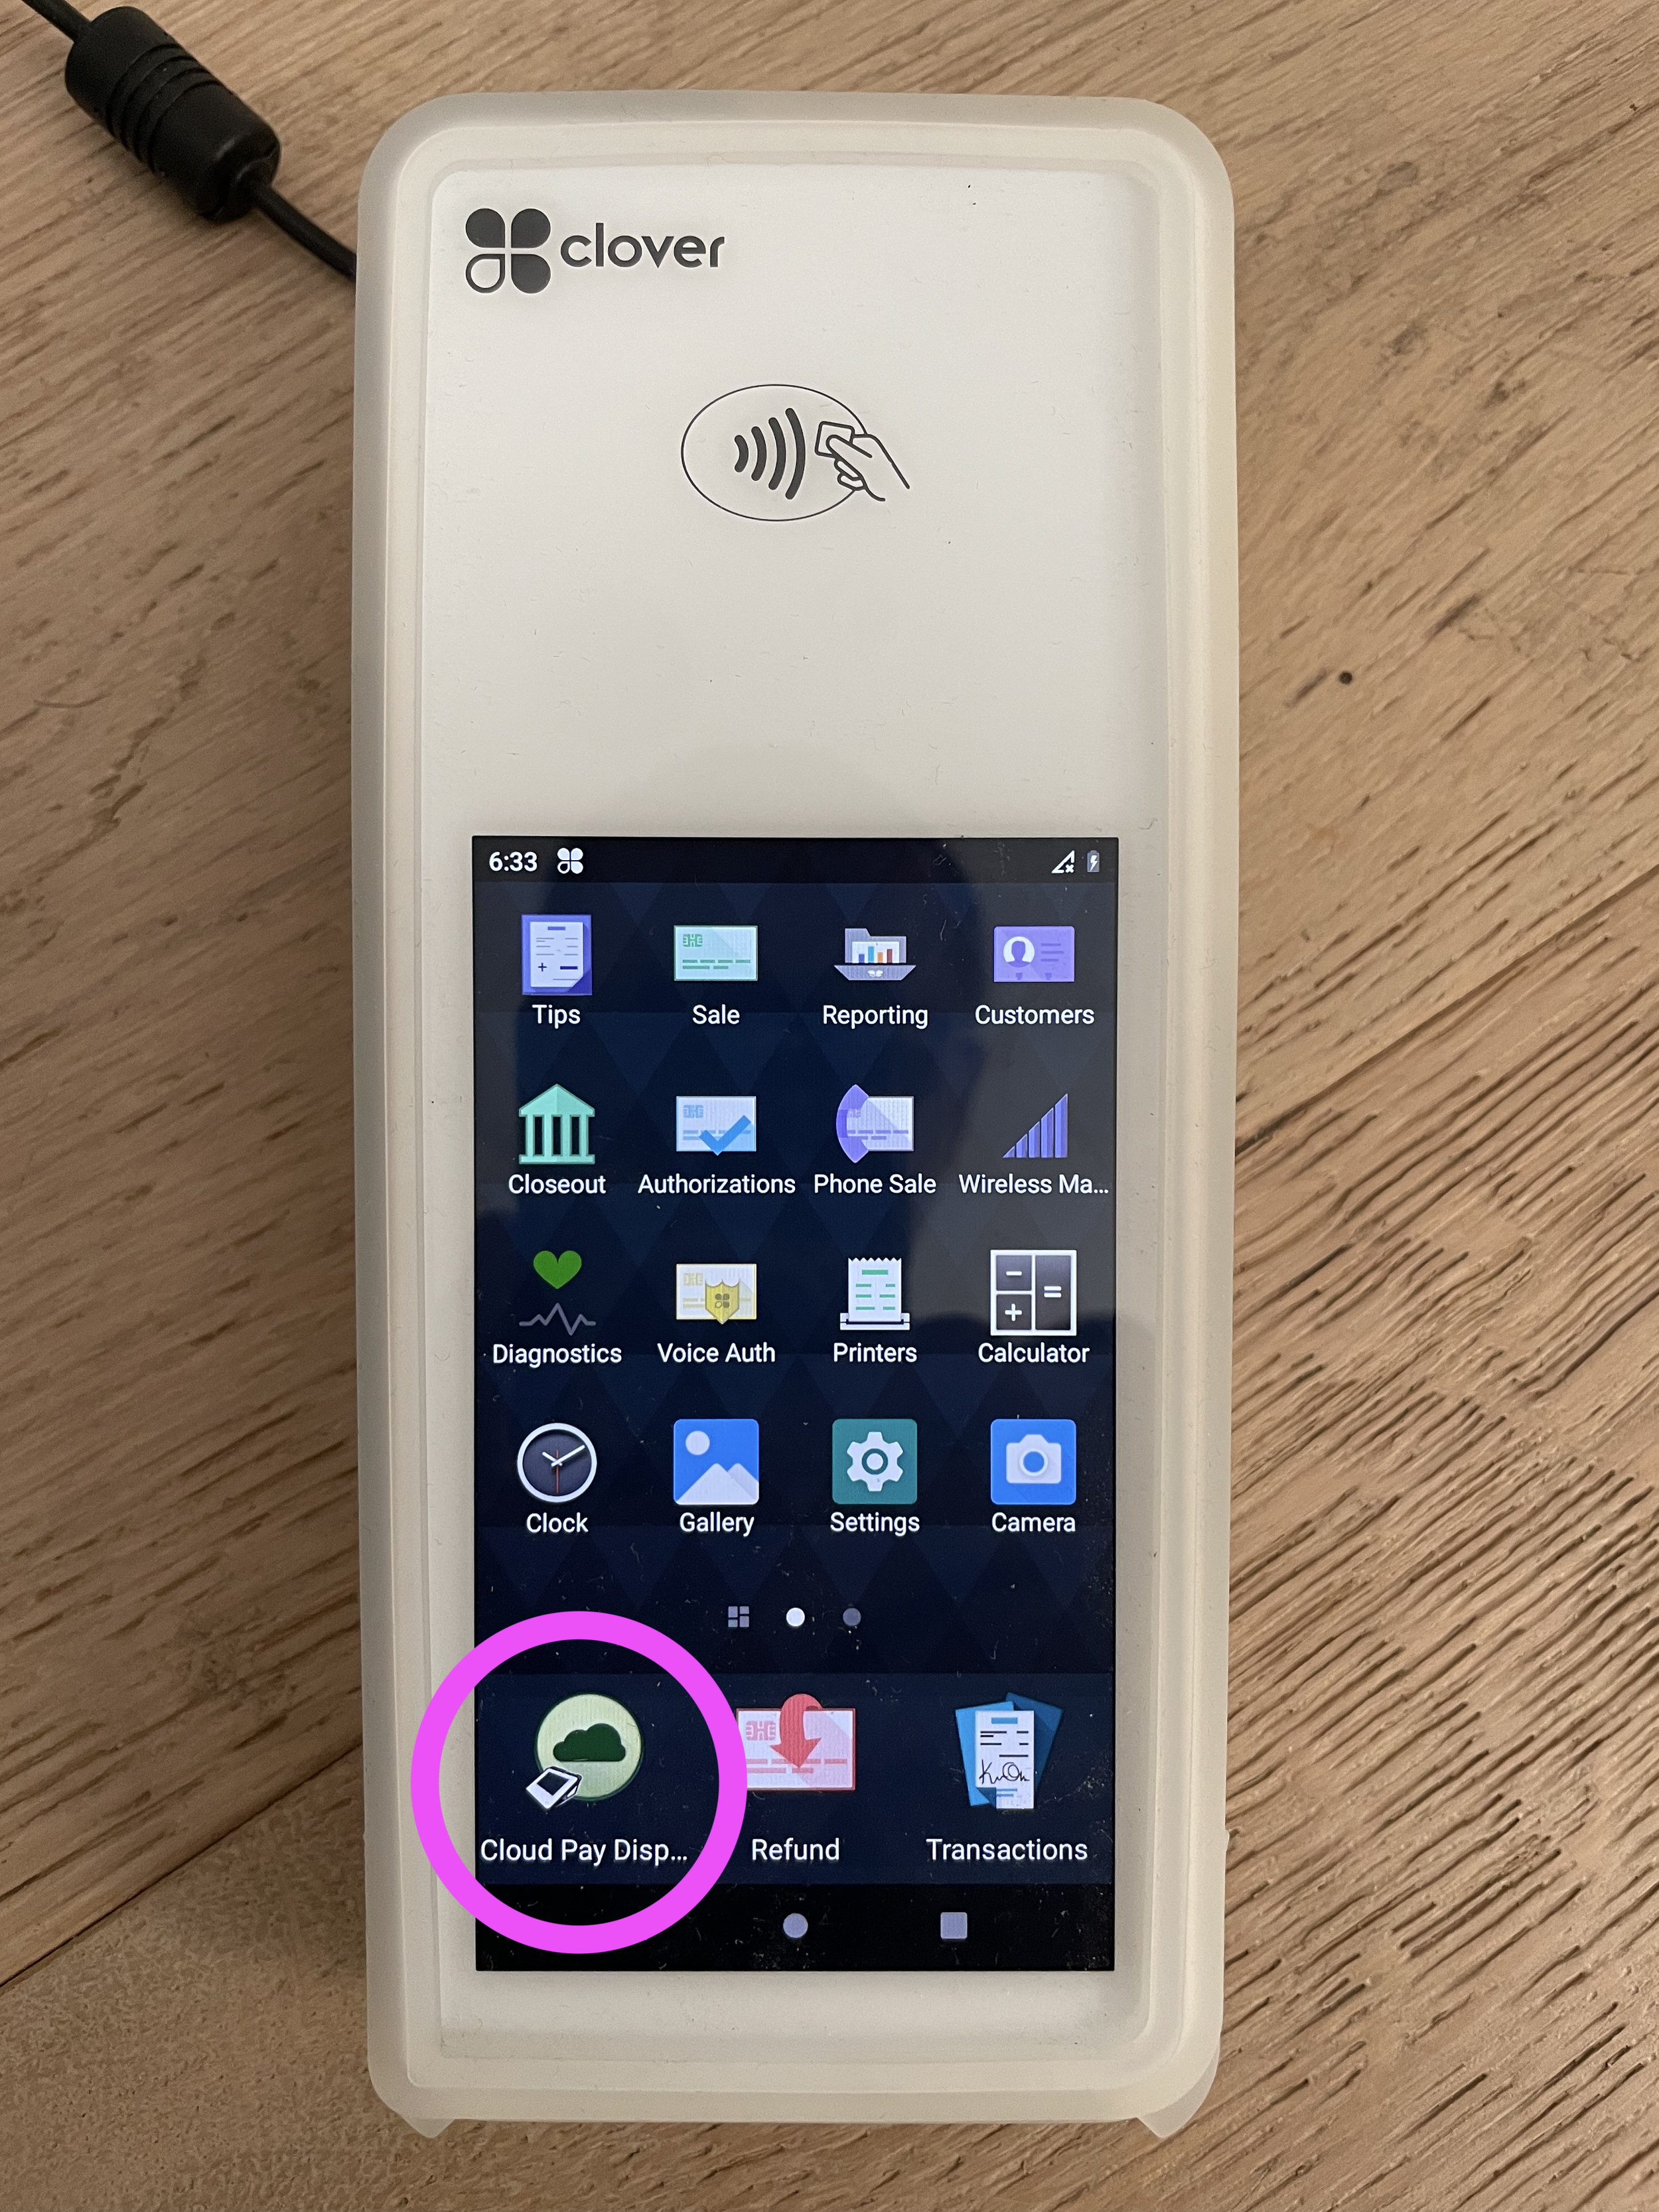
If you don't have Cloud Pay installed, open up the Settings menu > Apps and Notifications > See all Apps to add the Cloud Pay app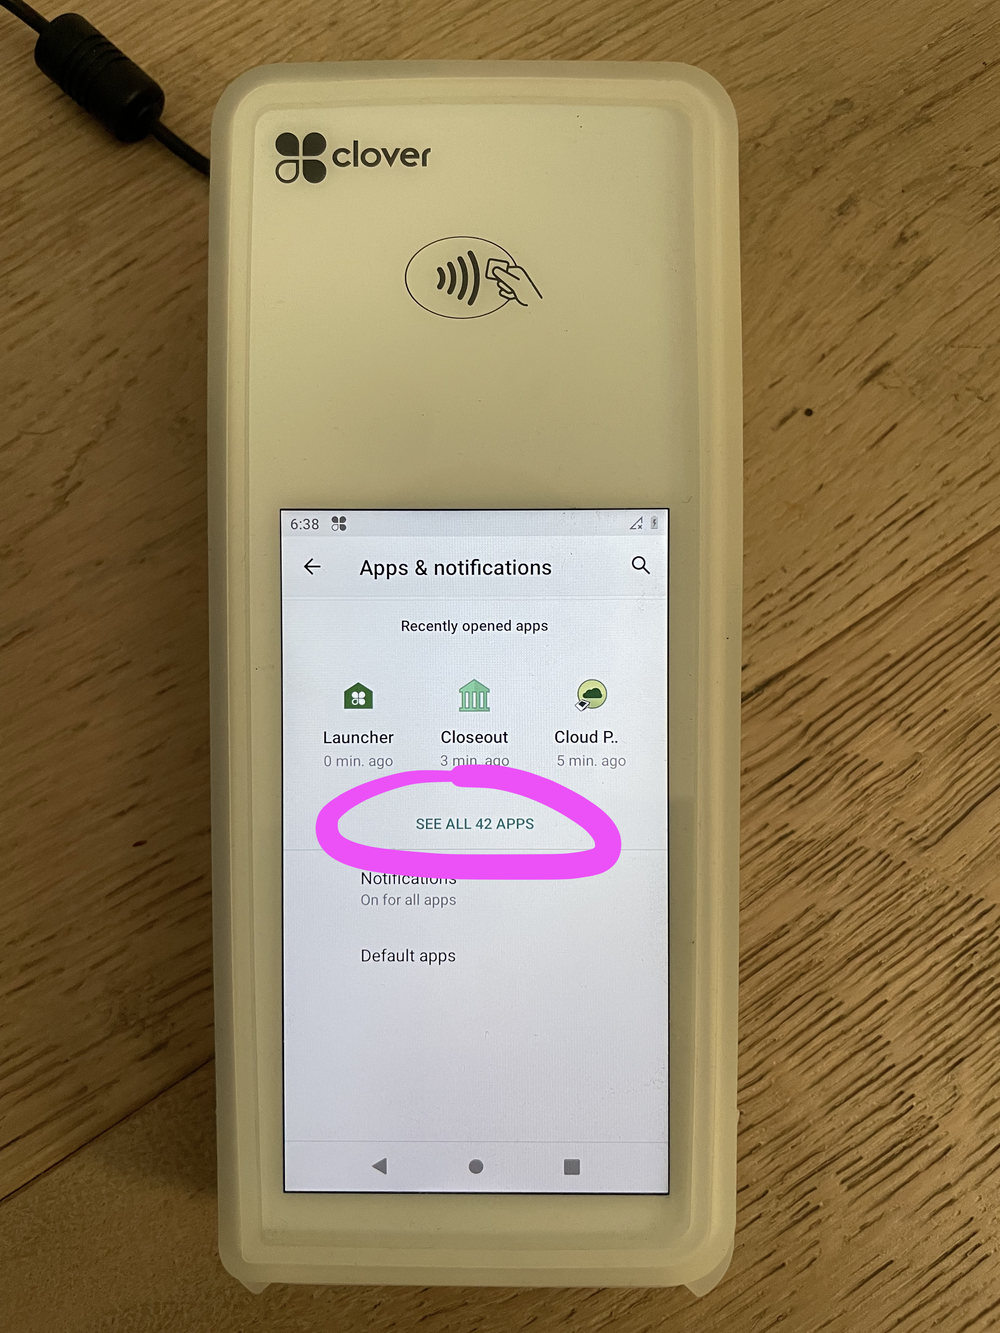
Once Cloud Pay is open, you should see a black screen that says "Welcome to" with your office name. This screen means that you are ready to take payments.
If you ever need to leave the screen, touch all 4 corners of the screen to leave.
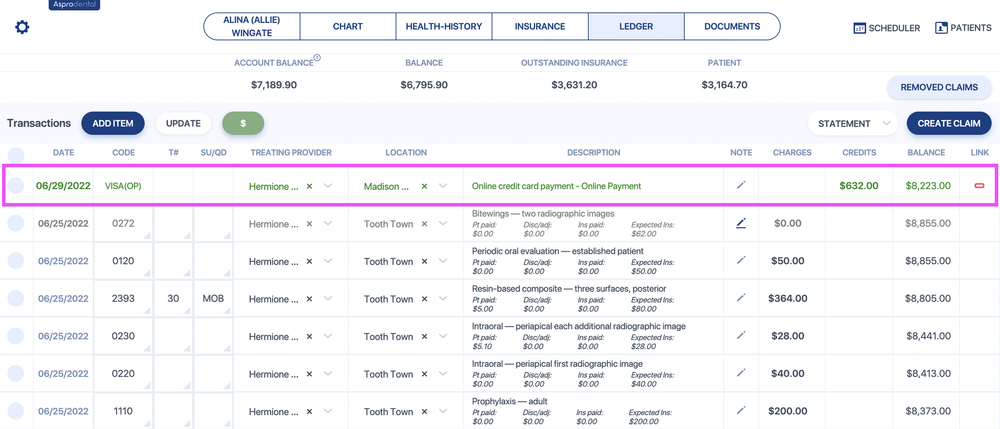
Take a payment on the credit card terminal
- Start from the patient's ledger
- Click the the green $ button
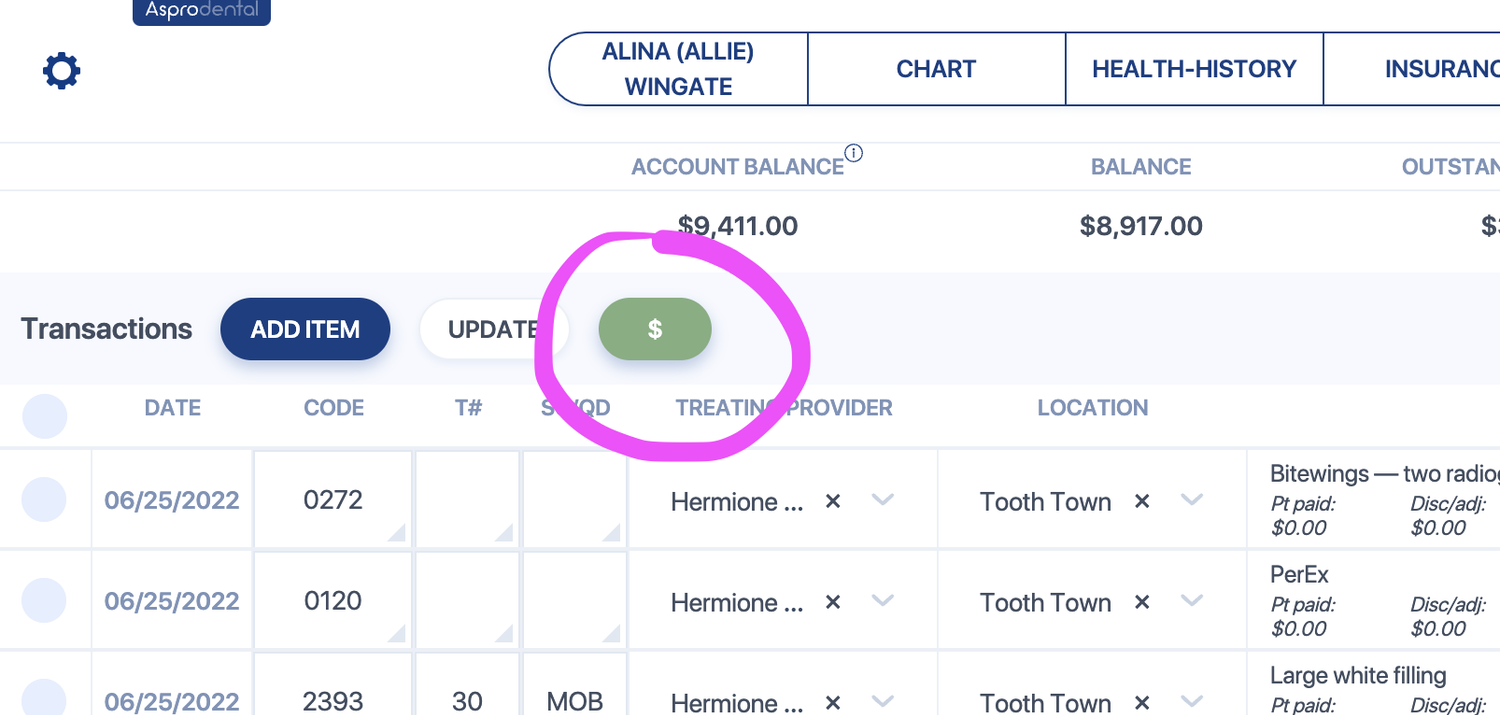
- Select "Payment" and put in your payment amount
- Click the "Send to terminal" button, or use "Manual entry" to type the card number into the computer
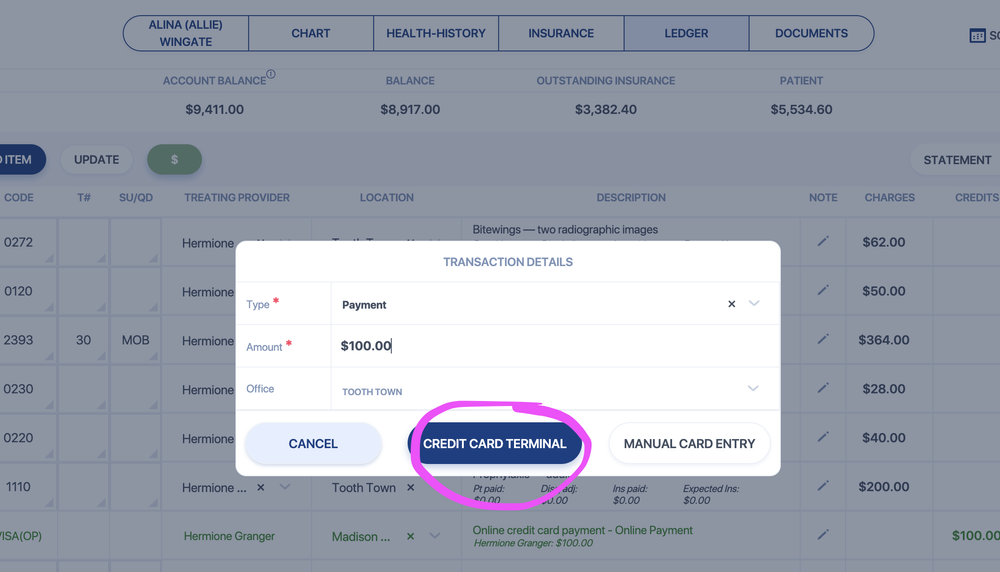 To do the Credit Card Terminal option, make sure the Clover is on the black screen that says "Welcome to" with your office name. When you click the "Send to terminal" button, the Clover should light up and be ready for a card to swipe/tap/insert.
 - Once the payment is processed, it will automatically post to the ledger and be ready to link:
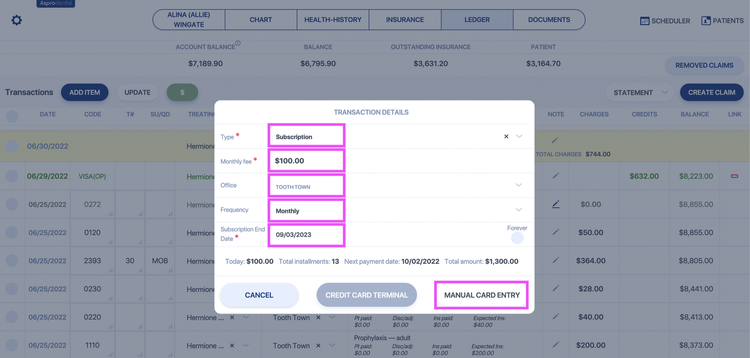
Set up a subscription (recurring) payment
The first subscription payment will begin on the date that you create the subscription. The next payment will be processed automatically with the card on file the following week/month/year per your selection.
- Start from the patient's ledger
- Click the the green $ button
- Select "Subscription" and fill in the blanks, then select Manual Card Entry and type in the card number.
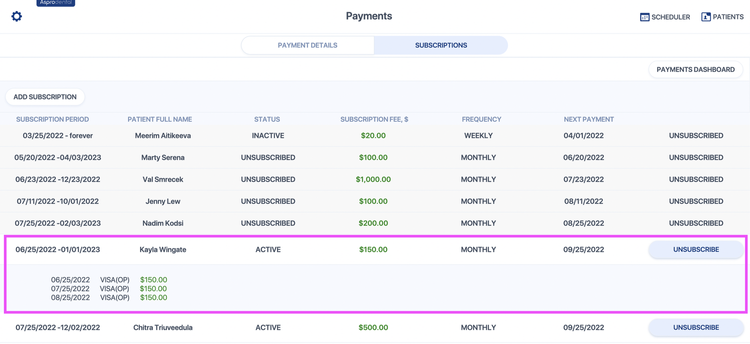
Manage your payments and subscriptions
Payments history can be found on your Gravity Dashboard by using the button on Settings > Payments > Gravity Dashboard.
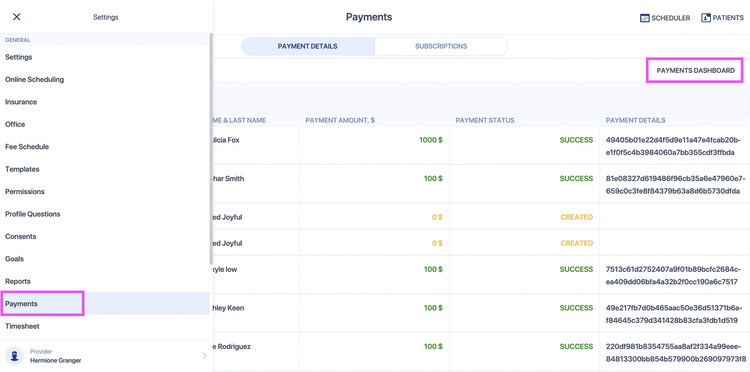
Subscriptions can be managed on the Subscriptions tab.
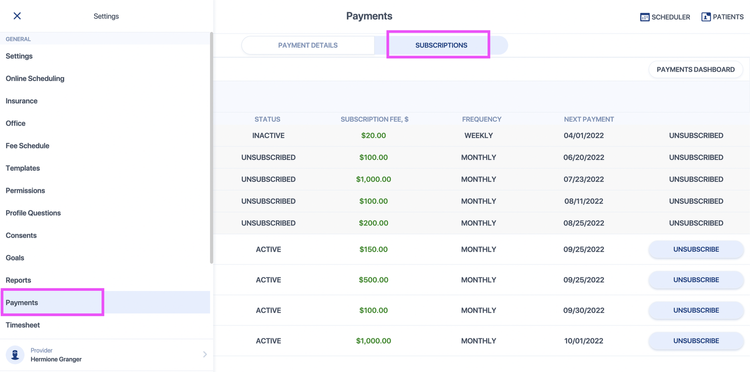
You can click on a subscription to view more detail and use the Unsubscribe button to cancel a subscription.
Payments support: (866) 701-4700
Reports
Daysheet
This report shows you the total transactions, production, collections, and adjustments for the selected date range.
Productivity
This report shows you the total production and collections over a selected date range. Production can also be shown specifically by provider.
Hygiene (recall)
This report can show you the history and future projection of scheduled hygiene appointments, as well as a list of patients who are due for upcoming hygiene.
Unscheduled hygiene list
This list will show only the patients who do not have their upcoming hygiene appointments scheduled. Hygiene appointments are tracked with the procedure codes 1110, 1120, and 4910.
If a patient has an upcoming appointment but it does not contain any of these codes, then the patient will show up on this list.
Automated hygiene reminders
Hygiene appointments are tracked with the procedure codes 1110, 1120, and 4910.
If a patient has an upcoming appointment but it does not contain any of those codes, they will receive a reminder.
For example: if the patient has upcoming appointments that are blank or contain other procedures (exams, fillings, crowns, etc.) but not any of the hygiene codes 1110, 1120, or 4910, then they will receive a hygiene reminder.
Accounts Receivables (Open Claims)
This report shows you the open balances from the selected date range.
For example, if John has a balance from his filling done last week, he would show up in the "0-30 days" range.
If Molly has a balance from her crown done a month and a half ago, she would show up in the "30-60 days" range.
You can also find the list of Open Claims from ths page by clicking on the "Open Claims" button
Customizable Report
This report shows you transactions made during a selected date range and the total number of patients, appointments, production, collections, and adjustments for those transactions.
You can filter the transactions for patients who have a certain insurance company, whose balances are above a certain number, who had fluoride or any particular procedure done, etc.